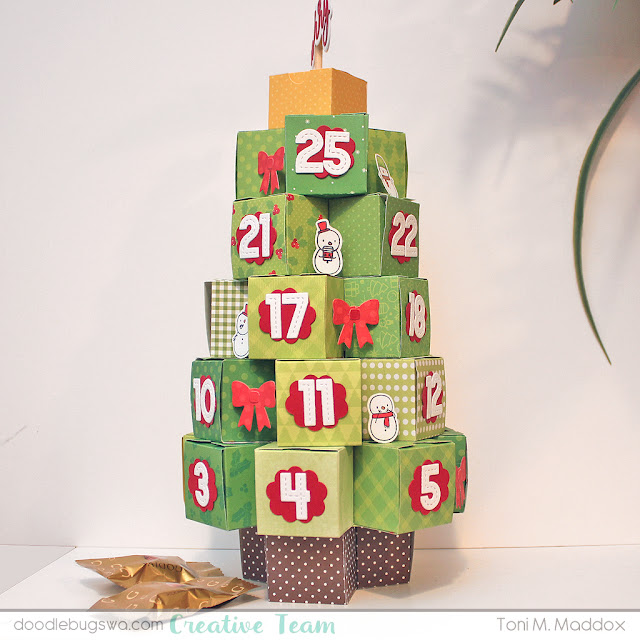
Hi, everyone! Toni here with you today sharing a tree-shaped advent calendar constructed using a variety of products you can find in the DB shop.
I started by cutting out a bunch of Lawn Fawn Tiny Gift Boxes using green 6x6 paper that I've collected (it can't be called hoarding if you use it sometimes, right?). A large number of the ones I used here were from Sunny Studio and are very similar to the currently available pad, Joyful Holiday. I also used MFT Poppin' Polka Dots and some Lawn Fawn.
The number you need is dependent upon how you plan to configure your advent tree. I needed 25 green boxes (tree), 3 brown (trunk), and 1 yellow (star). From the top, the overall construction is thus:
1 (star)
3, 4, 5, 6, 7 (tree)
circle for support
3 (trunk).
I had seen online how some people used more boxes for the trunk but I wanted it to look tapered so I did my own thing by cutting out a circle and adhering the trunk on one side and the base of the tree on the other. This was necessary so there would be sufficient surface area between the tree and trunk.
In this pic you can see how the boxes are connected as well. I cut out 1" wide strips which I then cut into 1" lengths, and folded in the middle. I didn't bother using a scoring board because who has time for that business when I've got 29 boxes to put together?
I used a similar technique to add the Mama Elephant Little Snowman Agenda images (colored with Copic BG10, C2, C4, R27, YG03, YG17, and YR04) and Mama Elephant Slim Peeking Presents bows between the boxes. I reduced the size of each strip to be about 1/4 x 3/4." No need to be exact here as long as it gets the job done. You can see this in the very top pic of this post.
Now this is a big project so I tried to streamline production as much as possible.
- I cut the boxes out of 2 papers at once.
- I used red cardstock scraps with the Mama Elephant Cloud Grid Cover to create ornaments of a sort behind the Lawn Fawn Oliver's Stitched 123s countdown numbers. Imagine if I had cut those out individually!
- I used Scor-tape to adhere the connecting strips so there was no drying time.
- I assembled the ornaments and numbers at once, flat, before using liquid glue to add them to the boxes. I could have used Scor-tape here as well by opening each box and pressing lid to the number ornaments but didn't think of that until just now. LOL.
The numbers were not something I could save much time on because I used thick cardstock that couldn't be doubled up when cutting but the result made up for it.
Another time-saver, albeit accidental, was the circle diecut. I had adhered the Avery Elle Holiday Happy Tag to a skewer and realized as I was positioning it as a topper that if I puncture the top box and the circle diecut, it would stand up perfectly and I wouldn't have to trim it down at all. Woo hoo!
Is this a project you can do lickety split? Nope. BUT, it's manageable and it's cute so why not spend some quality time with your favorite papercraft?
I'll see you again soon. If you'd like to check out my other creations in the meantime, you can visit my blog, Frankie Helps Craft, my Instagram, or my Pinterest Board. Have a great rest of your day!

PRODUCTS USED AND/OR RECOMMENDED


No comments:
Post a Comment