Friday, July 29, 2022

Hello orchids!


I've had such a fun time water coloring this month and hope you've enjoyed it, too!  Today, the last Friday of July, I've decided I just had to share a new die from Waffle Flower Craft and the simplest way to add the color to their gorgeous Layered Orchids!  

My card started by simple die-cutting those petal layers from 110# white cardstock.  Then I searched for Orchids on my phone to find one I'd like to use as a guide... here's what I found:


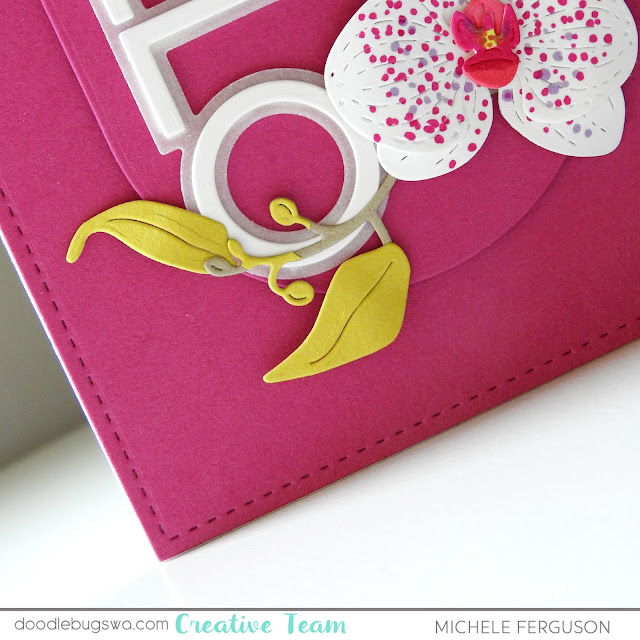
After a good smattering of Copic dots on the petals, I used Copics to add color the stamen as well!  To mix it up a little I die cut the stems from kraft cardstock, and again in a chartreuse. 


A brand-new HELLO from Waffle Flower has found a permanent home
in my favorites stash - love it layered over vellum!


I am so in awe of anyone who can keep orchids blooming in their home!  These will be fresh for a very long time!

Thanks for stopping by today - hope you have a happy crafty weekend!
=] Michele

Links to products used or recommended are listed below: 

Wednesday, July 27, 2022

Fun One-Layer Birthday Card....


Hello and happy Wednesday everyone. I am sharing a super fun one-layer birthday-themed card with you today. I used the awesome Confetti Layering Stencils set from Lawn Fawn. 


I began by using the Chickie Favor Bag die from Mama Elephant to create a stencil to use to add a fun design to the card base. I used the chickie die along with Picked Raspberry, Abandoned Coral, and Milled Lavender Distress Oxide inks to create the domed shapes to the base of the card. I then used the Knitted Background Stencil along with  Vintage Photo Distress Oxide to add a bit of interest to the inside/bottom layer of the card. 


I then heat embossed the sentiments onto each of the colored areas using the sentiments from the How You Bean? Star Add-on, Magic Messages, and the Offset Sayings: Birthday stamp sets. I then used the Confetti Layering Stencils set from Lawn Fawn to add the fun confetti in the same colors along with Peacock Feathers Distress Oxide ink. 


I hope you enjoy the card I created to share with you today. Thank you so much for taking the time to stop by. I hope you each have a wonderful and blessed day. Please feel welcome to visit me on my blogIG or Pinterest.

Links to products used or recommended are listed below: 

Monday, July 25, 2022

One Layer Masculine Birthday Card


Hi, everyone!  Toni here with you today sharing a masculine card that's perfect for those summer birthdays.

I started by stamping the Avery Elle Jawsome Wishes and Waffle Flower Sea Birthday images onto Copic-friendly cardstock. 


I colored the images using Copics, taking my color inspiration for the octopus from a picture I saw online.  I love how the purple tentacles transition into the orange body and carried those colors over to the shark's accessories.


I think one layer cards lend themselves well to masculine cards as they're not very fussy. 

I did compromise on my desire for more fussiness, so to speak, by adding waves using Distress Oxide Salty Ocean stamped off to create different shades.  I add the bubbles to hide a smudge (you can just see it to the left of the octopus' hat).  I'm sneaky that way.


I'll see you again soon.  If you'd like to check out my other creations in the meantime, you can visit my blog, Frankie Helps Craft, my Instagram, or my Pinterest Board.  Have a great rest of your day!

PRODUCTS USED AND/OR RECOMMENDED

Friday, July 22, 2022

Honey Bee, Concord & 9th and Pinkfresh!


I have had such fun combining dies from several companies today!
Look, ma!  NO stamping! lol


Just lots of fun dies from some very fun companies:
  • Honey Bee's fabulous Coneflower [finally came home to Mama!]
  • Concord & 9th's gorgeous new Just Saying sentiment dies
  • and Pinkfresh Studio's Slimline Ornate Banner - that was easily shortened for my A2 card ... these dies were made for each other in my humble opinion!
And aren't these Honey Bee patterned papers just gorgeous??
You'll find them linked below!


Hope you love it, too!  Enjoy a little time in your garden this weekend - or craft a few flowers in your craft studio - it's all good!

=] Michele

Links to products used or recommended are listed below:  

Wednesday, July 20, 2022

Sweet As Honey One-Layer Card...


Hello and happy Wednesday everyone. I am sharing a sweet one-layer card with you today. I used the Honey stamp set from Honey Bee Stamps


I began by using the Simply Hexagons die from Pinkfresh Studios to use as a stencil to add a fun design to the card base. I used Shaded Lilac, Seedless Preserves,  Abandoned Coral, Festive Berries, and Milled Lavender Distress Oxide inks.


I then heat embossed the sentiments onto the card using the Honey stamp set. 


I hope you enjoy the card I created to share with you today. Thank you so much for taking the time to stop by. I hope you each have a wonderful and blessed day. Please feel welcome to visit me on my blogIG or Pinterest.

Links to products used or recommended are listed below:

Monday, July 18, 2022

Partial Stencilling without Masking on a One Layer Card


Hi, everyone!  Toni here with you today sharing a floral card with a selectively stenciled background.

I started by stamping the fantastic Pinkfresh Studio Chrysanthemum onto Strathmore Bristol using Versafine Onyx Black. 


Here's where the selective stencilling comes in. I am not a huge fan of masking, totally because I'm lazy. What I tend to do instead is to be careful with my sponging, trying to minimize overlap with the stamped image. And if it overlaps a bit, big whoop; I'll just paint or color right over it. Sneaky!

This method obviously would not work if the overlapping color is too dark but perfect here.


In this case, I sponged the MFT Sunrise Radiating Rays stencil with Distress Oxide Squeezed Lemonade then watercolored the image with Zigs. I added shadows using Polychromos.

I embossed the Altenew Paint-a-Flower African Daisy sentiment in black. I added some black and white spatters and finally a thin strip of Altenew Gold Washi.


I'll see you again soon.  If you'd like to check out my other creations in the meantime, you can visit my blog, Frankie Helps Craft, my Instagram, or my Pinterest Board.  Have a great rest of your day!

PRODUCTS USED AND/OR RECOMMENDED

Friday, July 15, 2022

Honey Bee I'd flip for a pair of these!


Hello my Doodlebug friends!  It's Friday and I have such a fun card to share with you today - you should know that as soon as the temperatures reach 55 F. the flip-flops come out until Fall around here!  [that is when shoes are required at all =]

My card started simply just by cutting these darling flip flops from Honey Bee out of 110# white cardstock several times, and one more time from fun-foam...


Then I took a good look through my floral stamp sets until I found the perfect
embellishments for my custom flip flops!  Altenew Peony Bouquet to the rescue - after all blueberry season will soon be upon us here in Michigan!
My little berry sprigs were stamped, Copic colored, then cut with their coordinating dies.
Aren't they the perfect size? 


I was in need of a graduation card for a sweet girl who is a totally RAD GRAD!
Thanks to Honey Bee's Flip Flip Builder, an old [discontinued] MFT stamp set yet STILL available All the Encouragement dies, and a Fine Alpha set from Altenew, 
I was able to say what I wanna say with a combination of stamping and die-cutting!


I'm hoping by the time this goes live, we'll have that well-loved Altenew Dotted Swirls debossing die back in stock... it's a workhorse in my studio, isn't it?  Even without it, this MFT Elegant Rectangles panel makes a stunning place to flip those flops!  lol

This one's heading to the mail, and I'm heading to the beach for a walk!  Hope your weekend includes lots of crafty time!

=] Michele

Links to products used or recommended are listed below:

Wednesday, July 13, 2022

Tropical Fun One Layer Card...


Hello and happy Wednesday everyone. 
 I am sharing a one-layer card with you today


I decided to go with a square-shaped card. I began by using the stencils in the set to add the tropical leaves to the card base. I used Distress Oxide inks along with a deeper colored ink from Lawn Fawn. I used Twisted Citron, Mowed Lawn, Rainforest, Spiced MarmaladeDried MarigoldLucky Clover, Broken China, and Mermaid Lagoon inks to add the color to the leaves. 


I then stamped the sentiment from the Picked Posie Greetings from Concord & 9th using black ink. Next, I added detail to the leaves and the card base using Gelly Roll white pen. 


I hope you enjoy the card I created to share with you today. Thank you so much for taking the time to stop by. I hope you each have a wonderful and blessed day. Please feel welcome to visit me on my blogIG or Pinterest.

Links to products used or recommended are listed below:

Monday, July 11, 2022

Using a Stencil on a One Layer Card


Hi, everyone!  Toni here with you today sharing a happy little one layer card featuring Avery Elle Be Zesty. I'm a huge fan of lemon flavored anything (except lemon bars because I don't like crust--I know, I'm a weirdo) so had to pick up this set.


I stamped the Avery Elle Be Zesty image and colored it up with Copics. I then masked it using my favorite Inkadinkado masking paper. 


Next I used the Lawn Fawn Lots of Hearts Layering Stencils along with Distress Oxides to create a cascade of hearts behind the lemons. I achieved the iridescent look of the purple hearts by accident.

I had originally sponged that layer using DO Salvaged Patina but that wasn't zesty enough so I went over it with DO Picked Raspberry. Love the result!


I'll see you again soon.  If you'd like to check out my other creations in the meantime, you can visit my blog, Frankie Helps Craft, my Instagram, or my Pinterest Board.  Have a great rest of your day!

PRODUCTS USED AND/OR RECOMMENDED

Friday, July 8, 2022

Pretty Pink Posh Flourishing Fuchsias!


There are few flowers that can draw in the sweetest little feathered friends the Hummingbirds to our garden like a big hanging basket of Fuchsias!  There are few sets that represent these flowers more beautifully than this favorite from Pretty Pink Posh!  this Flourishing Fuchsias is another perfect image for no-line coloring - and every other technique I know of!


A little closeup shows the details of the process of building up shadows while
keeping highlights when no-line water coloring.  This time the images were stamped with
Abandoned Coral Distress Ink, and also water colored with Distress Inks - the coral again, and dusty concord to be exact!


The subtle stamping of the leaves in the background was achieved by
picking up ink from my pad, then pouncing into water spritzed on my glass mat before
stamping randomly on my card panel using an acrylic block.


The fuchsias and their leaves were cut using the coordinating dies, popped up in a
few places and arranged on my slimline card panel.  The leftover watery ink was splattered here and there with a water brush, and my sentiment from Honey Bee's My Favorite Flower set, stamped in grey ink, was the finishing touch.  


I have much better luck with Fuchsias than I have with Hydrangeas!  Perhaps it's the Hummingbirds that give them the loving care needed to make them flourish?

Have a wonderful weekend my friends!

=] Michele

Links to products used or recommended are listed below: