Friday, March 31, 2023

Why wait until April when there is a perfect Spellbinders Umbrella blooming right now?

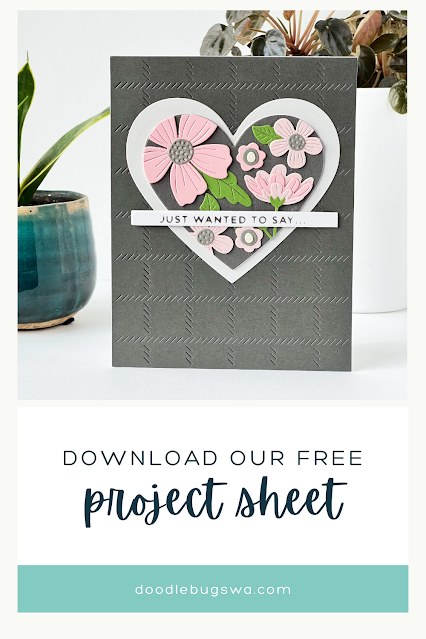
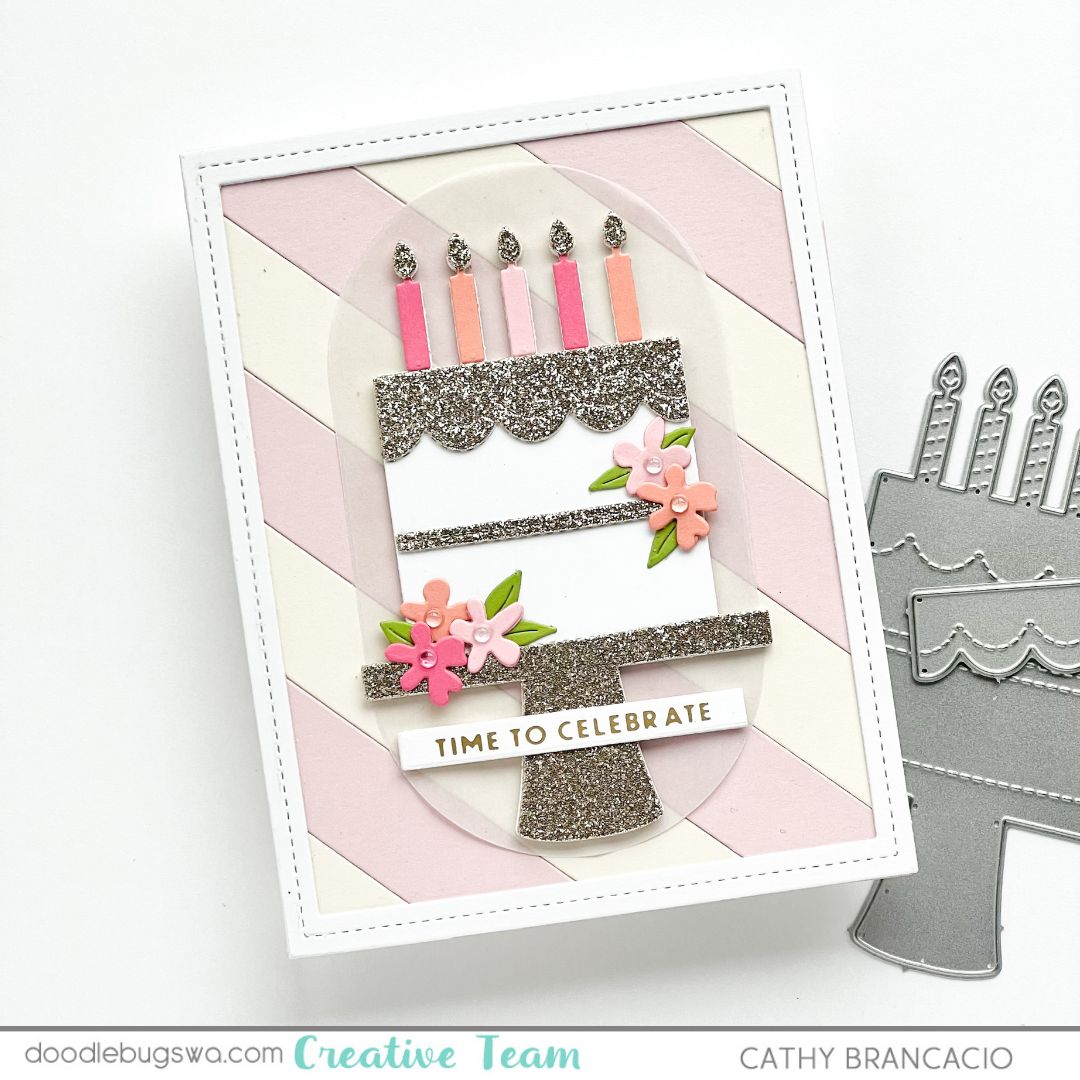
When is it a delight to be caught without an umbrella?  When your umbrella is filled with flowers, that's when!

Hello, Doodlebugs friends!  It's the end of March and I'm sure some of you have already been blessed with a full-on Spring - it's not always a given in Michigan where I live!  So today I created my own flowers in a rainbow of colors and filled this sweet Spellbinders umbrella to send a little cheer to a friend. 

Spellbinders Umbrella Blooms


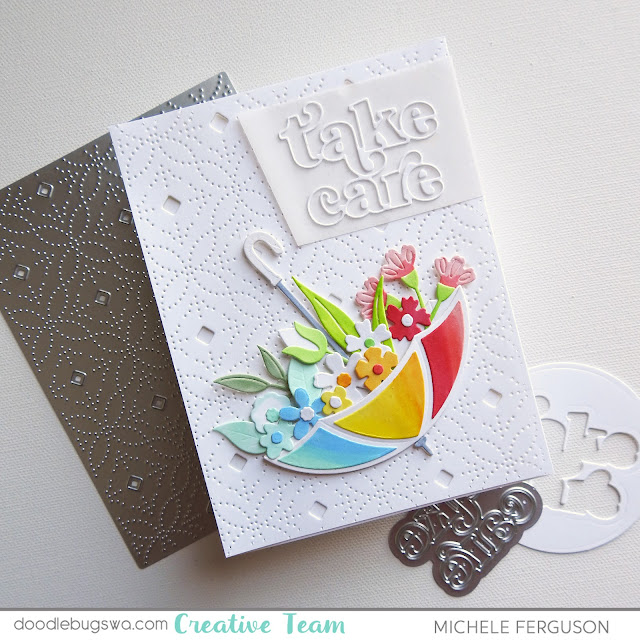
I've used colored cardstock for many of my die-cut blooms lately - today I found plenty of
white snippets in my recycle bit the perfect size to cut the blooms and greenery that are included in this Spellbinders Umbrella Bloom set!


I used my Copic alcohol markers to color them, and my umbrella, in a rainbow of shades!

I love all the options Spellbinders designer Vicky Papaioannou designed for this umbrella!

Spellbinders Umbrella Blooms


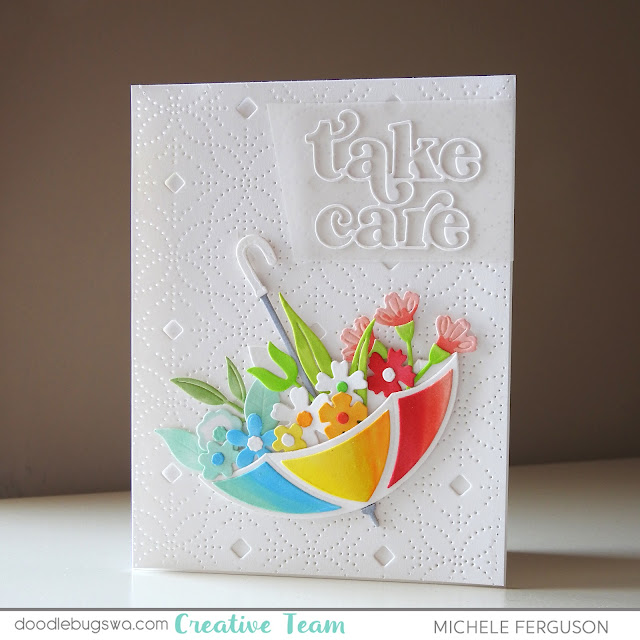
I'll share a closeup of my sentiment - from Pinkfresh Studio a darling Take Care die that cuts an outline, and the alphas in one cut - today I opted to use only the outline and adhered it to a simple snippet of vellum - that wonderful Ornate Medallions die is just too pretty to cover up completely!

May your gardens be full of flowers and your umbrellas dry, my friends!  Happy Weekend!
=] Michele

Links to products used or recommended are listed below:  

Wednesday, March 29, 2023

Using flowers and heart die cuts to create a beautiful, dimensional card

Today I have another version of the card featured in our FREE Project Download for March.  If you've downloaded the FREE Project Sheet you'll have all the information you need to create this version as well as my original version.

Spellbinders Be Bold Blooms and Altenew Versatile Greeting

For this version, I used a different background die, the Dotted Scales die from Altenew.  The sentiment for this card was die cut using the Versatile Greetings die, also from Altenew.  You'll find the exact product with links at the end of this post.

I also added a few gems for some bling.

Spellbinders Be Bold Blooms and Altenew Versatile Greeting

I used the flowers from the Be Bold Blooms die set from Spellbinders for the floral images, but you could use any small die images you have.

Download the FREE Project Sheet and start creating!


I hope you're inspired to create something.

Cathy

Links to products used or recommended are listed below:  

Monday, March 27, 2023

Create festive cards with the Build a Gift die from Pretty Pink Posh

One of my favorite dies for creating gifts and presents is the Build a Gift die from Pretty Pink Posh.  I love cutting and assembly loads of little gifts and having them on hand for a quick birthday card.  It's also a great die for the holidays!!


Pretty Pink Posh Build a Gift and Lawn Fawn Snowfall Background

I used the Snowfall Backdrop die from Lawn Fawn to create the look of confetti for my background.  I didn't realize this die is retired.  Uggh!  There are some fun confetti stencils and hot foil plates that are similar.  I'll link them below if you're interested.  

Then I stacked the gifts and added a quick sentiment.  

Pretty Pink Posh Build a Gift and Lawn Fawn Snowfall Background

My birthday list is long this time of year.  So, this card will be headed to the mailbox soon.

Happy Monday friends.  Hope you have some time to get crafty this week.

Cathy

Links to products used or recommended are listed below: 
 

Friday, March 24, 2023

Wait! Christmas in March?

Happy Friday, friends!  I have had so much fun combining a new wreath die set from Altenew with a Christmas background stamp today - think it can't be done?  There's proof in the pudding:

Altenew Sweet Blooms Die

Take a really good look at my background panel... see it?  
Yes, that is Pinkfresh Studio's Holiday City View - white heat embossed!
[come on - admit it!  we all have a neighbor who leaves their Christmas wreath on the door until the birds build their nest in it!!]

Altnew Sweet Blooms die

I had the best time cutting all the bits and pieces in this sweet Altenew Sweet Blooms die set!
I created blooms in many color combinations before deciding the purple/lavender was my favorite for Spring.  

I love the bit of texture and interest this background brought to my card without adding anymore bulk!  That sweet little tag sets this card up perfectly for any message I'd like to add inside - for any occasion at all!  Hello from HoneyBee Stamps' My Favorite Flower, and the tag is HoneyBee, too.

Hope you take another look at your Christmas supplies before storing them away!
Have a wonderful, crafty weekend, my friends - thank so much for stopping by today!
=] Michele
 
Links to products used or recommended are listed below:  

Wednesday, March 22, 2023

Celebrating with a Fancy Cake from Pretty Pink Posh

I recently celebrated my mom's birthday with this beautiful card.  She deserves, cake, flowers and glitter all wrapped up in one birthday card.

Pretty Pink Posh Fancy Cake  and Lawn Fawn Simple Diagonal Stripe

I cut the base of the cake and some of the accents from Altenew's Gilded Glitter Cardstock.  This paper makes the perfect accent for your cards and the glitter stays on the card, not everywhere else.  It's my favorite "go to" glitter paper.

Pretty Pink Posh Fancy Cake and Lawn Fawn Simple Diagonal Stripe

As you can see, I love to stack up my dies to create dimension.  The tiny flowers I added to the cake came from the Sealed Wildflowers die set from Spellbinders.  I embellished them with the smallest size drop from Trinity Stamps Boiled Sugar gems.

Pretty Pink Posh Fancy Cake and Lawn Fawn Simple Diagonal Stripe

The stripe background was created using the Simple Diagonal Stripe background from Lawn Fawn and that foiled sentiment is from the Birthday Unboxing hot foil plate from Spellbinders.

Hope I've inspired you to create something today!

Cathy

Links to products used or recommended are listed below: 

Monday, March 20, 2023

Easy, die cut, layered card using Spellbinders Essential Hearts and Be Bold Blooms

Hearts are not just for Valentine's Day.  Today's card and FREE project download sheet uses hearts and flowers to say....anything.  I love when the sentiments on the front of my cards allow me use the card for any occasion.  If you like this card and would love to create it, or something similar, be sure to download our FREE PDF project sheet.


Spellbinders Essential Hearts and Be Bold Blooms

I'm still working on using up the die cut flowers I have left from some previous projects.  So, I layered them up on hearts I had left over from Valentine projects.  You should see my crafty space!  What a mess.

Spellbinders Essential Hearts and Be Bold Blooms

You'll find all the details for creating this card in our Printable PDF Project Sheet.  It's FREE.  The link will take you to the website where you can download the instruction sheet.  Add it to your cart, check out, and start creating.

Spellbinders Be Bold Blooms and Essential Hearts


 Links to products used or recommended are listed below:   

Friday, March 17, 2023

A beautiful old friend meets a new one!

Hello again, my Doodlebugs friends!  Michele here so that means the weekend is upon us!  As the title hints, I've brought together a wonderful layering set from Altenew, and a new embossing folder to spend some time with today ...


Altenew Fairytale Blooms and Spellbinders Four Petal Floral

More than a dozen alcohol markers were used to color this gorgeous 
Fairy Tale Florals bouquet!


However only one gorgeous embossing folder from Spellbinders Four Petal Collection was needed to give all this wonderful interest to the card base!  The folder is big enough to emboss a 5x7" card panel, but I centered my A2 panel for today's card.


Put the two together and add a sprinkling of pearls, and you've got yourself a wonderful 
card to give to your bestie - or the delivery person who graces your 
front porch with goodness on a regular basis!

Altenew Fairytale Blooms and Spellbinders Four Petal Floral

The moral of today's story:  Old + New = just right!  
Happy weekend, my friends!

=] Michele

Links to products used or recommended are listed below:  

Friday, March 10, 2023

Are you a narcissus?

Or a daffy-dil?  ha!  Hello my Doodlebugs friends!  Michele here at my silliest again!  But seriously - what is the difference between a Daffodil and a Narcissus? My search on the internet answered my question:  the IS NO difference!  To top it all off they are also called Jonquils!  OY!

I had a really soothing take-my-own-sweet-time water coloring session with the gorgeous Build-a-Flower: Narcissus layering set from Altenew recently.  All I can say is I went with my memory of those growing in my mom's garden when I was a kid.  She never once got mad at me for picking a little bouquet for our neighbor!  Such a beautiful first look at Spring!

Altenew Build a Flower Narcissus

The perfect sentiment was found in the same set!

Altenew Build a Flower Narcissus

Think I used some fancy water coloring pigments?  Think again - simply grabbed a few
dye inks in various shades of my memories!

Altenew Build a Flower Narcissus

A few highlights by leaving some areas untouched, drying time between layers of ink, and
a few splatters [hope the recipient doesn't mind that wayward splat] from leftovers, and an additional bloom die cut with the coordinating dies, and my job here is done!


Happy weekend eve, my friends!
=] Michele

Links to products used or recommended are listed below:   

Link to Distress Inks

Monday, March 6, 2023

Create a die cut, heart shaped card

Anyone else have lots of die cut hearts sitting around in their crafty space?  I cut quite a few hearts last month for Valentine's Day projects and decided I'd challenge myself to use what I have left to create friendship and thank you cards.

Today I'm featuring a heart shaped card I created with the Spellbinders Essential Hearts dies.

Heart shaped cards with Spellbinders be bold blooms and essentials hearts die
This was a super easy card to create.  I added a bunch of layered, floral images to the front of a heart that was slightly smaller that the heart shape I was using for my folded card base. The flower dies are from the Be Bold Bloom set from Spellbinders.

This is how I created the folded base.  1.  Cut two hearts from the same sized heart shape die.  2. Score one of the dies across the top of the heart at 1/2 inch.  This will be the back of  your card.  3.  Glue the heart that you will be using for the front of your card,  to the heart you cut and scored for the back of your card.  Only add the glue to the 1/2 inch portion of the card, above the score line, securing the two pieced together.  4.  Cut approximately 1/2 inch from the bottom tip of the heart on the back portion of the card. This will help it to stand up straight on display.


Heart shaped cards with Spellbinders be bold blooms and essentials hearts die
I added the smaller, embellished heart to the front of my card.  The sentiment was hot foiled, but you could stamp a sentiment if you don't have a hot foiling system.

Hope this inspired you to create a shaped card.  They are so much fun.

Cathy

Links to products used or recommended are listed below:  

Friday, March 3, 2023

With Anemones like these!

Hello, Doodlebugs friends - I am fond of changing words around to suit my cards.  Today, is one of those days ... 'with Anemones like these - who needs friends?'  LOL

I am so happy to have these gorgeous Spellbinders' Anemones in the house!  For my first card, I used the cutting dies with some glossy photo paper a little bit of simple blender brush coloring, and the sentiment Friend die that is included in the Glimmer Anemone Glimmer Blooms set.

Spellbiners Anemones die

I cut this VERY fine friend from black cardstock once, and white two more times, 
then used an alcohol marker to color the edges black - also the Anemone centers!

Spellbinders Anemone die

This pretty oval is part of the Spellbinders Postage Edge Ovals set - love 
that itty bitty pierced dotted detail!

My next Anemone uses the Glimmer Hot Foil plate and die combo and a bit of simple alcohol marker coloring...

Spellbinders Anemone hot foil plate

I used the same foil to add these darling hearts from Pinkfresh Studio on my panel,
and Fancy Script Words hot foil plate and coordinating dies for my sentiment.

Spellbinders Anemone hot foil plate

Hope you like!  Of course, I'm not serious about not needing friends - what in the world would I do without you??  I do NOT want to find out! xx
=] Michele

Links to products used or recommended are listed below:  

Wednesday, March 1, 2023

No line watercoloring with Concord and 9th Blended Petals

Today I'm sharing my final cards using the Blended Petals stamp from Concord & 9th.  I used the no line watercolor technique to create them and was happy with the way the turned out (mostly).   I was inspired by Dawn at WPlus9.  Here's the video that inspired me.  Be sure take a peek at all her beautiful creations on YouTube.  I'm sure you'll be inspired. 

I used Distress Antique Linen to stamp my image on watercolor paper.  This gave me a light image to use as a guide for painting.  Since the Distress Ink is reactive with water, the lines disappear into the paint when I touch them with the wet brush.

As I colored the image, I added some water in a few areas on the background.  This let the paint move from the image to the wet paper and created a soft, loose look that I loved.  Be sure to watch Dawn's video if you think you might like to try this technique.
 

I had so much fun I tried a second version. 


I added sentiments using the Versatile Greeting die set from Altenew.

Have a great day and thanks for stopping by!

Cathy

Links to products used or recommended are listed below: