Wednesday, March 30, 2022

Happy Easter with Lawn Fawn...


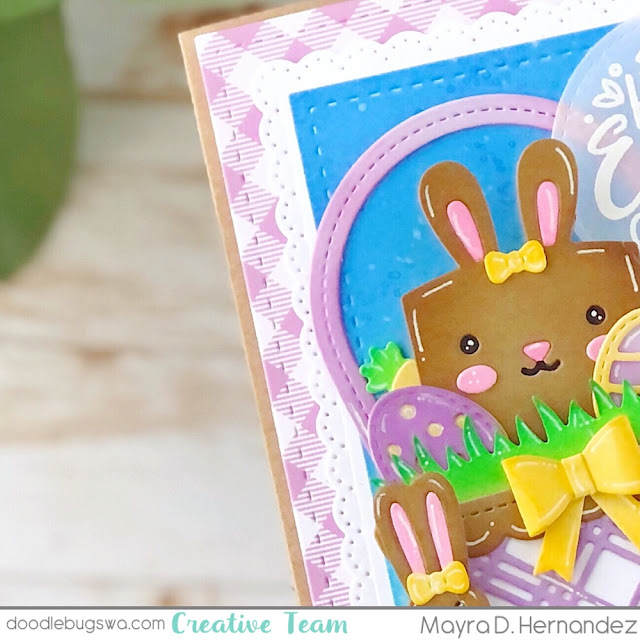
 Hello and happy Wednesday. I am sharing this fun Easter-themed card with you today. I used the super cute Build A Basket die. 


I began by die-cutting the base layers of the card using the three largest dies from the A2 Lacy Layers die set. The patterned paper is from the new Gotta Have Gingham Rainbow 6 x 6 paper pad. I then die-cut the layers to create the basket from the Build A Basket die set, the bunny from the Tiny Gift Box Bunny Add-on, and the grass from the Mushroom Border die set. 


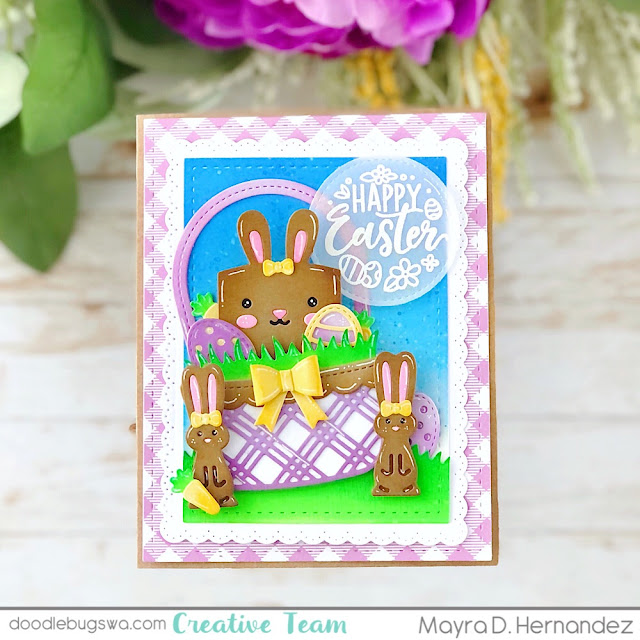
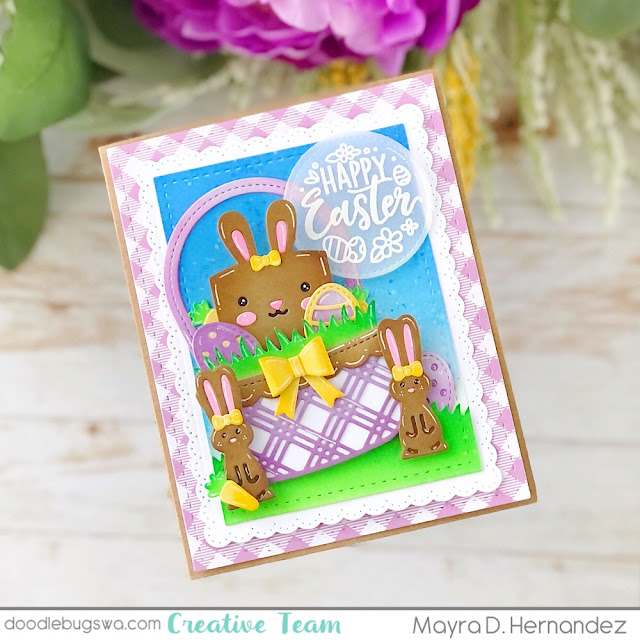
I then added color to each of the die cuts. I used Clover and Noble Fir for all of the green areas. For the blue, I used Salty Ocean and Blueprint Sketch. For the purple, I used Seedless Preserves and Dusty Concord. For the brown areas, I used Gathered Twigs, Brushed Corduroy, and Ground Espresso. For the yellow areas, I used Mustard Seed and No.2 Pencil


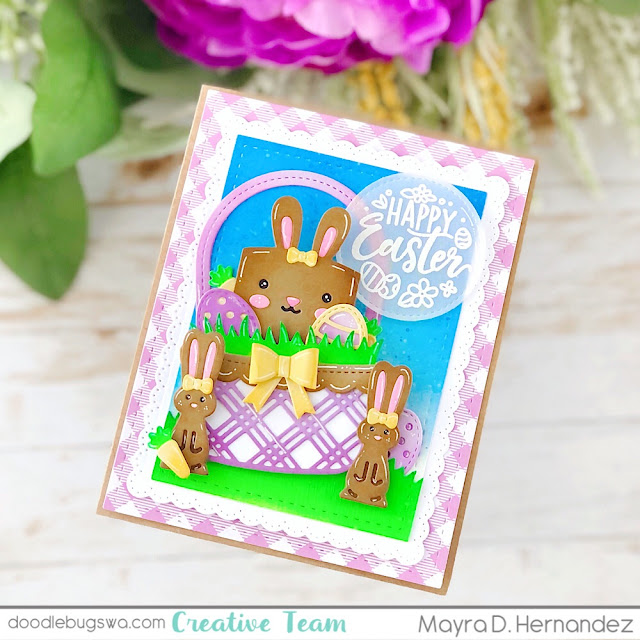
I then heat embossed the sentiment from the Magic Spring Messages stamp set onto a piece of vellum.  I hope you enjoy the card I created to share with you today. Thank you so much for taking the time to stop by. I hope you each have a wonderful and blessed day. Please feel welcome to visit me on my blogIG or Pinterest.

Products used or recommended are linked below:

Monday, March 28, 2022

Embossing and Watercolor


Hi, everyone!  Toni here with you today sharing a watercolored floral card using Altenew African Daisy and Pinkfresh Studio Brushed Sentiments with a Honey Bee Crystal Kaleidoscope Stencil background.


I embossed the Altenew African Daisy on Strathmore Bristol and colored it up with Zigs. The embossed edges help to corral the ink as well as lends the image a no-line coloring look. My favorite part is definitely the corraling--no need to wait while the paint dries!

ASIDE: African daisies are among my usual summer flowers and the above picture (not mine) is my favorite colorway. They're really easy to grow and will bloom continuously through October here in the PNW as long as you deadhead.


I used the Honey Bee Crystal Kaleidoscope Stencil with Distress Oxide Salvaged Patina to create a backdrop for the floral image which I had fussy cut out.

I stamped the Pinkfresh Studio Brushed Sentiments in a bold black and cut them out with the Pinkfresh Studio Brushed Sentiment Dies. I don't usually buy outline dies but make an exception for sentiments as I love how clean it looks.


I'll see you again soon.  If you'd like to check out my other creations in the meantime, you can visit my blog, Frankie Helps Craft, my Instagram, or my Pinterest Board.  

PRODUCTS USED AND/OR RECOMMENDED

Wednesday, March 23, 2022

Spring-Themed Birthday Card....


 Hello and happy Wednesday. I am sharing this sweet card with you today using the lovely Beautiful Blooms stamp set from Pink Fresh Studio. 


I began by coloring the images using Copic markers. 

Copics Used: 

Soft Peach/Pink: R00, R01, R12, R30, R93

Soft Purple: V01, V04, V06

Green: G40, YG11, YG03, YG17, YG67, G28, G94, G99

Yellow: Y11, Y08, Y19, YR24


I then used the Basic Rectangles  die set to die cut the base panel for the card. I also die-cut the largest of the rectangles to create a layered look for the card base. The patterned paper for the base of the card is from the Fresh Brewed 6x6 Paper pad. 


Next, I heat embossed the sentiment from the Scripty Bday stamp set onto a strip of vellum using Versamark ink and White Embossing Powder. I then added the colored floral images to the card base using Foam Tape

I hope you enjoy the card I created to share with you today. Thank you very much for taking the time to stop by. I hope you each have a wonderful and blessed day. Please feel welcome to visit me on my blogIG or Pinterest.
 

Links to products used or recommended are listed below:

Monday, March 21, 2022

Offsetting Large Diecut Sentiments


Hi, everyone!  Toni here with you today sharing a card featuring cute little bees on a foiled background.

Remember that bird card from a couple of weeks ago where I used the Pinkfresh Studio Lush Vines Hot Foil Plate to emboss? Here I hot foiled it using a lime green perfect for spring.


I sponged the Sunny Studio Out on a Limb die using Distress Oxide Walnut Stain and Mowed Lawn. I used the Walnut Stain as well as Wild Honey on the MFT Beehive Die. I spattered both with water and set them aside to dry while I assembled the bees of the Honey Bee Honey Bees Paper Piecing dies.

I cut the Honey Bee Honey Cut out of black cardstock then realized I didn't like it over the beehive as I had originally planned so I pushed it down and trimmed off the excess at the bottom.  Looks fab! I need to keep this in mind for future cards.


I add the Honey Bee Honey "hello" embossed white on black as well.  

I'll see you again soon.  If you'd like to check out my other creations in the meantime, you can visit my blog, Frankie Helps Craft, my Instagram, or my Pinterest Board.  

PRODUCTS USED AND/OR RECOMMENDED

Wednesday, March 16, 2022

Bloom with Grace with Honey Bee Stamps...

 Hello and happy Wednesday everyone. I am sharing this card with you today using the lovely Honey Bee Stamps: Lovely Layers: Hydrangea die. 


I began by using the Fancy Lattice Backdrop die to die cut the base layer for the card along with the largest stitched rectangle from the Basic Rectangles  die set from Mama Elephant. I then die-cut the layers to create the beautiful Hydrangea using the Lovely Layers: Hydrangea die. 


Next, I added color to the layers of the flower using Milled LavenderSeedless Preserves , Dusty Concord ,and Wilted Violet Distress Oxide inks. I then added color to the leaves using JalapenoClover, and a bit of Milled Lavender along with Seedless Preserves. I then used a Gelly Roll pen in white to add a bit of detail to each of the die-cut layers. 


I then heat embossed the sentiment from the Stems and Sprigs stamp set onto a piece of black cardstock using Versamark ink and White Embossing Powder. 


I hope you enjoy the card I created to share with you today. Thank you very much for taking the time to stop by. I pray you each have a wonderful and blessed day. 
Please feel welcome to visit me on my blogIG or Pinterest.


Links to products used or recommended are listed below:


Monday, March 14, 2022

Easily Create a Layered Scene


Hi, everyone!  Toni here with you today sharing a cheerful fairy card. Spring is definitely here and it's wonderful!

I sponged the Lawn Fawn Backdrop Meadow (Landscape) Dies with Distress Oxide Mowed Lawn and Rustic Wilderness, making sure I highlighted the grass especially.  I sponged the stump with DO Vintage Photo and Walnut Stain.


I adhered the backdrop onto the card base along with a piece of Lawn Fawn Dandy Day 6x6 Paper. Next I added the Sunny Studio Garden Fairy images I had colored with Zigs. 

Notice how I layered the stump on top with the flower fairy tucked into the grass slot and the last fairy on the card base to create a bit of depth to the scene.


I added a sprinkling of tulips and butterflies cut from the Lawn Fawn Mushroom House Dies. If you have butterflies of different sizes, you could add the largest in front and the smallest in back to further emphasize the depth of the scene.  Cool!

I'll see you again soon.  If you'd like to check out my other creations in the meantime, you can visit my blog, Frankie Helps Craft, my Instagram, or my Pinterest Board.  

PRODUCTS USED AND/OR RECOMMENDED

Wednesday, March 9, 2022

Spring Hydrangeas with Altenew...

Hello and happy Wednesday. I am sharing this card with you today using the lovely Paint-A-Flower Hydrangea Outline stamp set from Altenew. 

I began by stamping the image onto watercolor paper using Antique Linen Distress ink. Next, I used Zig Clean Color Brush Pens. I used: 


I then used one of the stitched rectangles from the Basic Rectangles Creative Cuts set to die-cut the panel for the card. I then layered that panel on a pink base, and then on a patterned paper from the Sweet On You 6x6 paper pad. I then die-cut the banner using the Fancy Wavy Banners die set. I heat embossed the sentiment from the Beautiful Blooms stamp set by Pinkfresh Studios. 


I hope you enjoy the card I created to share with you today. Thank you very much for taking the time to stop by. I hope you each have a wonderful and blessed day. Please feel welcome to visit me on my blogIG or Pinterest.


Products used or recommended are linked below:


Monday, March 7, 2022

Using a Hot Foil Plate to Emboss


Hi, everyone!  Toni here with you today sharing a super cute spring-themed card.

To start my card, I decided to use the Pinkfresh Studio Lush Vines Hot Foil Plate as an impression plate.  Those leaves and vines are perfect for these little birdies.  I totally think of a canopy of trees.


I used a rubber mat beneath the cardstock and hot foil plate sandwich just like you would for impressing with any die. Note I treated this like I do 3D embossing folders by spritzing the cardstock lightly with water to reduce the chances of the paper breaking.  Worked a treat!

And not to worry, you will definitely see the foiled version soon enough!


I colored up the Sunny Studio Little Birdie images using Copics.  I particularly love how their eyes are drawn. So cute!

I stamped the sentiment on a Lawn Fawn Simple Wavy Banner and perched a bird on it because why not. :)  

I'll see you again soon.  If you'd like to check out my other creations in the meantime, you can visit my blog, Frankie Helps Craft, my Instagram, or my Pinterest Board

PRODUCTS USED AND/OR RECOMMENDED

Wednesday, March 2, 2022

Happy Easter with Mama Elephant...

Hello and happy Wednesday everyone!!! It is March!!! That means it is time to create Spring/Easter-themed cards. I am sharing this sweet Easter card. I used the adorable Chickie-Favor die. 

I began by die-cutting the layers for the chick using the Chickie-Favor die. I then added color to the edges using Sunflower ink from Lawn Fawn, Mustard Seed, and Spiced Marmalade Distress Oxide inks, along with a bit of Fake Tan. I added a bit of Kitsch Flamingo to the cheek area. I then added a couple of details using a white gel pen


Next, I used the scalloped die from the Framed Tags-Union Square creative cuts dies set to die-cut the scalloped frame for the card. I then used the grass border from the Slimline Grassy Hillside Borders die set to die-cut the grass area for the card. I added a bit of color using Twisted Citron, and Jalapeno-colored inks. 


I then used the bow from the Tiny Gift Box die set to create a bow for the chickie. Next, I die-cut the banner using the Fancy Wavy Banners die set. I heat embossed the sentiment from the Eggstra Amazing Easter stamp set. 

I hope you enjoy the card I created to share with you today. Thank you very much for taking the time to stop by. I pray you each have a wonderful and blessed day. Please feel welcome to visit me on my blogIG or Pinterest

Links to products used or suggested are listed below: