Friday, June 30, 2023

Apple Blossoms are blooming!

Hello, friends! Michele here to wish you all a happy weekend eve again!  I have another fun MISTI playtime to share with you today - and the most darling of all mini stamp and die sets around: Altenew's Mini Delight: Apple Blossoms! This wee little set has one bloom with SIX layers! I found a way to set up to stamp four blooms and four leaves with a simple turn of a square of cardstock!

Are you with me so far?  Maybe I'll show you the finished project first... you can see the stamp set along the left...

Altenew Apple Blossoms

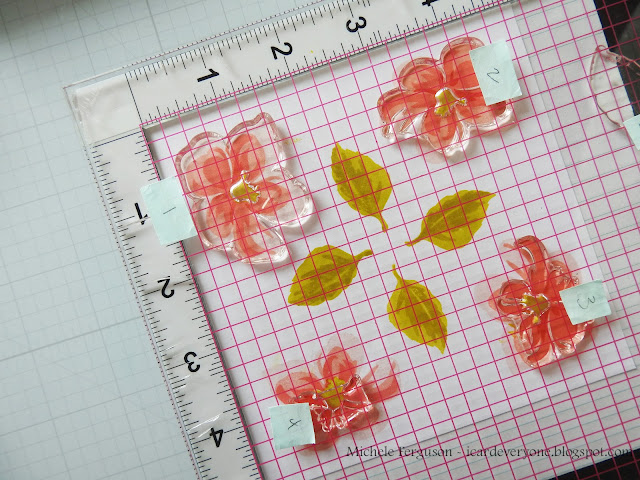
Here is how it all started:

1. mount a 5x5" piece of cardstock into the lower corner of your Original MISTI; choose four shades of ink for the bloom, and two shades for their centers, and leaves.

2. Place stamp A1 into the lower left corner and pick it up with the MISTI lid - apply lightest ink, and stamp.

3. Turn your cardstock clockwise once and stamp A1 again, and again two more times - until you have stamped four images.

4. Line up image A2 over the upper left bloom - pick it up with the lid and stamp the second shade of ink.  Turn and stamp the second layer on all four images.

5. Line up image A3 over the top right image - pick it up with the lid and stamp all four images with the third shade.

6. Line up image A4 over the bottom right image - pick it up with the lid and... you get the picture, right?

Now push that square up to the top of your MISTI and follow the same steps for the two images A5 & A6 that layer the center of the bloom.

There was just the right amount of space in the center of my
square for four leaves - here is how to position stamp B1 & B2:


When all the layers are stamped this is what you'll have for 
your efforts:


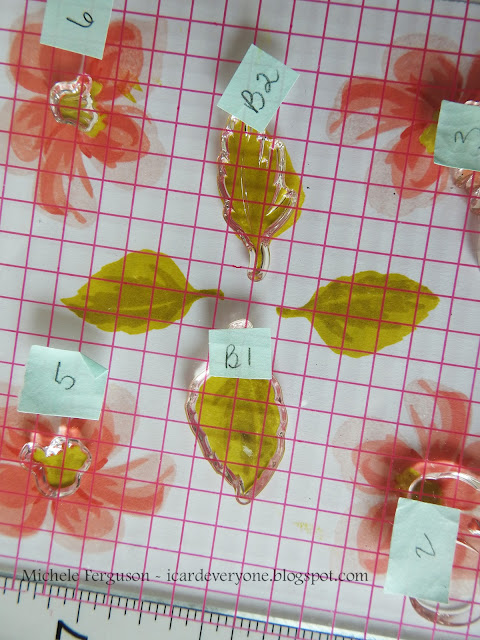
Just add another 5-inch square of cardstock and stamp 
another four in a flash!


After cutting them with the coordinating dies, you will
have the perfect 'jig' for aligning the stamps the next time - just add die-cut blooms and leaves into the spaces and use them to line up the images! 

Two weeks in a row I've talked your legs off - hope you don't mind!  BTW it will work for ALL layering sets!  Just start with a square!

Ready for my projects? Both cards use snippets for their backgrounds - I often position my dies so that I can use the remaining for another card!  See what I did here...

Altenew Apple Blossoms

Altenew Apple Blossoms


Altenew Apple Blossoms

 
Have a wonderful and hopefully crafty weekend!
=] Michele

Links to products used or recommended are listed below:  

Thursday, June 29, 2023

Happy Birthday Friend and a Faux Shaker Design

 Hello Friend! I had so much fun designing this project.  Do you see my theme, other than watermelon?


Mama Elephant Boba Shaker and Pretty Pink Posh Friend Shadow Die

I've been smitten with Pretty Pink Posh's newest fruity release.  Earlier I designed another watermelon card and had the leftover stacked cardstock piece.  I couldn't bear to toss it so I realized that I could upcycle it into this project.

The products I combined today include:
  • Mama Elephant - Boba Shaker combo | Creative Cuts
  • Pretty Pink Posh - Build a Gift | die
  • Pretty Pink Posh - Friend Shadow | die
  • Pretty Pink Posh - Simple Sentiments | stamp
  • Pretty Pink Posh - Starburst | stencil
  • Pretty Pink Posh - Lime Shimmer | confetti
Mama Elephant Boba Shaker and Pretty Pink Posh Friend Shadow Die

My leftover watermelon piece fit perfectly with the Mama Elephant Boba Shaker creative cuts! I designed the straw similar to the interior of the shaker. I love that red bow from the Pretty Pink Posh - Build a Gift die.  Does the cup look like someone you know?

Mama Elephant Boba Shaker and Pretty Pink Posh Friend Shadow Die

I have a bit of a secret, this is actually a faux shaker.  There is a plastic film over the opening, similar to a shaker design but I have glued down those Lime Shimmer Confetti bits.

The background has been stenciled with the Pretty Pink Posh Starburst.  That's a fun new one that you'll probably see quite often.  The sentiment is the Pretty Pink Posh Simple Sentiments along with their Friend Shadow die.

What are some of your fast cardmaking tips?

Links to products used or recommended are listed below:  

Tuesday, June 27, 2023

Birthday Cards with the Birthday Mug Additions die from Pretty Pink Posh

Today I'm sharing a few birthday cards I created using the Birthday Mug Additions die from Pretty Pink Posh.  It's a great addition to the Winter Mug die, but it's also a great die for birthday and celebration without the mug. I have a few more cards I'll be sharing in July using this fun die.

Pretty Pink Posh Birthday Mug Additions Die

After die-cutting several candles in different color cardstock, I added some stamped stripes using the Pick a Pattern stamp set from Concord & 9th.  This is such a great set for adding details to small die cut images.  As usual, I added a few layers to the candle to give them some dimension.

I cut the flames from some yellow cardstock and added a bit of orange ink to the bottoms of the flames before adding them to the tops of the candles.

Pretty Pink Posh Birthday Mug Additions Die

After cutting all the  candles, I die cut the word celebrate from some glittered cardstock and hot foiled a few sentiments that would partner well with the word celebrate.  The die cut word is from the Scripted Greetings set from Pinkfresh Studio and the hot foil plates are from Spellbinders Birthday Unboxing set.  If you don't hot foil, a simple stamped or heat embossed sentiment would look nice as well.

Pretty Pink Posh Birthday Mug Additions Die

I dug through my stash for something that would work as a sparkle behind the candle flames.  I think the one I used may have been a firework or a flower center.  If you don't have a starburst, you could also use a circle image stamped with a soft yellow ink.

After stamping the sparkle, I assembled the cards using my favorite liquid glue, the Lawn Fawn glue tube.

The final touch was some glitter glue on the candle flames and some gems and / or baubles.

Pretty Pink Posh Birthday Mug Additions Die

Hope you're inspired to create something!

Thanks for taking a look.

Cathy

Friday, June 23, 2023

Have a Delightful Day - compliments of Altenew!

Hi there, friends!  I picked up this gorgeous new Altenew Delightful Day floral from Doodlebugs recently and after receiving it, realized it had been designed to be used with Altenew's Stampwheel.

I found a wonderful way to make it work for me in my MISTI - most of us have a MISTI and I can't imagine ever not needing it!

Here's a closeup of the gorgeous set:

Altenew Delightful Day

See that 'cross?' It is in the middle of the group of four floral layers that complete one finished bloom. I found a way to stamp those layers by turning a square of cardstock, instead of the stamp!

First:
    Cut a square of copy paper 6x6 inches


Second:
    Fold the paper in half both ways which makes a cross in the center of the paper.  Tuck it into the bottom right corner of your MISTI and align the stamp's cross over top of the folded one on your paper.  [sorry my stamp is stained!]
 

Third: close the door on the MISTI and pick up the stamp.


Fourth: Replace the copy paper with your card stock square.


Now just choose your trio of inks and begin stamping rotating the paper with each layer! I went without the outline stamp this time.  Here's a tip I use for keeping the rotation pattern 
straight in my mind:


Make four blooms the exact same by using one set of inks for each - or mix it up as I did.  Just make sure you clean and dry those stamps with the palm of your hand between each stamping!!


Before removing the stamp, you can even go back and add a little more shading using a finger dauber as I did above with brown ink.

I then aligned the center detail stamp over one image, picked it up with my lid, and stamped it onto each bloom - easy peasy!


Okay!  Are you ready for my cards?? Completely different colors, but so pretty just the same... hope you agree!

Altenew's Delight Day stamp and die creates beautiful floral images.

Altenew's Delight Day stamp and die creates beautiful floral images.

The group of leaves in the set is stamped the same way, then I found a few other leaves in my Altenew stash that coordinate beautifully, stamped with their Nature's Wonders inks.

Altenew's Delight Day stamp and die creates beautiful floral images.

If you made it here to the end, and maybe learned a little something along the way, it would make me so happy!

Thanks so very much for stopping by and spending your weekend-eve with me here at Doodlebugs!
=] Michele

Links to products used or recommended are listed below:  

Thursday, June 22, 2023

Happy Birthday Masculine Style

 My older brother celebrated his birthday earlier this week.  So I'm back with another masculine themed design. These are the products I'm featuring this week:

  • Altenew - Wave Panel
  • Pretty Pink Posh - Simple Sentiments


Altenew Wave Panel and Ink Blending

I started with an ink blended panel using the following Distress Oxides:

  • Speckled Egg
  • Evergreen Bough
  • Broken China
The panel was trimmed down to 3.25 x 4.5 inches and mounted onto an A2 white panel.

Altenew Wave Panel and Ink Blending

The Altenew Wave Panel is absolutely gorgeous, so intricate and delicate.  I used a shim and ran it through my die cutter a couple of times.  I really want to go with a persimmon color cardstock but ultimately went with white.

Altenew Wave Panel and Ink Blending

The sentiment is by Pretty Pink Posh - Simple Sentiments. A must have for your crafty stash.

I hope you're having a fantastic week!
 
Links to products used or recommended are listed below:   

Tuesday, June 20, 2023

Half Circle Shaped Card Using Spellbinders Postage Edge Circles

Sometimes it's fun to create and give something that's a little unexpected.   Today I'm sharing a shaped card I created a while back using the the Postage Edge Circle Dies.  One of the circles in this set is fairly large and perfect for making a shaped card.


Spellbinders Postage Edge Circle Die and Be Bold Blooms

I cut the largest circle die and the postage edge die twice from white and grey cardstock.  I double stacked them both for dimension and added stability.  Then layered them on top of each other.  

I then cut a second of the largest postage edge die for the back side / flap of my card.  I scored it about 1/2 inch from the top, added some adhesive to that small area above the score line and then secured it to the back of the front portion of my card.  This creates a back flap that is identical to the front.  The scored top allows it to bend, forming an easel so the card will stand up.

Spellbinders Postage Edge Circle Die and Be Bold Blooms

I removed approximately 1 inch from the bottom of the card.  This allows it to stand easier and fit nicely into an A2 envelope.

The lovely flowers were created using the Be Bold Blooms die from Spellbinders.  One of my favorites!  I layered them up to create a nice bouquet and added the Just Because sentiment.  This sentiment is from the Blended Petals stamp and die set from Concord & 9th.  You can probably tell, I stacked up the sentiment with several layers to create more dimension.  I love all those layers!

Spellbinders Postage Edge Circle Die and Be Bold Blooms

Thanks for stopping by!  I hope I've inspired you to create something.

-Cathy

Links to products used or recommended are listed below:  


Friday, June 16, 2023

Planting Concord & 9th posies in a new bed!

Michele here and I've found a new place to plant these darling Picked Posies from Concord & 9th!  

Concord and 9th Picked Posies and Spellbinders Scrolled Punch and Pierce Die

I do love a gorgeous cover plate - but when it cuts three separate panels?  Even better! Spellbinders' Scrolled Punch & Pierce die from their Four Petal release is
just such a die.  I think it adds a little bit of elegance to these pretty 'folksy' posies - don't you?

Concord and 9th Picked Posies and Spellbinders Scrolled Punch and Pierce Die
I've used one of the sentiments from the Concord &9th Picked Posies Greetings stamp set, and
love that there is a die in the coordinating die set for this sweet banner.
Sweet, simple-yet-feminine easy to mail card - I love it!

Hope you do too!
=] Michele

Links to products used or recommended are listed below:  

Thursday, June 15, 2023

Crafty Friends

I couldn't wait to use the Lawn Fawn - Magic Iris Beehive.  This week I'm featuring it without an interactive element.  Honestly I don't buy many of the interactive dies, I generally struggle with them.  I'm always game to use them without the interactive element.  Lawn Fawn is really great about designing them to use either way.


Lawn Fawn Magic Iris Beehive and Crafty Critters from Pretty Pink Posh

This is my supply list:

  • Lawn Fawn - Hive Five | stamp + lawn cuts
  • Lawn Fawn - Magic Iris | Beehive | lawn cuts
  • Lawn Fawn - Tea-rrific Day | stamp + lawn cuts
  • Mama Elephant - Sweet Treats | stamp
  • Pretty Pink Posh - Crafty Critters | stamp + die
  • Pretty Pink Posh - Crafty Sentiments | stamp

Lawn Fawn Magic Iris Beehive and Crafty Critters from Pretty Pink Posh


Every crafter needs adhesive and caffeine, right?

Both sentiments have been heat embossed.

Some Days I spend more time with photography than the actual designing of the project.  This card was being very camera shy.  I think it is the vellum belly band with the sentiment that was causing problems.


Lawn Fawn Magic Iris Beehive and Crafty Critters from Pretty Pink Posh

Hope you've carved out time this week to be crafty!
Amy

Links to products used or recommended are listed below:  

Tuesday, June 13, 2023

Ink Blending Die Cut Sentiments - Wonderful Script from Spellbinders

 Hello beautiful!  Hope you're all having a great day.

I'm excited to share two cards with you today.  They were fun, and pretty simple to create.

Spellbinders Wonderful Script Die and Four Petal Embossing Folder

I started by attaching a piece of cardstock to a sheet of double sided adhesive. Then I used my ink blending brushes to blend some bright colors onto the cardstock piece.  Once I was happy with the blended color, I die cut the sentiments from the ink blended cardstock.  I cut several sentiments from the cardstock and a few extra from some white cardstock (also backed with double sided adhesive).  The adhesive backing makes it easy to layer the pieces up for some added dimension.

After removing the ink blended piece from the adhesive backing, I added it to the top of the white piece for a second layer.  


I created quite a few sentiments so I'd be able to make a few cards.  This took the most time to create.  Now, with a few sentiments made, I was able to create 4 or 5 cards in little time.


For this card, I added the layered sentiment to the center of a piece I embossed with Spellbinders Four Petal 3D embossing folder.  I found a small HELLO sentiment from my stash and added some shimmer with Pinkfresh Studio Ombre Pixie Dust gems.

Spellbinders Wonderful Script Die and Four Petal Embossing Folder


Spellbinders Wonderful Script Die and Four Petal Embossing Folder

The second card is very similar. I used the Four Petal 3D Embossing folder for this card also.  I added the Braided Oval from Pinkfresh Studio on top, along with a hot foiled sentiment left over from a previous project.  The sentiment is from the Birthday Unboxing Hot Foil set from Spellbinders.

Spellbinders Wonderful Script Die and Four Petal Embossing Folder

Here's a close up view of that sentiment.
 
Spellbinders Wonderful Script Die and Four Petal Embossing Folder

I hope I've inspired you.  Thanks so much for stopping by.
 
-Cathy
 
Links to products used or recommended are listed below: