Friday, September 29, 2023

National Coffee Day Blog Hop - 2023

Happy Friday coffee lovers!!  We're super excited to be participating again in this year's National Coffee Day Blog Hop.  We're sharing a fun, coffee inspired project, a chance to win a $25 gift code and a discount code valid for 15% OFF your entire purchase.

Here are the details:

The hop starts HERE.  

Links can also be found below (be sure to keep reading for a discount code and a chance to win a $25 gift code):

You are invited to the Inlinkz link party!

Click here to enter


We are giving away a $25 Gift Code prize here, but there are lots of other prize opportunities and inspiration from the additional participants.  Please leave a comment on this blog post to be eligible for our prize.  We will randomly select a winner from the comments on October 1st and they will receive a $25 GIFT CERTIFICATE. (please note: we are sorry, but we cannot ship internationally - the giveaway is only open to US shipping).

Be sure to check our winner's post on October 4th for the winner's name and the details for collecting your prize.

We are also offering a great DISCOUNT CODE to celebrate National Coffee Day.  You'll save 15% on any purchase through October 1st.  The discount cannot be used with any other discounts or promotion.  See details below:

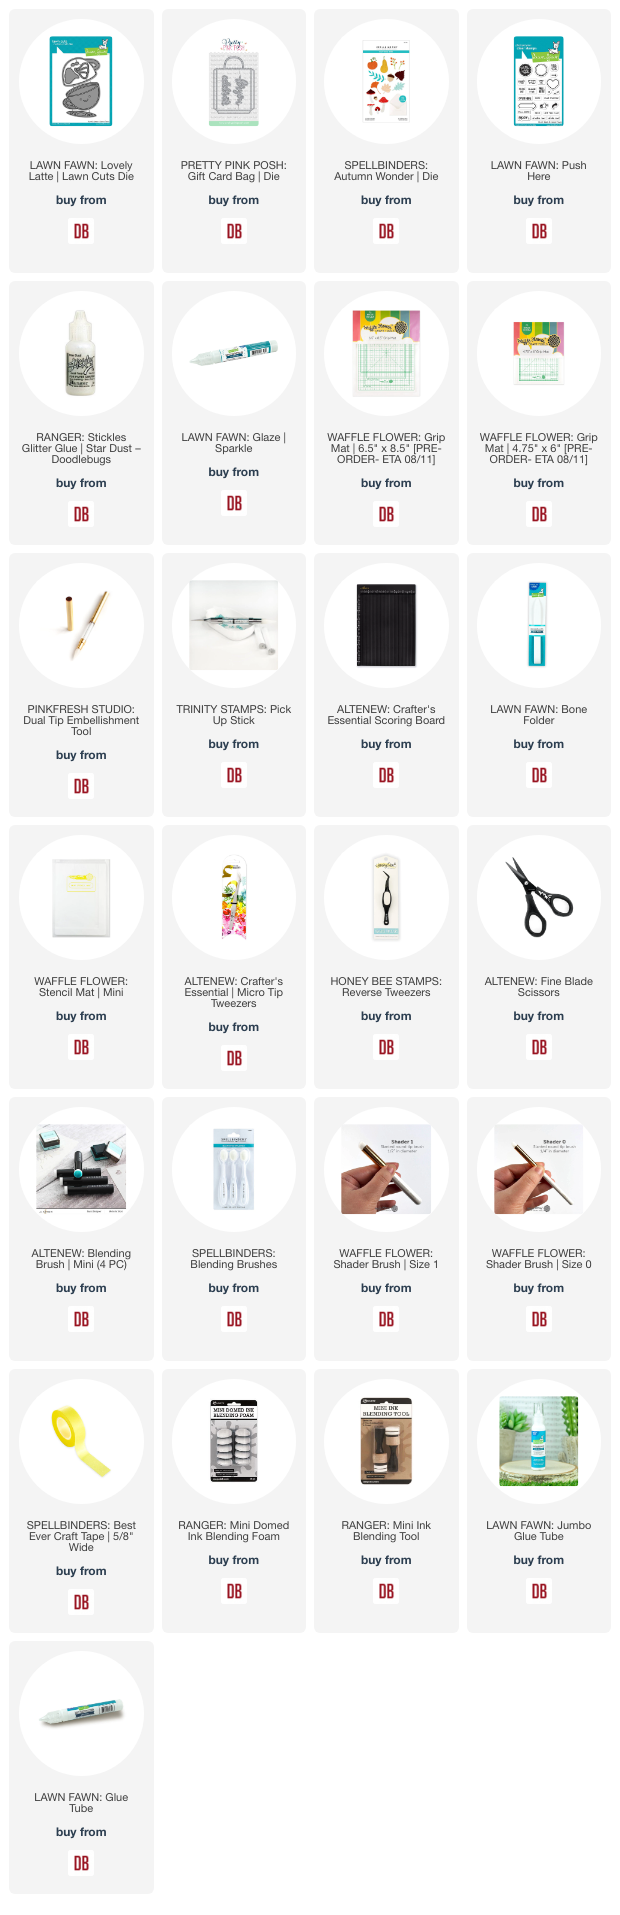
Now for our coffee inspiration.  I've created a fun coffee themed gift card enclosure embellished with fall leaves and a pumpkin spice latte.

Lawn Fawn Lovely Latter and Pretty Pink Posh Gift Card Bag

The decorative pieces were cut from white cardstock using the Lovely Latte die from Lawn Fawn and the Autumn Wonder die from Spellbinders.  I colored them up with some ink and a blending brush.

The gift card bag is easy to assemble.  Cut two of the bag dies (one for the front of the bag and one for the back).  Stamp the sentiment before you assemble and then glue the front and back together.  Add the coffee cup and leaves to the front of the bag.

Lawn Fawn Lovely Latter and Pretty Pink Posh Gift Card Bag

Cut a piece of cardstock measuring 2.75 inches x 4.5 inches.  This will be the insert that will slide your gift card up and out of the bag.  After cutting the insert, create a score line and fold up at .75 inches from the bottom (see the image below).  This flap will pull the gift card out of the bag when the recipient pulls up on the insert.

Thanks so much for stopping by.  Don't forget to leave a comment for a chance to win the $25 Gift Code.

Cathy

Links to products used or recommended are listed below: 

Thursday, September 28, 2023

Cutie Ghost Shaker Candy Wrap

Today I'm sharing some "not so spooky" ghost shakers I created using the Ghost Shaker die from Pretty Pink Posh.  I had so much fun making these!  I've been loving all the non traditional fall and Halloween colors that everyone has been using this year.  So, I chose some soft orange, pink and purple colors and went to work cutting the pieces.

Pretty Pink Posh Ghost Shaker Halloween Treat

I found some small flower dies in my collection of dies and used them to decorate the inside piece of the ghosts.  I then stacked and glued several of the ghost frames to create the shaker walls.  I added some confetti and then closed the top with a piece of die cut acetate cut from the ghost die.  A final ghost frame over the acetate finished the shakers.

Pretty Pink Posh Ghost Shaker Halloween Treat

I used white cardstock to create the candy wraps (see instructions at the end of this post) and embellished them with additional die cuts (those cute bats are from the Halloween Wonder die from Spellbinders).  The sentiments are from Lawn Fawn's Tiny Halloween stamp.  I curved the sentiments to fit onto the Fancy Wavy Banners die, also from Lawn Fawn.


Pretty Pink Posh Ghost Shaker Halloween Treat

I used a stencil for the candy wrap shown below and added that cute "boo" die cut that is included in the Ghost Shaker die from Pretty Pink Posh.
 
Pretty Pink Posh Ghost Shaker Halloween Treat
 
Here's a close up of that adorable ghost!
 
Pretty Pink Posh Ghost Shaker Halloween Treat

Finally, here's a quick diagram for creating the candy wraps. These fit the traditional size Hershey's candy bars.  You can adjust the measurements based on the candy bars you use.

Thanks so much for stopping by!  I hope you're inspired to create something today.

Cathy

Links to products used or recommended are listed below: 

Tuesday, September 26, 2023

Sending Positive [Caffeinated] Vibes

 Hello! If you've been following me for any amount of time, you might know that I love coffee.


Concord and 9th Celebration Squad

This project combines:
  • Concord & 9th - Celebration Squad | Die
  • Concord & 9th - Stitched Leaves Card Front | Die
  • Lawn Fawn - Woodland Critter Huggers - Winter Add-On | Lawn Cuts
  • Mama Elephant - Little Line Agenda | Stamp
  • Spellbinders - Essential Stylish Ovals | Die

Concord and 9th Celebration Squad

I love how fun this turned out, right down to her striped top.  The colors remind me of Kate Spade. I've been really enjoying working with standalone dies.

Concord and 9th Celebration Squad

How about you, would you rather design a card that is primarily dies or do you love stamping and coloring?
 
Links to products used or recommended are listed below: 

Monday, September 25, 2023

Thank You Box Card

Hey friends! This is Amanda from Twiddler's Nook. Mix it up Monday brings us thinking outside the box a bit...a box card that is. I love making box cards and don't do them near often enough. I recently picked up the Pretty Pink Posh Box Card die set and it's total perfection. Probably the easiest and most complete I've used yet. No need for extra "insert" dies and I love the scallop pieces to decorate every part of your box card.

Pretty Pink Posh Box Card and Mama Elephant Little Hamsters Agenda

I started by choosing a few of the adorable Mama Elephant Little Agenda Hamsters to stamp out. I colored them with Copic markers and used the coordinating dies to cut them out.

Sticking with my love of teal, I found some cardstock in my stash and started die cutting the pieces to my box card next. I chose white for all the decorative pieces so I could ink blend on them. Today I chose peacock feathers and cracked pistachio distress oxide ink for those.

Pretty Pink Posh Box Card and Mama Elephant Little Hamsters Agenda

For my sentiment I stamped the large sentiment from Mama Elephant Thank You (Love You) in Lawn Fawn dye inks - rainforest, peacock and mermaid for the ombre effect and used the coordinating die to cut it out. I also stamped a small sub-sentiment from the same set and used a Pretty Pink Posh Sentiment Strip to cut it out.

Pretty Pink Posh Box Card and Mama Elephant Little Hamsters Agenda

I used liquid glue and reverse tweezers to assemble my box card and then tear tape to add my images to the different levels of the card. I also cut a second large scalloped piece from white cardstock to glue on the back so I had a big clean area to write my message on.

I appreciate you sharing your time with me. Have a fabulous day!

 Links to products used or recommended are listed below: 

Friday, September 22, 2023

Stenciled Winter Wreath

Yesterday I shared a fall inspired card using the Dynamic Duo Leaf Wreath from Altenew.  Today I'm mixing it up a bit and sharing a winter or Christmas version of that card.  If you'd like the basic instructions for creating this card [the fall version] download the FREE Instruction Sheet I shared on yesterday's post.  I've listed the new product supply list below if you'd like to make the winter version instead of the fall version.

Dynamic Duo Leaf Wreath from Altenew

After creating the wreath I used gold ink to stamp the veins of the leaves and added some gold metallic paint splatters.

Dynamic Duo Leaf Wreath from Altenew

The banner is from the Make It Merry banner die set from Spellbinders and includes three different holiday sentiments.

Dynamic Duo Leaf Wreath from Altenew

The final touches are the Gold Glitter Drops from Pinkfresh Studio.  So pretty, and perfect for elegant holiday cards.

Thanks for stopping by!  I hope you're inspired to get creative today.

Cathy

Links to products used or recommended are listed below: 

Thursday, September 21, 2023

Ink Blending an Autumn Wreath

The projects for today's FREE Project Sheet were inspired by fall.  It's my favorite season!  Bring on the cool weather, colorful leaves and soup.

Altenew Dynamic Duo Leaf Wreath and Spellbinders Autumn Wonder Dies

Here's a few more images of the cards.

Altenew Dynamic Duo Leaf Wreath and Spellbinders Autumn Wonder Dies

Altenew Dynamic Duo Leaf Wreath and Spellbinders Autumn Wonder Dies


Altenew Dynamic Duo Leaf Wreath and Spellbinders Autumn Wonder Dies

You'll find all the details for creating these cards in our Printable PDF Project Sheet.  It's FREE.  The link will take you to the website where you can download the instruction sheet.  Add it to your cart, check out, and start creating.


 Links to products used or recommended are listed below:  

Tuesday, September 19, 2023

All A-Bat You

 Fall crafting is the best.  It is my favorite season and crafty products are not lacking when it comes to this time of the year.

Lawn Fawn Batty For You

Today's project features:
  • Lawn Fawn - Batty For You | Stamp + Die
  • Lawn Fawn - Cloudy | Stencil
  • Mama Elephant - Combo Rectangle | Creative Cuts
The stitched circle is from my stash.

Lawn Fawn Batty For You


The images have been stamped on watercolor paper and colored with Zig Clean Color Real Brush Markers and their blender pen. I love how it coordinates with the blended background.  These are the distress oxides I used:
  • Spun Sugar
  • Kitsch Flaming
  • Worn Lipstick
  • Picked Raspberry
Lawn Fawn Batty For You

Gotta love a pun, right?

Thanks for stopping by!

Links to products used or recommended are listed below: 

Monday, September 18, 2023

Coloring Your Die Cuts with Ink Blending Fall Card

Hi there! It's Amanda from Twiddler's Nook for Mix-it-up-Monday. Today we've got Spellbinders dies with Pretty Pink Posh stamps and dies. But the big thing I want to touch on today is a fun and easy way to add gorgeous color to your die cuts...ink blending before you cut!

Envelope and Autumn Wonder dies from Spellbinders

Today I created a shaped card using the Spellbinders Envelope of Wonder and Autumn Wonder die sets. The envelope base comes in the Envelope of Wonder set, then there are add on sets for autumn, Halloween and Christmas so far. You can snag a bundle of all the sets to save some money at Doodlebugs if you're quick. This is a really fun set and I'm sure once you get the first one, you'll be back for more.

Envelope and Autumn Wonder dies from Spellbinders

To start today, I cut the envelope base using kraft cardstock and tear tape to adhere all the pieces. I set that aside and took a piece of white cardstock and an array of fall coloring distress oxide inks. I just covered the whole panel with no rhyme or reason and not a lot of blending between colors either. I started light adding blobs here and there, working my way to my darkest. I used colors like mustard seed, crackling campfire, gathered twigs and forest moss. I spritzed the panel with a distress sprayer and blotted it dry. Then I used a heat tool to completely dry the panel before die cutting all of my Autumn Wonder elements. I have a stack of A2 white cardstock panels ready to go at all times and I'll be honest that I went back and blended a second panel of just leaves, plus a white panel for the mushroom stems and such to fill my envelope to my liking.

Envelope and Autumn Wonder dies from Spellbinders

Once those were all cut out, I stamped a sweet squirrel from Pretty Pink Posh Cozy Fall Critters and colored him with copic markers. Then I used the coordinating die to cut him out. I also die cut Pretty Pink Posh Give Thanks Script from brown glitter paper.

Envelope and Autumn Wonder dies from Spellbinders

I arranged everything in my envelope and used press 'n seal to pick it all up, added liquid glue and carefully slid it back in the envelope. Last, I used liquid glue to add my sentiment, big acorn and mushroom to the front. Then I popped the squirrel and his small acorn up with foam squares.

Envelope and Autumn Wonder dies from Spellbinders

For finishing touches I added black glaze pen to the squirrel's eyes and glossy accents to his nose. I just can't resist those little touches, especially with critters!

My daughter promptly stole this card from me so it won't be going in the mail but I think I'll definitely be trying out some of those other add on sets to the Envelope of Wonder for Halloween and, of course, Christmas too! They're too cute!

I appreciate you sharing your time with me. Have a fabulous day! 

Links to products used or recommended are listed below:  


Thursday, September 14, 2023

Celebrating Summer with Altenew's Zinnia Layering Dies

As the end of summer approaches, my garden, particularly my Zinnias are looking lovely.  They inspired me to create this floral card using the Zinnia layering dies from Altenew.

Altenew Zinnia Layering Dies
I started by creating the Zinnias.  I die cut multiple pieces from several different colors of cardstcok.  I then add a touch of color with some ink and my small blending brushes.  I applied the color to the centers of the flowers, adding color to each layer.  A few flowers also got a touch of color on the edge of the petals.  After the color was added, I assembled them using the instructional sheet included with the dies.

Altenew Zinnia Layering Dies

The background was created using the Quatrefoil background dies from Honey Bee Stamps.  I love the pierced details the base plate creates and how lovely it looks when you add the top plate.  Each of these background dies can be used on their own, but they are so beautiful when used together.

After I created the background piece, I die cut an oval from the Modern Ovals die set from
Spelllbinders.  I scored the oval about a half inch from the top and folded it over the top of the layered base I created.  I used some strong adhesive to secure the 1/2 inch portion to the back of my background and then covered it with another sheet of white cardstock cut the same size as my A2 base.  Now I have an oval flap that lifts up on the front of the card.  I added another white oval under the flap so I'd have a place to include a message.


Altenew Zinnia Layering Dies

I added the flowers and a foiled sentiment along with a die cut sentiment to the oval flap to finish the card. 

Thanks so much for stopping by.  I hope you're inspired to create something today.

Cathy

Links to products used or recommended are listed below: 

Tuesday, September 12, 2023

Hey Boo!

Fall is definitely my favorite season but in real life and in card making. I've been loading up tons of fun new fall products.  Here's how I was inspired for today's post:

Pretty Pink Posh Halloween Mug Additions

I've been noticing this year's fun trend of pops of pink.  I love that! Today's card features the following products:

  • Pretty Pink Posh - Winter Mug | die
  • Pretty Pink Posh - Halloween Mug Additions | die
  • Pretty Pink Posh - Large Boo Shadow | die
  • Lawn Fawn - Sunray Background | stencil
  • Concord & 9th - Playful Pumpkins | die
Pretty Pink Posh Halloween Mug Additions

I love all the fun colors in this card and it's a no stamping project!

I used Concord & 9th's Clementine ink with the Lawn Fawn stencil.

Pretty Pink Posh Halloween Mug Additions

Do you send out Halloween cards?

Thanks so much for stoppin' by!
 
Links to products used or recommended are listed below: 

Monday, September 11, 2023

Spooky Scene Creating with Mama Elephant and Pretty Pink Posh

Hey friends! It's Amanda from Twiddler's Nook today creating a fun spooky scene with Mama Elephant and Pretty Pink Posh stamps and dies. I had so much fun coloring and inking. I just love how this turned out. It's so fun! Also, fall crafting is my favorite so that might have something to do with it too.


Pretty Pink Posh Halloween Signs

I started this card by deciding my layout on the Mama Elephant Stardust Trail cover plate and then stamped out all the images. I colored them with copic markers and used the coordinating dies to cut them out. The images are from a combo of Mama Elephant Hey Pumpkin and Pretty Pink Posh Halloween Signs.

Pretty Pink Posh Halloween Signs

Then I die cut the Stardust Trail cover plate from white cardstock and used blending brushes with Lawn Fawn dye inks to add my color. Then I used gold watercolor and painted a piece of white cardstock that would show behind the star cutouts. I used liquid glue to adhere them together and then to a card base.

Pretty Pink Posh Halloween Signs

Then I added foam squares to pop all my images up with foam squares. For finishing touches I added glossy accents to the kitty's nose and black glaze pen to his eyes. I needed more sparkle so I also added stardust Stickles to the bubbling cauldron.

Pretty Pink Posh Halloween Signs

I think these spooky characters are just the cutest and can't wait for Halloween to come. We're already decorating at our house because we love it so much! That way we get two months of spooky before things switch to just fall and turkeys. Do you decorate for Halloween?

 I appreciate you sharing your time with me. Have a fabulous day!

 Links to products used or recommended are listed below: