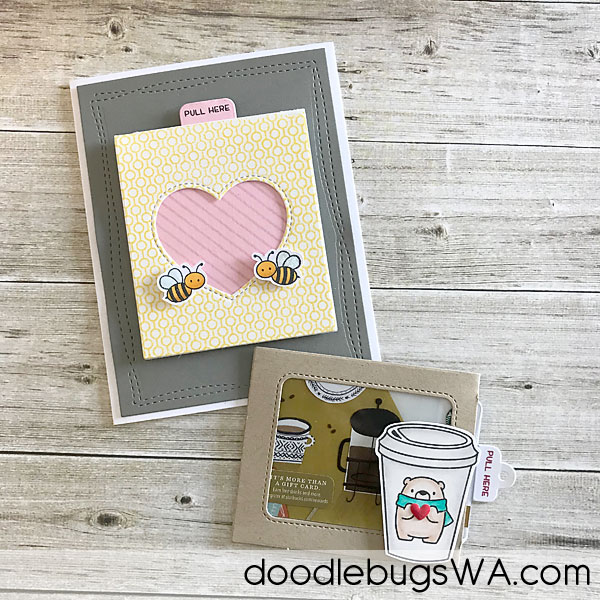
We've got a quick post today. We're sharing this cute and simple card created with the new Avery Elle Cool Beans stamps and dies. The adorable bear is from the Bitty Bears set by MFT Stamps. We colored the bear using Copic Markers and the Coffee Cup was colored with Polychromos pencils. I love the look of colored pencils on kraft cardstock!
We are excited to be a Super Sponsor for the Winter Coffee Lovers Bloghop. A huge, "Thank You" to Amy and her team for putting this all together. You can join the fun and be eligible for prizes by uploading your projects over on the Coffee Lovers Blog. Hurry, the fun ends December 15th!
We're sharing our Winter Coffee Lovers inspired project below. We hope you enjoy it and are inspired to create some Coffee themed projects of your own. Here's a LINK to our online store and a list of some great coffee related products.
The following supplies were used to create the project shown above, and are available in our online store. Click on images for links to products.
We're loving this cute card using the new Plushoween stamp and die from Mama Elephant. We stamped the image using Copic friendly ink onto Copic friendly paper. Then, colored with our Copic markers.
We cut several pieces of orange and black cardstock using the Scallop Fringed die from MFT Stamps and layered it up on the front of the card (love that die!)
Today we're sharing a couple cards created with the Together stamp and die from Neat and Tangled. We combined these with a simple watercolor background using Distress Inks. Super fun, and super easy!
We created the striped, watercolor background above, using some Tim Holtz
Distress Ink. We placed the inks on a non-porous surface. We picked up
the ink with a wet, flat brush, and painted striped lines (approximately 1 inch wide) alternating the colors. We dried the paper with our heat tool (we're too
impatient to wait), then painted a second (darker layer) repeating this process until we had a color and blend we were happy with.
We also used Distress Ink for the pink card shown above. We placed the ink on a non-porous surface. We picked up
the ink with a wet, flat brush, and painted 2/3 of the watercolor paper. We dried the paper with our heat tool (we're too
impatient to wait), then painted a second (darker layer) starting
approximately 1/2 inch from where we started the first layer of color. We repeated this
process, drying the paper after each layer, then starting the next layer
approximately 1/2 inch down from the last layer, until the sheet was covered with 1/2 inch stripes.
We created a striped, watercolor background using some Tim Holtz Distress Ink. We placed the ink on a non-porous surface. We picked up the ink with a wet, flat brush, and painted the entire sheet of watercolor paper. We dried the paper with our heat tool (we're too impatient to wait), then painted a second (darker layer) starting approximately 1/2 inch from the top of the paper. We repeated this process, drying the paper after each layer, then starting the next layer approximately 1/2 inch down from the last layer, until the sheet was completely covered with 1/2 inch stripes.
We cut two backgrounds (one rectangle and one circle) from the watercolored paper. We added some stamped images, a sentiment and cute heart embellishment.
Hello everyone! I know it's been a while since our last post. We've been busy adjusting to all the changes and hope to be back to a semi normal routine soon.
In the meantime, we have a cute card to share today. It was created using The Cat's Meow stamp from Mama Elephant. You'll find a list of the additional supplies we used at the bottom of this post with links to purchase the items.
The image was stamped using copic friendly ink and colored with Copic markers. We added the HOORAY balloons and sentiment from Mama Elephant's Celebration Balloons set. After coloring the balloons, we added a layer of Glossy Accents. Then, used a white gel pen to add some white accents to the balloons and cats.
Here's a closer look at the Glossy Accents we added to the balloons.
We finished the card by framing the image using the Framed Tags Madison Avenue die set from Mama Elephant.
We are having so much fun with the new Turnabout Stamps from Concord & 9th. If you're not familiar with these stamps, be sure to watch the video at the end of this post. It will demonstrate how to use these fun background stamps.
Today's card was created using the Oh, Hello Turnabout stamp along with the Say Hello stamp set and Say Hello die set.
We stamped the Oh, Hello Turnabout stamp on to an A2 size piece of white cardstock using Minty Fresh dye ink from Lawn Fawn along with an assortment of grey and black ink. After stamping the card panel, we temporarily secured the front panel to the front of our A2 card and cut the larger Hello die from the center of the card making sure we cut through both pieces of cardstock. This created a window for the front of our card.
We closed the card and stamped Hello onto the inside of the card positioning it so that it was centered inside the Hello window. Removed the front panel that we temporarily secured and placed a piece of acetate between the front of the card and the front panel that was stamped with the Oh, Hello Turnabout stamp.
The thin Hello die was cut from white cardstock and colored with coordinating ink. It was then secured to the acetate window so it was positioned over the Hello that we stamped inside the card.
If you haven't seen the Turnabout stamps in action, you'll find them HERE.
Tips for setting up and positioning your Turnabout stamps can be found HERE.
Finally, one last video from Jennifer McGuire using the Triangle Turnabout stamp. You can view that HERE.
We have a quick and easy birthday card to share with you today. We hope it inspires you to create something fun.
The candle images, flames and sentiment are all from the Make a Wish stamp set from MFT Stamps. We used various dye inks to stamp the flames, hearts, and candles. The background was stamped using the Diagonal Stripe background stamp from MFT Stamps and Versa Fine Onyx Black ink.
We added some Jewel Drops from Nuvo around the sentiment. It makes me think of confetti tossed in celebration!
We have winners for the 2017 Spring Fling Mega Sponsor Blog Hop. A huge thank you to everyone who participated! We are so happy that you joined in on the fun.
The winner for Doodlebugs is:
Amy Kolling- $25 Online Gift Certificate
Congratulations to all the winners! Be sure to visit each blog on the hop for winner announcements.
NOTE: Please contact the sponsor of the prize you won in order to claim it! If not claimed by Friday, May 17, 2017 at midnight, the sponsor has the option to choose another winner or void the prize altogether.
It's release day for Avery Elle! Here's a peek at some of our favorites. However, be sure to head over to our online store for a look at all the new products! You'll find them all HERE.
View Avery Elle's Beside the Sea Stamp video HERE.