Wednesday, September 30, 2020

Have A Beary Cozy Fall with Lawn Fawn...


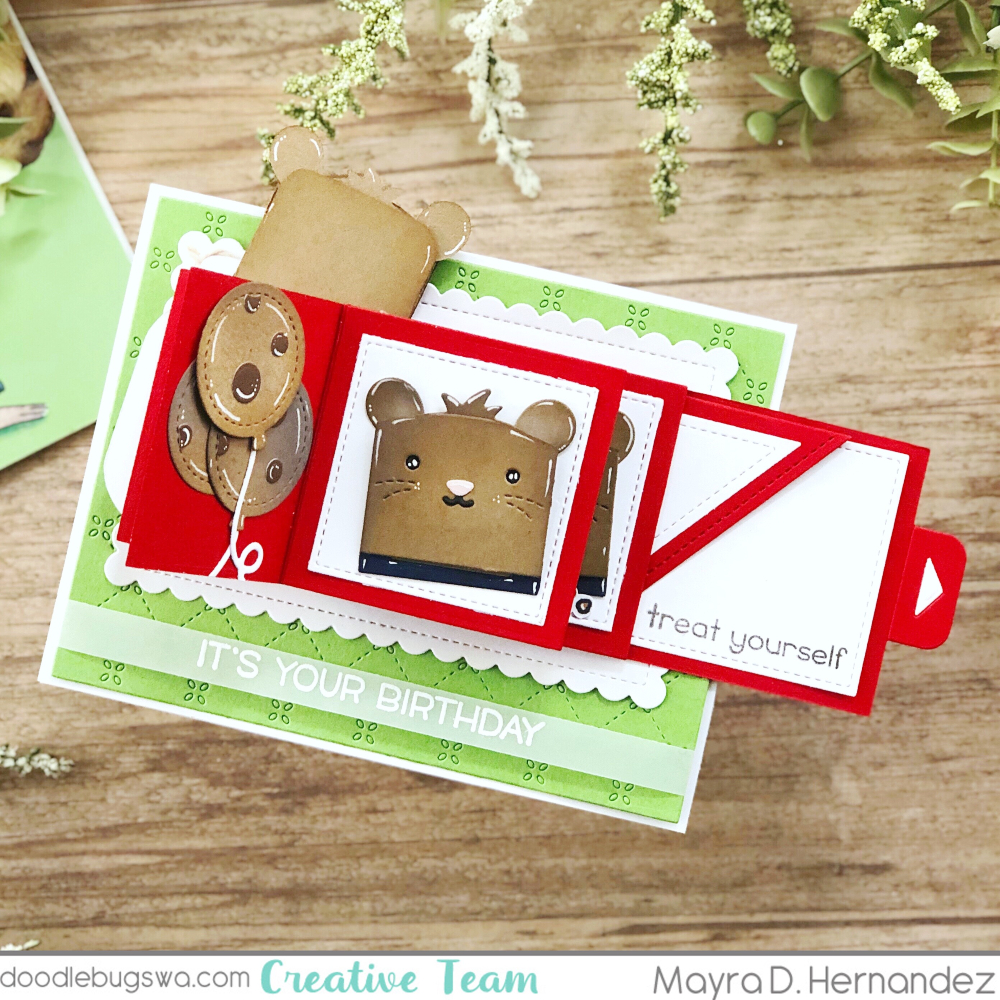
Hello and happy Wednesday everyone!!! Mayra here with you today. I have a super fun card to share with you. I love creating scenes for my cards. I enjoy going through my stamp sets and seeing which images will go together to create the scene I am hoping for. 

I used the new super cute Den Sweet Den stamp set from Lawn Fawn, along with the Jump For Joy (for the leaves), Pick Of The Patch (for the adorable squirrels), Oh Gnome (for the mushrooms), and Crazy Antics (for the picnic basket). I combined these sets with the super cute Lawn Fawn Backdrop Lift The Flap Tree, Slimline Simple Stitched Hillside Border, and the Stitched Dens dies. 


I began by coloring the images I would be using. I used Copic markers to color them. 
For the brown bears, I used E41, E42, E43, and E44. For the yellow areas, I used Y11, Y13, Y15, Y18, YR23, and YR27. For the olive green, I used YG99, YG97, YG91, and BG90. For the rusty orange, E08, E99, YR23, Y32.


After coloring my images, I set them aside while I die cut the layers I would be using for my card. 
I used Bristol Smooth Cardstock for the sky area behind the Backdrop Lift The Flap Tree piece. I added Peacock Feathers and Tumbled Glass Distress Oxide Inks to give it the color. I then used a bit of Brushed Corduroy, Gathered Twigs, and Ground Espresso Distress Inks to the trees to give them a bit of color. For the grassy hill, I used Peeled Paint and Forest Moss. After adding color to each layer, I assembled what would be the front of the card. 


For the inside of the card, I made into a shadow box card using the  Stitched Dens die. I used the Into The Woods Remix 6x6 Pattern Paper pad to create the den for the little bears. For the sentiments, I used white embossing powder and heat embossed them onto vellum. 


I hope you enjoy and feel inspired by the card I created to share with you. Thank you so very much for taking the time to stop by. Hoping you each have a wonderful and blessed day. 
Please feel welcome to visit me at my blog: Mayras Designs, my IG, or on Pinterest

Links to products used are listed below:

Monday, September 28, 2020

Hello from Toni: Sunny Studio Autumn


Hello, everyone!  The leaves are starting to turn and fall is definitely on its way in.  Yay!  This is my favorite time of year: crisp weather, beautiful foliage, and brilliant blue skies.


Today Sunny Studio is helping me celebrate the season.  My first card uses the SS Elegant Leaves set. I stamped and masked the leaves then sponged Distress Oxide Salty Ocean, Blueprint Sketch and Chipped Sapphire.


I colored the leaves using Copic R39, R08, YR07, Y15, Y11, and YR04.  The sentiment is embossed.


For the second card, I used the MFT Candy Stripes stencil with Distress Oxide Carved Pumpkin, Mustard Seed and Peacock Feathers to create a warm plaid background.

I then colored up the SS Bountiful Autumn images, popping up the cornucopia.  


Have a great rest of your week!  If you'd like to check out my other creations, you can visit my blog, Frankie Helps Craft, my Instagram, or my Pinterest Board.   

Products Used and Recommended Include:

Friday, September 25, 2020

Hello from Amy: Happy Birthday | Mama Elephant


Hey there and Happy Friday!  It's Amy here and I'm sharing a card that features Mama Elephant:


The Scene Builder images have been stamped with VersaFine Onyx and colored with various Zig Clean Color Real Brush Markers.


I decided to color the Animal Parade images with copics.  You know how I love those pale colors.


These are the copics I used:

R00 | R30
YR0000 | YR000 | E01
YG01 | YG03
C0 | C1 | C3

I used some tiny enamel dots from my stash with the juggling penguin.


Thanks so much for stopping by!
 
Links to products used are listed below:

Wednesday, September 23, 2020

If You Give A Mouse A Cookie Theme With Lawn Fawn...


Hello and happy Wednesday everyone!! Mayra here with you today with a fun interactive card. A bit ago, I created a card inspired by the children's book If You Give A Mouse A Cookie. It was one of my youngest sons favorite books. I really enjoyed reading that book with him. For my card today I was once again inspired by that book. But for this card, I wanted to use mainly die cuts. 


I began by die cutting all the pieces I would be using to create the little mouse and the cookies. For the mouse, I began with the
Tiny Gift Box Chick and Duck Add- On (I used the main layer for the tuft of hair, nose, and the rounded piece that looks a bit like a flame for the ears), Tiny Gift Box Cat Add-On (for the face of the mouse). I cut off the ears from the cat layer and added the rounded piece to the base layer to create the rounded ears. I then used Distress Inks to add a bit of color to my die-cut pieces. I used Hickory Smoke Distress Ink, Lawn Fawn Premium Dye Ink in the color Hippo, and Brushed Corduroy Distress Ink.


For the cookies, I used the round layer for the sun from the Foursquare Backdrop Die, Mushroom Border Lawn Cuts Die (I used the pieces from the little mushrooms for the chocolate chips). I also used Brushed Corduroy Distress Ink to add a bit of color to the edges of the cookies. Next, I die cut the layers I would be using for my card. I used the Quilted Backdrop for the base of the card. I then die cut all the pieces from the Flippin Awesome Lawn Cuts Die set I would be using. I also used the Flippin Awesome Add-On Lawn Cuts Die and the Diagonal Gift Card Pocket


Next, I began assembling my card. I also used the mason jar from the How You Bean? stamp set. I added some of the cookies I had made to it after I colored it with my Copic markers. I also used the small tag from the Double Slider Surprise die. I heat embossed the sentiment onto the tag from the Tiny Tag Sayings stamp set, for the sentiment on the front of the card and the inside I used the Village Shops stamp set. I also added a couple of chocolate chip cookie themed balloons on one of the layers using the smallest balloon from the Outside In Stitched Balloon Stackables


I hope you enjoy the card I created to share with you. Thank you so much for stopping by. Hoping you each have a wonderful and blessed day. Please feel welcome to visit me at my blog Mayras Designs, Instagram, or on Pinterest.

Links to products used are listed below:

Monday, September 21, 2020

Hello from Toni: Mama Elephant Oh Penguin Tree


Hello, Doodlebugs fans!  Has the new Mama Elephant release given you the vapors? Me too!  It's full of so much cuteness.


I decided to break open the ME Oh Penguin Tree set first.  It's so flipping cute.  I have the ME Little Penguin Agenda set, naturally, but the thought of individually putting all those penguins on there or masking them--no, thank you.


I colored up the penguins using Zigs (083, 220, 048, 092, 052, 036, 027, 072) on Strathmore Bristol Smooth paper (my fav!). I love that they're all in pastels! 

I used the new Lawn Fawn Let It Shine paper on the background. It goes so well with the soft colors, don't you think?


Have a great rest of your week!  If you'd like to check out my other creations in the meantime, you can visit my blog, Frankie Helps Craft, my Instagram, or my Pinterest Board.   

Products Used and Recommended:

Friday, September 18, 2020

Hello from Amy: Nuts | Lawn Fawn


Hello and Happy Friday!  It's Amy here and I have a card that features Lawn Fawn:

Backdrop Lift the Flap Tree

Those new squirrels make me smile.  They are filled with energy and mischief!


I used stacked rectangles for my black frame.   The images have been colored with copics:

G20 | G21
E41 | E42
W00 | W0 | W1 | W3


I love all the stitching on the tree trunks.  So fun.  Do you see the small sentiment I used?  The speech bubble is from the Oh Gnome! set.


Here's what it looks like inside the tree flap windows:


That's it for me!  I hope you have an amazing weekend!

Links to products used are listed below:

Wednesday, September 16, 2020

I have So Mushroom In My Heart...With Lawn Fawn


Hello everyone. Happy Wednesday. I have a fun card to share with you. I used the super cute Oh Gnome! stamp set along with Pick Of The PatchButterfly Kisses (for the little tufts of grass), the little 'hello' and heart in the speech bubble are from the How You Bean stamp set. 

I started by die cutting the pieces I would be using for my card. I used the adorable Mushroom House, I die cut this one and the slimline card bases using Large Slimline with Sliders dies twice, the grassy hills using the Slimline Stitched Hillside Borders. I then die cut two more of the largest rectangles from the Large Slimline with Sliders die set using plain white cardstock. On one of them, I used the Scallop Oval Frames by Mama Elephant to die cut an oval in the center. For the second piece of cardstock, I used the larger rectangle from the Small Slimlinewith Lift The Flaps dies to create a frame. For the sentiment on the front of the card, I used the banner from the Shadow Box Card Add-On Ocean set. 


I then added color to the grassy hills, the dirt area, and the skies using Distress Oxide Inks. For the grass, I used Forest Moss and Mowed Lawn. For the sky, I used Peacock Feathers. For the dirt area, I used Brushed Corduroy. Next, I used Copic markers to color all of my images. After coloring my images, I set them aside to assemble the cards. For the front of the card, I used the piece of white cardstock with the die-cut scalloped oval in the center. I made this top layer into a shaker using foam tape and acetate. I then created the scene for the inside of the card and glued everything together. 


I hope you enjoy the card I created to share with you today. Thank you so much for stopping by. Hoping you each have a wonderful and blessed day. Please feel welcome to visit me on my blog Mayras  Designs, or my Instagram, or on Pinterest.

Links to products used are listed below:

Monday, September 14, 2020

Hello from Toni: ME Little Spaceship Agenda


Hello from outerspace, friends!  Hey, we're on month bezillion of COVID so I'll gladly take outerspace over my living room at this point. LOL.


My cards today feature the Mama Elephant Little Spaceship Agenda set. Now I'm not normally a big fan of outerspace sets but one where I can easily substitute any of my little agenda critters? Heck, yes!


For the first I sponged the MFT Mini Cloud Edges stencil with Distress Oxide Salty Ocean. I then used the stencil as a mask to sponge the space portion with Distress Oxide Blueprint Sketch, Chipped Saphhire, Picked Raspberry and Mustard Seed. I spattered it with water and, once dry, with Copic Opaque White.


I then colored up and placed the images using Copics.  The sentiment is stamped with Versafine Onyx Black. I added Clear Wink of Stella to the spaceship and Glossy Accents to the glass bits.


For my second card, I went much simpler, creating a nighttime cityscape.  I used my Copic airbrush on the skyline.  I stamped the Little Spaceship Agenda and Little Monkey Agenda images directly onto the card front and colored them with Copics.

That little monkey is so cute who wouldn't want to abduct it?! 


I hope you all have a great rest of your week!  In the meantime, if you'd like to check out my other creations, you can visit my blog, Frankie Helps Craft, my Instagram, or my Pinterest Board.

Products Used and/or Recommended Include:  

Friday, September 11, 2020

Hello from Amy: Purrson | My Favorite Things


Hello and Happy Friday!  It's Amy and I have a fun card that features My Favorite Things:


Here's how I was inspired:


My daughter is cat sitting a large gray cat so I made this for her.  He's been known to scratch at her beautiful wool rugs so they're currently rolled up and hidden from the cat.  The Cat-astrophe set is perfect.  Love all the fun sentiments and mischievous kitties.

I had to combine it with the Grande-Sized Love set.


 I did some mixing and matching of patterns. 

These are the copics I used:

R20
R000 | R30
E11 | YR01
G03 | G05
E51 | E53
W00 | W0 | W1
W3 | W5
N3 | N4
N6 | N7


Have a super Friday!

Links to products used are listed below: