Friday, April 29, 2022

Altenew Magnolia Ballerina! It's tutu cute!


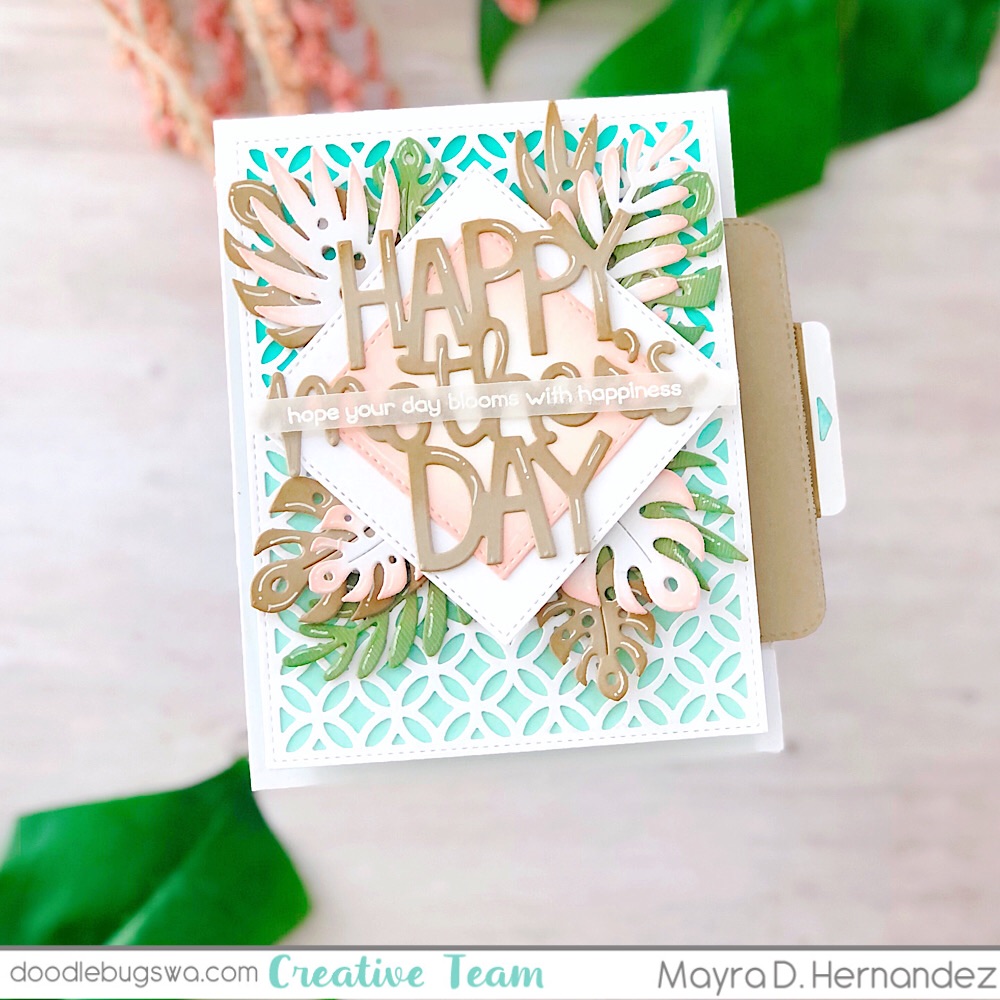
Hi everyone - it's Michele, your gal-Friday again!  Happy weekend eve!
I have such a pretty set to feature today, so let's get right to it, shall we?

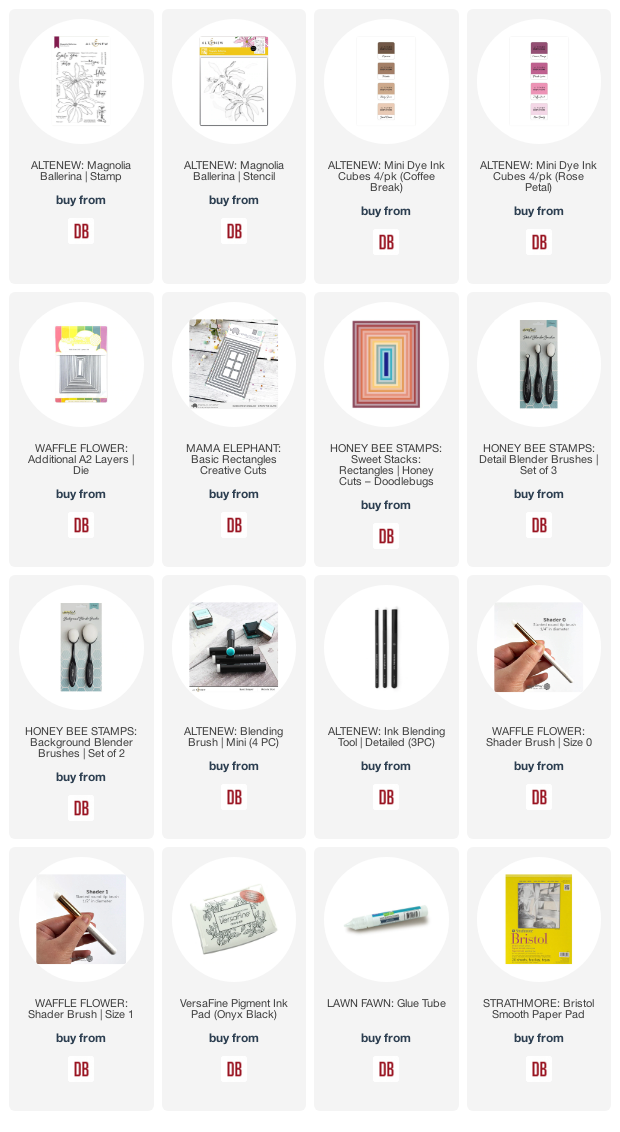
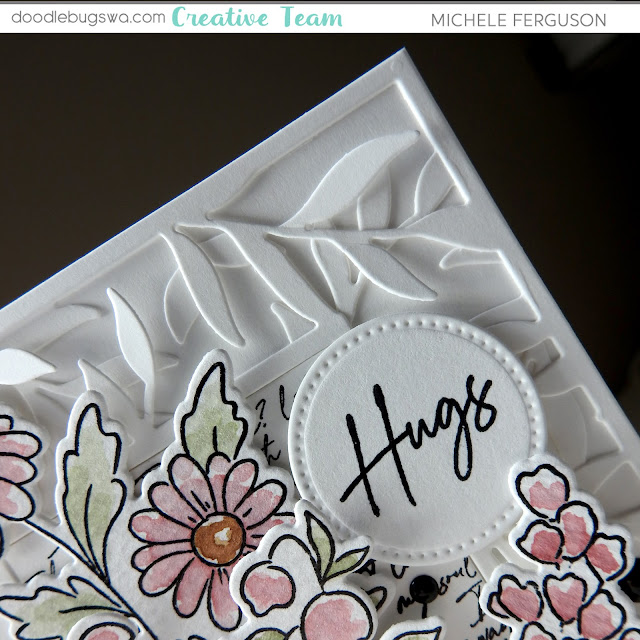
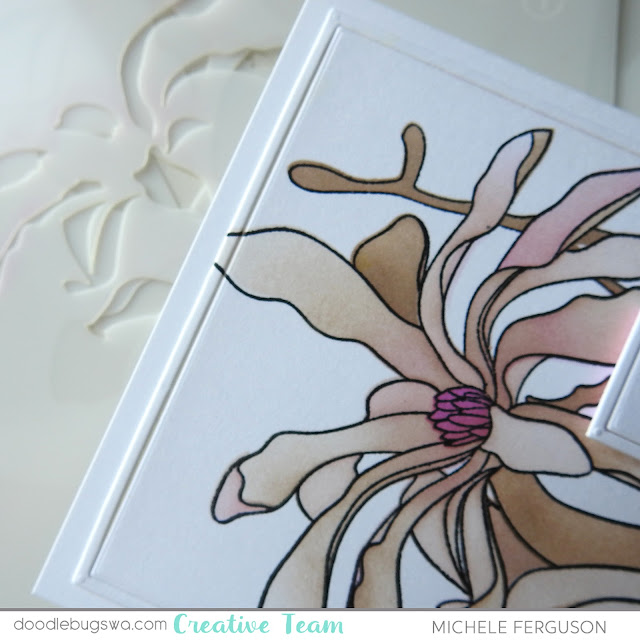
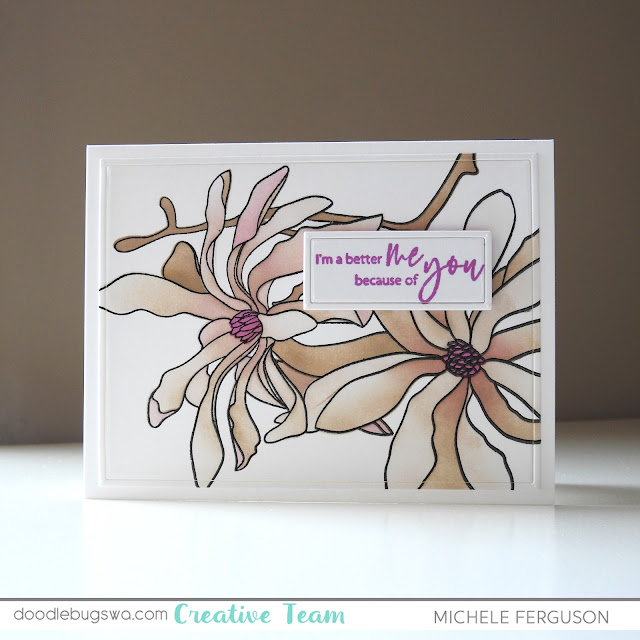
The Altenew Magnolia Ballerina stamp, and stencil set are so big, and so
magnificent it could hardly matter which colors you choose.  I often reach for a neutral, and that's exactly what I did for my premier stamping today.


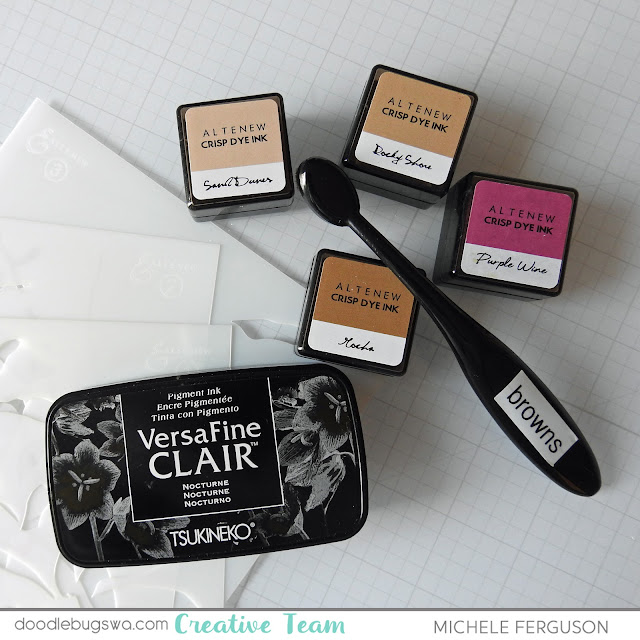
Black for the outline stamping, three neutrals from Altenew's Coffee Break set, and the second darkest from their Rose Petal collection - called Purple Wine - for the stenciling.  You might reach for any color combo you have that gives you
varying shades of color.


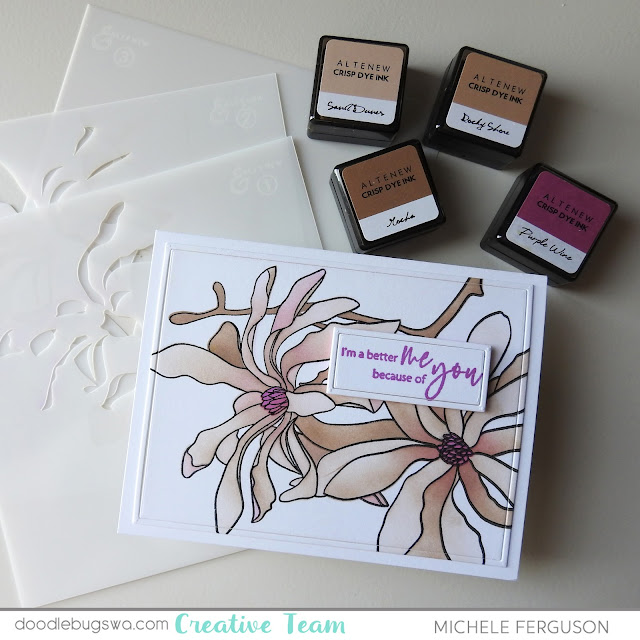
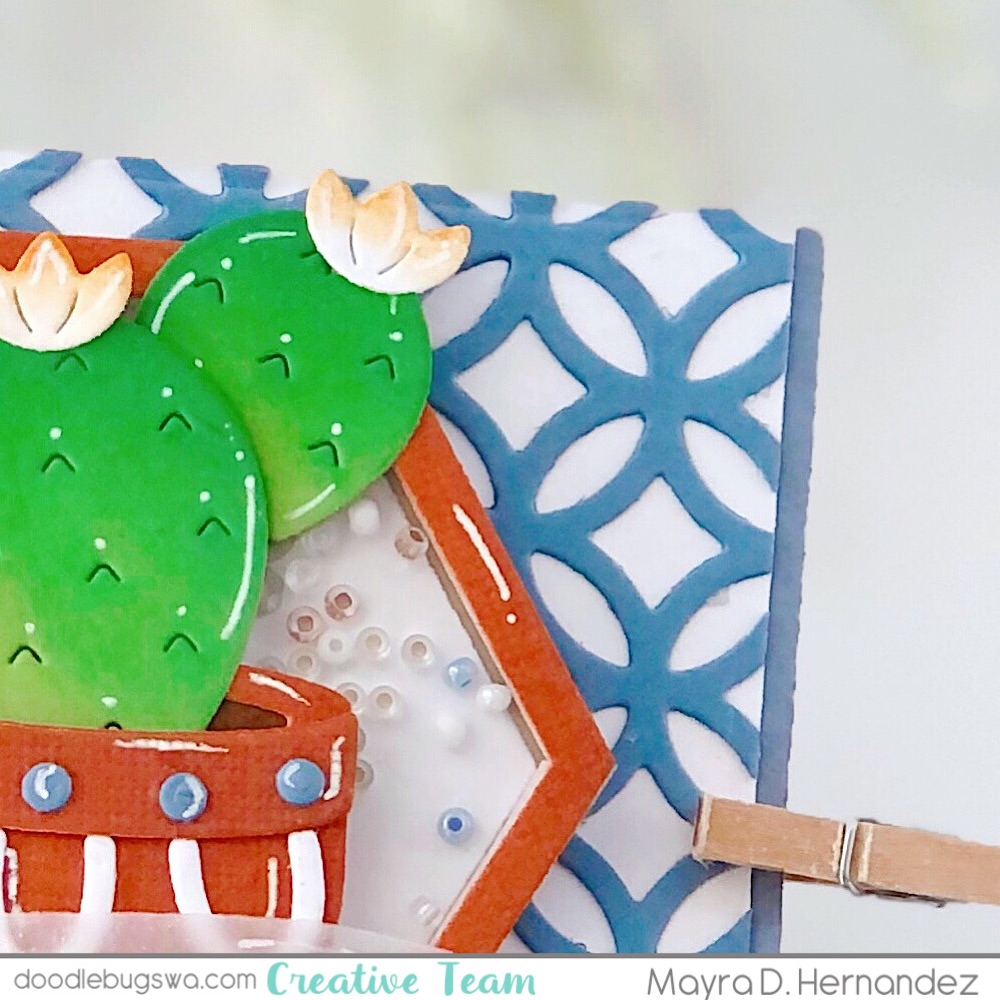
I absolutely love how my accidental cross over of inks brought 
warmth and interest to my blooms!  
Tell me who doesn't need to hear these words on occasion? 
You'll be happy to know it IS included with this set.


An A2 set of rectangle dies like this one from Waffle Flower Crafts is 
indispensable in any card maker's arsenal of tools.  Simple. Elegant. Versatile.

Have a fabulous weekend my friends!
=] Michele

Links to products used or recommended are listed below:

Wednesday, April 27, 2022

Fun Interactive Plant-Themed Birthday Card...


Hello everyone. Happy Wednesday. I am sharing a fun Plant-themed birthday card using the lovely new Plant A Succulent die along with the Center Picture Window die. 


I started by die-cutting the layers to create the Center Picture Window card base. I also used the Fancy Lattice Backdrop die to create the designed layer for the front of the card. I then used the awesome Nesting Hexagons die set to create the hexagonal-shaped shaker part for the front of the card. I then die-cut the layers to create the plants and succulents using the Plant A Succulent die. I also used the flower pot from the Little Flowers die set. 


Next, I used the small arched-looking dies from the Favor Bag Accessory Fox die set to create the designs on the pots along with the cutouts that the Fancy Lattice Backdrop die created. I then added color to the die cuts using Rusty Hinge and Ground Espresso inks. For the green areas, I used Twisted Citron, Mowed Lawn, Clover, and Noble Fir


Next, I die-cut the small banner from the Framed Tags Madison Avenue dies set. I then heat embossed the sentiment from the Love Poems stamp set onto the banner using Wow! Super-Fine Embossing Powder and Versamark ink.  I then heat embossed the sentiment from the Year Ten stamp set onto the banner for the inside of the card from the Center Picture Window die set. Next, I stamped the rest of the phrase using the Looking Sharp stamp set. I then added white accents to the die cuts using a white Gelly Roll Classic Pen. I hope you enjoy the card I created to share with you today. Thank you very much for taking the time to stop by. I hope you each have a wonderful and blessed day.  Please feel welcome to visit me on my blogIG or Pinterest.

Links to products used or recommended are listed below:

Monday, April 25, 2022

Interactive Lift the Flap Cards


Hi, everyone!  Toni here with you today sharing a super cute lift-the-flap card using a mash up of Lawn Fawn, Sunny Studio, Avery Elle and Mama Elephant. Let's get started!


I diecut the Lawn Fawn Backdrop Lift the Flap Tree Die and sponged it with Distress Oxide Vintage Photo, Walnut Stain and a touch of Aged Mahogany. I spattered this with water and put it aside to dry.


I colored up the Lawn Fawn Furry & Bright and Let's Go Nuts critters, adding an additional hat from Avery Elle Stay Cool.


With the trees dry, I embossed the Mama Elephant Mixed Wishes Greetings sentiment, adhered the panel to Doodlebug Design Fairy Garden 6x6 Paper, then placed the critters.  

I completed the scene by adding Sunny Studio Out On a Limb leaves and Lawn Fawn Mushroom House flowers, grass and butterflies that I had sponged with Distress Oxides.  


I'll see you again soon.  If you'd like to check out my other creations in the meantime, you can visit my blog, Frankie Helps Craft, my Instagram, or my Pinterest Board.  

PRODUCTS USED AND/OR RECOMMENDED

Friday, April 22, 2022

Honey Bee Lovely Layered: Tulips on an Altenew Mid-Century cover die!

Do you love tulips as much as I do?  I don't know if that's possible - I even carried them down the aisle!  But today, I'm betting you'll grow to love these gorgeous Honey Bee Stamps: Lovely Layers: Tulips as much as I do!  

Here's how I got started using these layering dies - I headed straight to the Honey Bee's guide, wrote down the names/numbers of each die, and printed out the easy-to-follow layering guide.  I even printed it out to tuck into my packaging. 


Then, it was just a matter of choosing colors - I had just received my Doodlebugs order which included the newest Distress ink: saltwater taffy.  I used Oxide for the wet painting, and regular for my splatters.  I always find the original Distress inks have a more vibrant color when used with water.  I love tulips that are a variety of colors... here are my pale pink with touches of green - twisted citron to be exact...


Layering them up was so easy using the guide, and liquid glue.

I knew I was going to use my new Altenew Mid Century cover plate - so I created 
a little interest for the panel behind it by simply swiping that twisted citron ink
a few times onto a Neenah 80# A2 panel.


I even found a sweet way to add a simple hello from Honey Bee's My Favorite Flower - can you figure out how?  Take a look at the finished card...


Thanks for stopping in today - and allowing me to add tulips to your weekend-eve!
=] Michele

Links to products used or recommended are listed below:

Wednesday, April 20, 2022

Fun with Flippy-Flappy Mother's Day- themed Card...


 Hello everyone! Happy Wednesday. I am sharing this interactive Mother's Day-themed card with you today using the awesome Flippy-Flappy and the Giant Happy Mother's Day dies from Lawn Fawn. 


I began by die-cutting the layers to create the base of the card using the Fancy Lattice Backdrop die to die-cut the designed backdrop from white cardstock, and the base of the card using the largest rectangle from the Basic Rectangles die set from turquoise colored cardstock. I then added a bit of color to the turquoise-colored layer using Peacock Feathers Distress Oxide ink. I then used square dies to create the layers for the front of the card and for the inside of the flippy-flappy feature. You can use the Additional Squares die set, or the stitched squares from the Four Square Backdrop PortraitFlippin' Awesome Lawn Cuts Die, Scalloped Box Card Pop-Up die, or from the Platform Pop-Up Add-On.  


Next, I used the 
Tropical Leaves die set to die-cut several of the tropical leaves for the card. I then used the Happy Hibiscus die set to die-cut the layers to create the Hibiscus flower. I added color to the leaves using Peeled Paint and Rustic Wilderness Distress Oxide inks for the green leaves, Saltwater Taffy over the white leaves, and the Hibiscus. I used Gathered Twigs and Brushed Corduroy on the tan-colored leaves and the Giant Happy Mother's Day die cut.  


I then assembled the  Flippy-Flappy feature and used the Henry's ABCs dies to die-cut the word 'mom'. The sentiment on the inside is from the Classic Sentiments stamp set and the sentiment on the front of the card is from the Garden Before n' Afters stamp set. 


I hope you enjoy the card I created to share with you today. Thank you so much for taking the time to stop by. I hope you each have a wonderful and blessed day. Please feel welcome to visit me on my blogIG or Pinterest.

Links to products used or recommended are listed below:

Monday, April 18, 2022

Easy to Mail Pop Up Interactive Cards


Hi, everyone!  Toni here with you today sharing a cute holiday card that lays flat for mailing but pops up when it's removed from the envelope. Say what?!

I sponged Distress Oxide Salvaged Patina on the card base, spattering it with water, shimmer spray and white pigment ink. I set that aside to dry.


I then diecut the various pieces of the Mama Elephant Display a Card dies.  I hadn't used these dies in quite some time but had no problem remembering how it worked. Nice!!!  But, if you'd like a refresher, check out the Mama Elephant demonstration video.

I also used the Lawn Fawn Forest Border in the background. I assembled the display with the tree border at the back and a hill on the next fold up.


I stamped and colored the Lawn Fawn Frosty Fairy Friends images, adhering them on the different levels of the display for a lovely 3D effect.

I added the sentiment on a Lawn Fawn Simple Wavy Banner, nestling a mushroom right behind it. 


It was around this point that I thought this would be so cute in a snowglobe. Ding ding ding!

I cut a piece of acetate to fit the front of the display and used Hero Arts Unicorn Pigment Ink with a Tsukineko Sponge Dauber to add frost around the window. Now THAT is so it!


I'll see you again soon.  If you'd like to check out my other creations in the meantime, you can visit my blog, Frankie Helps Craft, my Instagram, or my Pinterest Board.  Have a great rest of your day!

PRODUCTS USED AND/OR RECOMMENDED

Friday, April 15, 2022

Beautiful Blooms of Blue!

Hello, friends!  Remember last week I used the Beautiful Blooms from Pinkfresh Studio?  You may also know that there are SIX darling blooms in that set, right?  I'm back this week with the other beautiful trio.  

Today I'm thinking of Forget-me-nots, Lavender, and Periwinkle - all blue!  all very simply, loosely water-colored with Distress inks in blueprint sketch, and leaves of shabby shutters.  A bit of foam tape gave them a lift over my card front.


I sure do wish our April showers brought these beautiful flowers 
outside my window...


I've used the wonderful Mama Elephant A2 Four Window cover die cuttiing it twice from a 110# cardstock, and another from a long-saved piece of Honey Bee patterned paper - don't worry there are many beautiful Honey Bee papers in stock in the Doodlebugs shop!  I stacked two white and one patterned paper layer together for the outside frame, and only patterned paper for the 'windowpanes for a little added interest.

That speech bubble?  I used an oldie from my stash - 
but search dies in the Doodlebugs shop and you'll find lots of options! 
The sentiment Miss You is from the Pinkfresh Beautiful Blooms set.

I hope you follow my lead when using sets that stamp multiples, especially when there are coordinating dies that cut three at the same time - why not cut a bunch? That's multi-crafting at its creative best!

See you next week!  Happy weekend, everyone!
=] Michele

Links to products used or recommended are listed below:

Wednesday, April 13, 2022

You Are Berry Special Pop-Up Card....


Hello everyone. Happy Wednesday! I had to create another Platform Pop-Up card to share with you today. I can't believe how quick it is to create a card with this die!! For today's card, I also used the Platform Pop-Up Add-on


I began by coloring the images from the Berry Special Open Me, Crazy Antics, and the Super Star stamp sets. I used Copic markers to color the images. 
Browns/Wood: E41, E31, E55, E35, E84, E87
Red: R05, R27, R46, R59
Yellow: Y11, Y08, Y19, YR24
Green: G05, YG01, G09


Next, I  die-cut all of the pieces I would use to create the 
Platform Pop-Up card, along with the pieces to create the large strawberry house using the Outside In Stitched Strawberry, Acorn House and the Stitched Strawberry Frame dies. I also die-cut a fence using the Build A House Spring Add-on die set and the bushes were created using the clouds from the Platform Pop-Up Add-on and the Outside In Stitched Cloud die sets. I then added a bit of Merman ink to the sky-colored cardstock that was die-cut using the  Platform Pop-Up Add-on die. Next, I used the Cloudy Stencil along with white pigment ink to create the clouds in the background.  I then added color to the red die cuts using Lobster and Cranberry Lawn Fawn inks. To the green areas, I added color using Jalapeno, Clover, and a bit of Noble Fir Lawn Fawn inks. To the yellow areas, I added a bit of ink using Mustard Seed Distress Oxide ink and No.2 Pencil Lawn Fawn ink. 


Next, I die cut the letters to form the word 'you' using Henry's ABCs font die set. The sentiment on the front of the card is from the Berry Special stamp set heat embossed onto a banner die-cut using the small banner from the Framed Tags Madison Avenue die set. I hope you enjoy the card I created to share with you today. Thank you very much for taking the time to stop by. I hope you each have a wonderful and blessed day.  Please feel welcome to visit me on my blogIG or Pinterest.


Links to products used or recommended are listed below:


Monday, April 11, 2022

Creating Individual Shaker Windows


Hi, everyone!  Toni here with you today sharing a fun and easy shaker card using the Sunny Studio Happy Hamster set.


I sponged my card base with various Distress Oxides. I localized the colors but didn't sweat it if there was overlap. I spattered the inks with water as usual.  Love that look.


To create the shaker portion, I diecut the Mama Elephant Six Window Cover out of a sturdy white cardstock. I added an acetate panel, taping along along the outer edges (didn't want to waste my precious tape!). 

Then I taped again, this time in a grid pattern. The 1/8" Scor-tape is the perfect size for the grid.  Note the foam dot is totally optional; I like adding it when I'm able as it allows a bit more movement of the sequins.


I colored up the super cute Sunny Studio Happy Hamster using Copics. I was fortunate that the wheel fit perfectly over one of the apertures.


I'll see you again soon.  If you'd like to check out my other creations in the meantime, you can visit my blog, Frankie Helps Craft, my Instagram, or my Pinterest Board

PRODUCTS USED AND/OR RECOMMENDED

Friday, April 8, 2022

Pinkfresh Studio - Hugs!

It's FRIDAY!  and I can't wait to introduce today's card!  Pinkfresh Studio has SO many beautiful florals - Beautiful Blooms will get all my focus today!  Ready to practice your loose water coloring again?  Join me!


I've stamped the images in Versafine Tuxedo Black, then clear heat-embossed them - this time onto Tim Holtz watercolor card - love the white of that paper!  Only three Distress inks were used for my messy kind of water coloring today: 
victorian velvet, bundled sage, and gathered twig!  
[teaser: next week you'll see what I did with the other three in the set!]


After they were dry, I used the coordinating dies to cut them out. 


Do you recognize this frame?  I've cut two of the Altenew Leaf Frames from white cardstock, and put them together one upside right, one upside down!  I love the added dimension, and shadows they give to my card front.  If you have this die, too, you know there is a sweet little rectangle cut from the middle.  Before I tucked it in, I gave it a quick stamping of messy script - but a repeated sentiment, patterned paper, or splatter would be just as interesting - which would you use?

The blooms were arranged on top and given a little lift in places using foam squares.  My short but sweet sentiment comes from the same set - today I gave it the same stamp/heat emboss treatment, then cut it with a workhorse in my studio - a stitched circle die.  Okay - a few enamel dots, or Nuvo Drops, and voila! 

Hope you have set aside some time this weekend to get crafty - if so, I'd love to have you tag @doodlebugswa and me, too, @mfergu01 ... or how about sharing at our Doodlebugs Community at Facebook?  

=] Michele

Links to product used are recommended are listed below: