
Hello, friends! Michele here to wish you all a happy weekend eve again! I have another fun MISTI playtime to share with you today - and the most darling of all mini stamp and die sets around: Altenew's Mini Delight: Apple Blossoms! This wee little set has one bloom with SIX layers! I found a way to set up to stamp four blooms and four leaves with a simple turn of a square of cardstock!
Are you with me so far? Maybe I'll show you the finished project first... you can see the stamp set along the left...

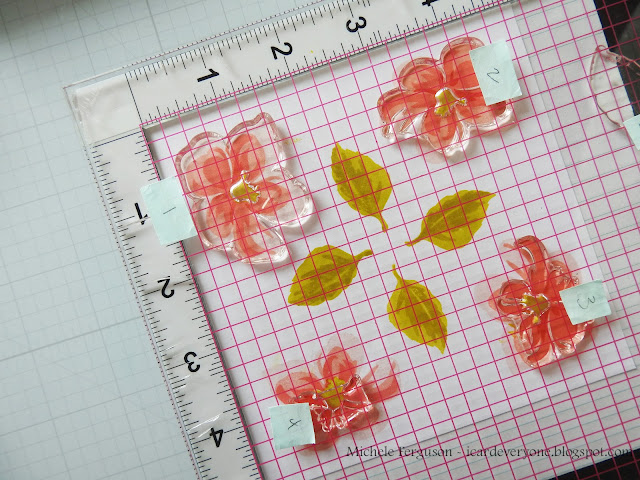
Here is how it all started:
1. mount a 5x5" piece of cardstock into the lower corner of your Original MISTI; choose four shades of ink for the bloom, and two shades for their centers, and leaves.
2. Place stamp A1 into the lower left corner and pick it up with the MISTI lid - apply lightest ink, and stamp.
3. Turn your cardstock clockwise once and stamp A1 again, and again two more times - until you have stamped four images.
4. Line up image A2 over the upper left bloom - pick it up with the lid and stamp the second shade of ink. Turn and stamp the second layer on all four images.
5. Line up image A3 over the top right image - pick it up with the lid and stamp all four images with the third shade.
6. Line up image A4 over the bottom right image - pick it up with the lid and... you get the picture, right?
Now push that square up to the top of your MISTI and follow the same steps for the two images A5 & A6 that layer the center of the bloom.
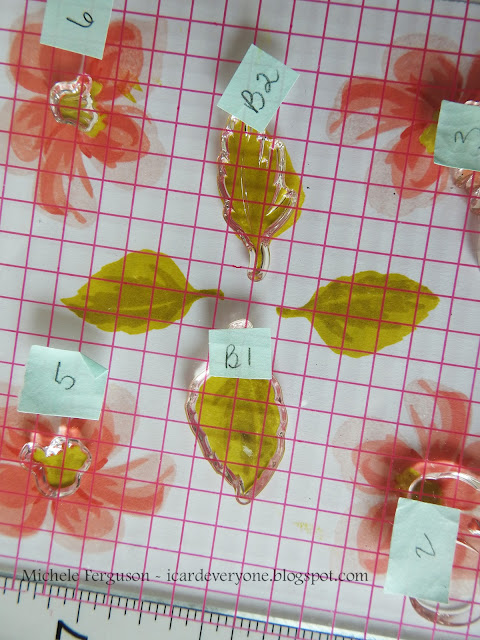

Just add another 5-inch square of cardstock and stamp


Have a wonderful and hopefully crafty weekend!
GREAT idea and the finished products are beautiful!!!
ReplyDeleteWonderful cards and thanks for the how-to.
ReplyDeleteLove the cards and such great instructions for making leyered stamps easy. Thank you. I shall definitely be trying it xx
ReplyDeleteI see what you did there and I love what you did there! Also love your tutorial. One can never have too many tips and tricks! Thanks, Michele for two beautiful cards!
ReplyDeleteAnother wonderful tutorial and splendid card.
ReplyDeleteTwo absolutely wonderful cards Michele and I love the picture tutorial...very helpful!! :0)
ReplyDeleteYour flowers are gorgeous....and you make it look so easy!
ReplyDeleteYou are so clever to figure this out! A sweet flower and your card designs are both awesome!
ReplyDeleteExactly how I do it, Michele. I love those sweet apple blossoms and the negative and positive leaves.
ReplyDeleteOh how pretty! Thanks for the clear instructions. You are a wonder and a marvel and I'm so glad you share all you share.
ReplyDeleteI am speechless! Your cards are gorgeous and your mind is amazing.
ReplyDeleteWow, Michele! Two lovely floral cards and a very tricky way to make flowers for more. TFSharing, and Happy 4th of July!
ReplyDeleteTruly pretty, my heartstrings were definitely given a tug by your slimline white card, but both are totally gorgeous! Your ingenuity has no boundaries, Michele
ReplyDeleteYou got a lot of punch from this mini-stamp set! Both cards are amazing and I especially love the gorgeous slimline that's sitting on my buffet right now. I'm so glad to see this post so I can know what supplies you used. Some favorite colors, and those Dainty Leaves dies look just as good in the negative cut as they do in the positive. Thanks again for your how-to in the MISTI.
ReplyDeleteThe designs of both cards are fabulous! I'm not sure I'd be as successful with the stamping! Your results are wonderful.
ReplyDeleteNow why haven't I tried this before Michele?! Because my brain doesn't work like your genius brain does! LOL I love this and will have to try it out with my Misti, maybe I will do better with layering stamped images. Love, love, love your cards and love that you used the negative die cut piece as well. Both cards look amazing just like I knew they would! Hugs, Brenda
ReplyDeleteBoth cards are beautiful!
ReplyDelete