Tuesday, June 25, 2024

Wishing you a Gull-Tastic Birthday

 I don't know about you, but I think any umbrella drink makes everything a party.


Waffle Flower Inquisitive Seagull

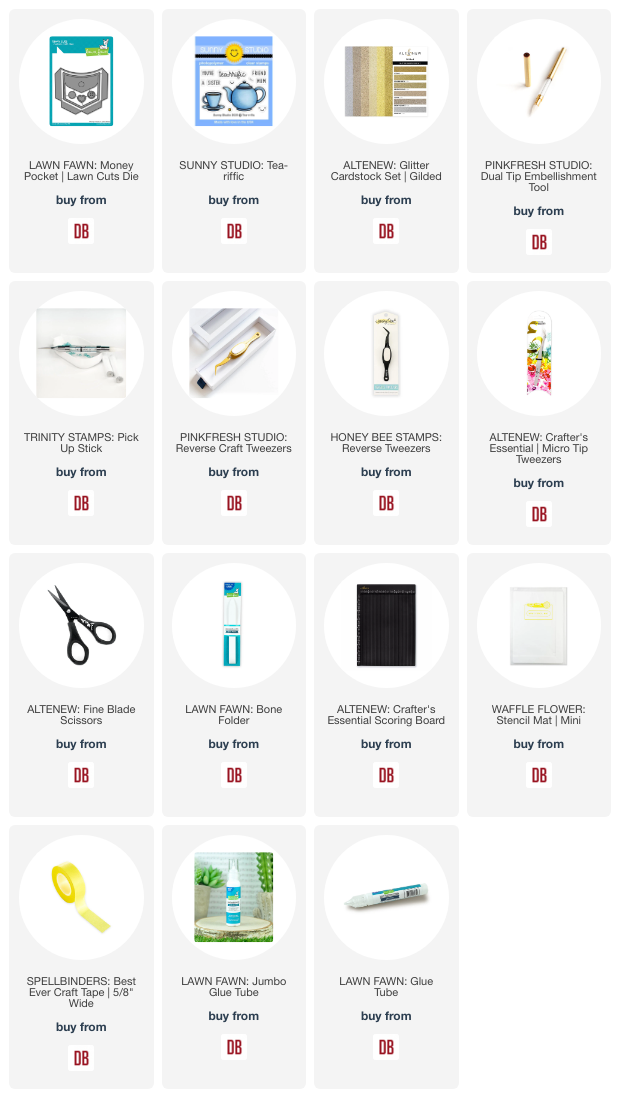
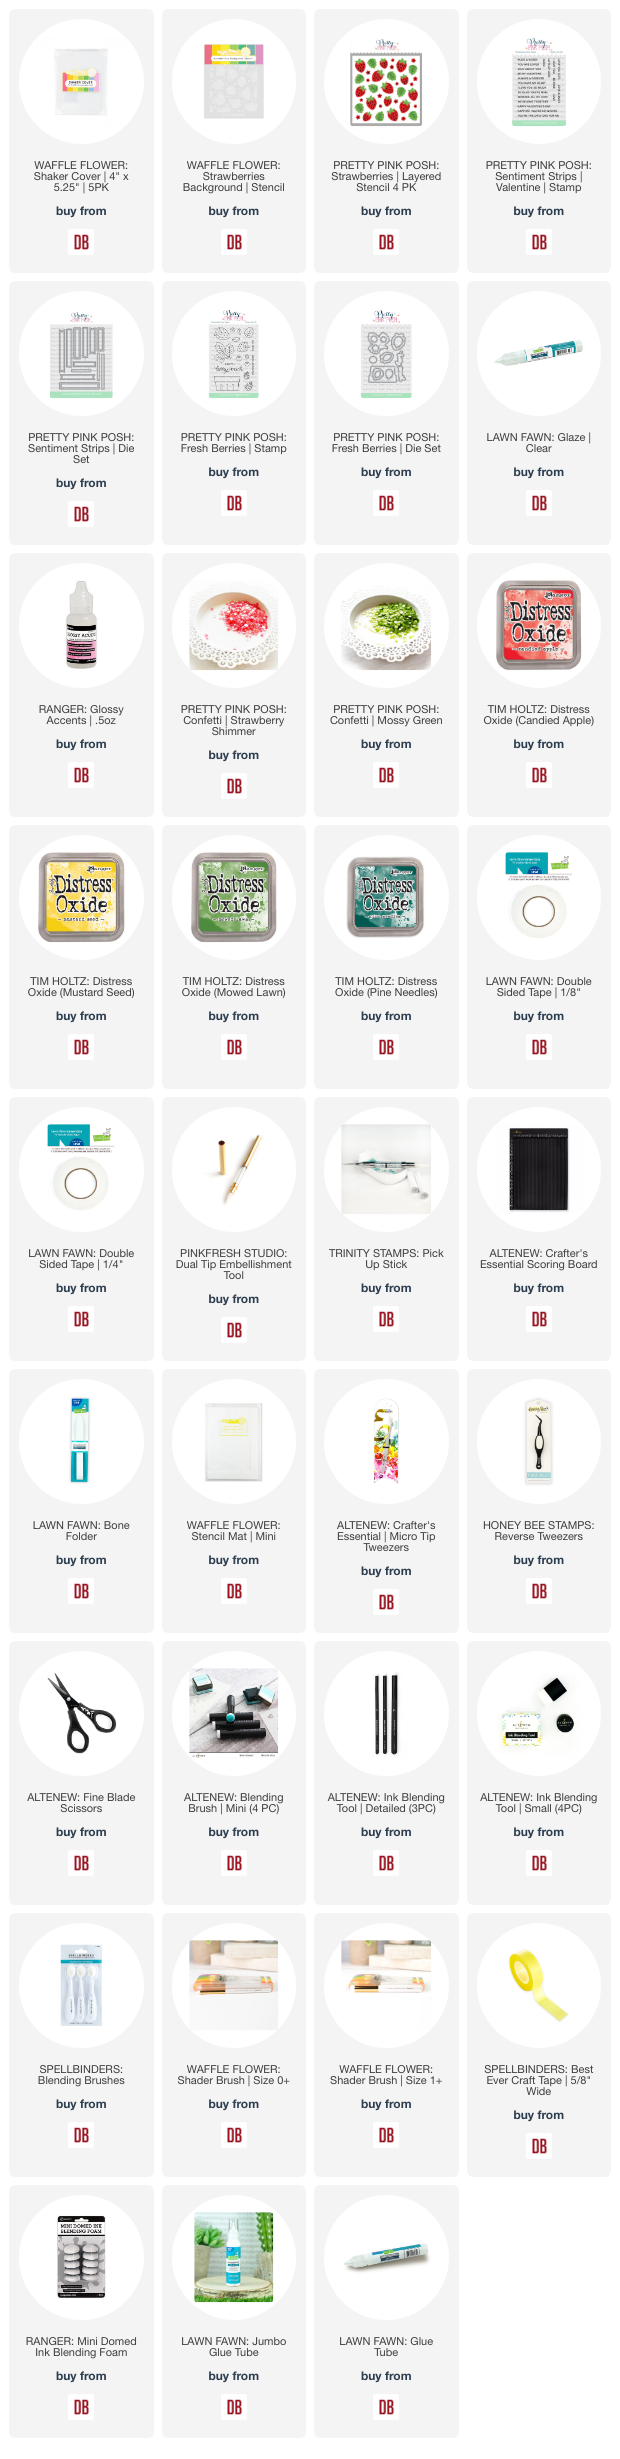
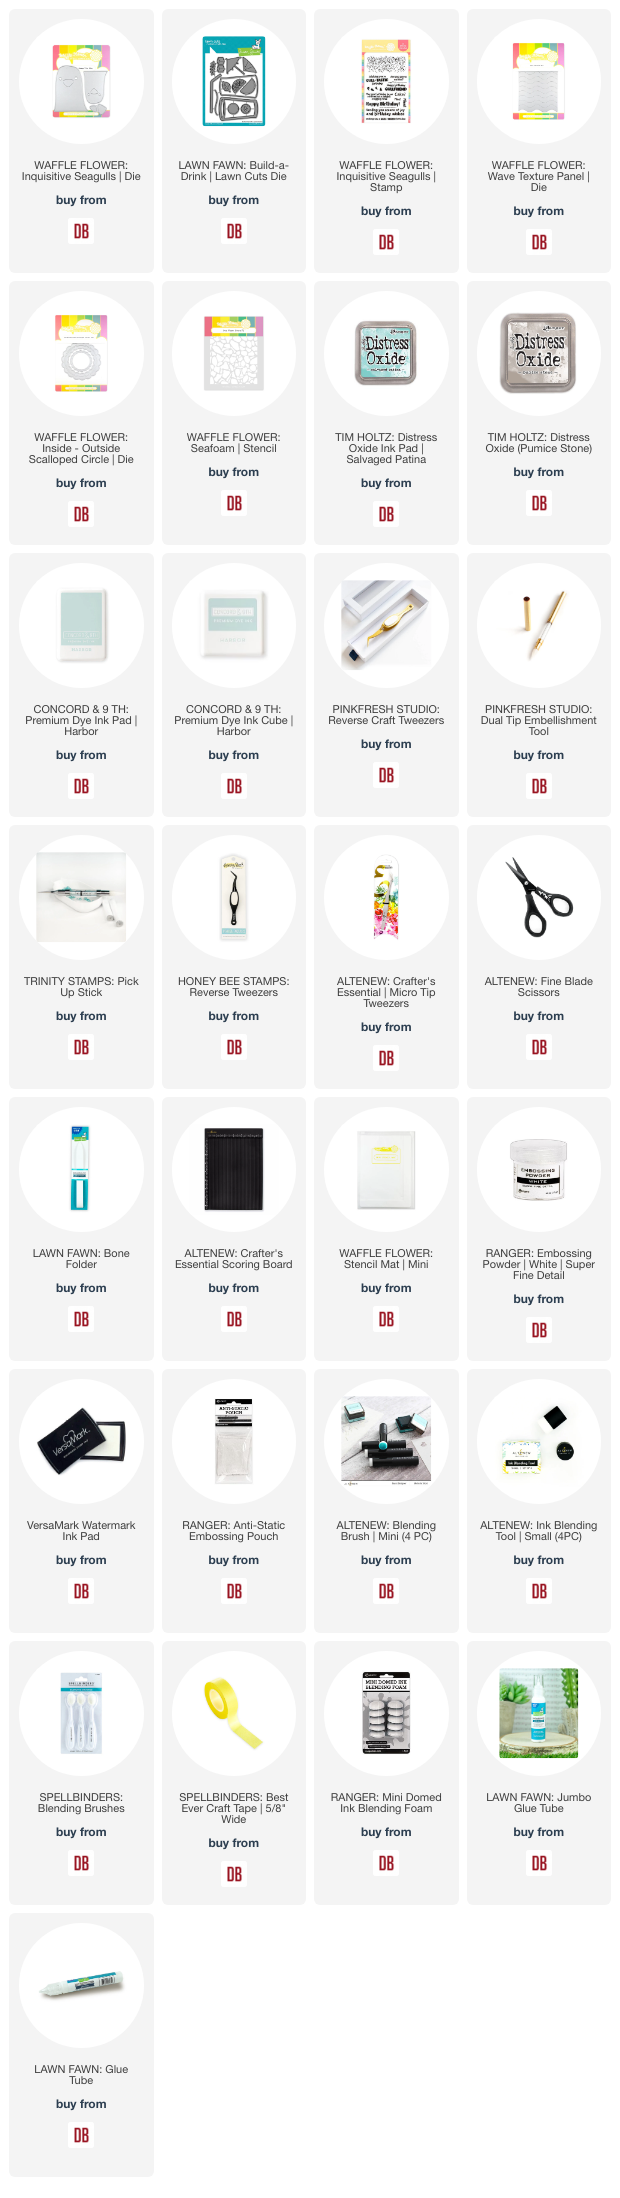
Today's project features:

  • Waffle Flower Crafts - Inquisitive Seagulls | die + stamp
  • Waffle Flower Crafts - Seafoam | stencil
  • Waffle Flower Crafts - Wave Texture Panel | die
  • Waffle Flower Crafts - Outside Scalloped Circle | die
  • Lawn Fawn - Build-a-Drink | lawn cuts
  • Pretty Pink Posh - St. Patrick's Day | clay confetti  

Waffle Flower Inquisitive Seagull

That seagull is so much fun.  There are two different sizes, this is the larger one.

The stencil work was done with Concord & 9th - Harbor | ink.  The drink has been ink blended with Salvaged Patina | distress oxide.  I lightly distressed the seagull with Pumice Stone | distress oxide.
The sentiment has been heat embossed in white.

Waffle Flower Inquisitive Seagull


Thanks for stopping by!

Links to products used or recommended are listed below: 

Monday, June 24, 2024

Mass Producing Gift Tags

Hello everyone! It's Amanda from Twiddler's Nook. For this week's Mix-it-up Monday I'm sharing a gift tag project I created for work. We just had our annual Conference last week and I made gift bags for some of the Board as an end of year thank you to them. You know I can't have gift bags without cute tags to go with them. So I spent a little bit and assembly lined a batch of froggy cuteness.

Mama Elephant Little Agenda Frogs

This whole project started with me playing around with the Mama Elephant Combo Circle creative cuts. They're so fun and I thought they would be great for a different tag. Once I chose my scallop colors I started die cutting all the pieces - 2 white centers (front and back), a blue scallop and a green scallop.

Mama Elephant Little Agenda Frogs

I couldn't decide which little agenda critters to use so I solicited my daughter's help and she chose my favorite frogs. I can't get enough of them. So I stamped out nine different ones, colored them all and used the coordinating dies to cut them out.

After assembling the layers of the combo circles, I blended a little green and teal inks in the center and splattered them with cracked pistachio distress oxide ink.

Mama Elephant Little Agenda Frogs

While the splatter was drying, I stamped and heat embossed a sentiment from Pretty Pink Posh Sentiment Strips | Fall and cut them out with a Pretty Pink Posh Sentiment Strip die. This die set and the coordinating collection of sentiments will not collect dust on your shelf. I promise. I am constantly reaching for them to add that perfect something.

Last, I popped the sentiment strips and frogs up with foam squares and strips. I used a Fiskars hole punch and threaded some twine through the holes. Now these are ready to be tied to the bags and handed out. 
 
I appreciate you sharing your time with me. Have a fabulous day! 
 
Links to products used or recommended are listed below:  


Tuesday, June 18, 2024

Birthday Cheer

 Any root beer float fans?

Lawn Fawn Build a Drink Root Beer

I've been a long time fan of root beer floats.  I had so much fun mixing and matching products for this card:

  • Lawn Fawn - Build-a-Drink | Root Beer Add -On | lawn cuts
  • Pretty Pink Posh - Fruit Mug Additions | die
  • Pretty Pink Posh - Valentine Mug Additions | die
  • Pretty Pink Posh - Friend Shadow | die
  • Pretty Pink Posh - Sentiment Strips | Birthday | stamp
  • Lawn Fawn - Brick | stencil

Lawn Fawn Build a Drink Root Beer

The brick was stenciled with Distress Oxide - Pumice Stone.  The root beer panel was ink blended with Distress Oxide - Walnut Stain.  The float was inked up with Distress Oxide - Antique Linen.

Lawn Fawn Build a Drink Root Beer

The sentiment was heat embossed in white on a black cardstock strip.

Thanks for stopping by!

Links to products used or recommended are listed below:  

Monday, June 17, 2024

Treat Yourself on your Berry Special Day

Hello everyone! This is Amanda from Twiddler's Nook. It's time for another mix-it-up Monday on the Doodlebugs blog. Today we're mixing all the strawberry things together again in a different way. I love how bright today's card turned out! It's so sweet you can almost taste it.

Pretty Pink Posh Fresh Berries

I started with the Pretty Pink Posh Fresh Berries stamp set. I stamped out a few berries and leaves, coloring everything with copic markers before using the coordinating dies to cut it all out.

Next, I stamped and heat embossed a sentiment from the Waffle Flower Birthday Wishes stamp set and cut it out with the coordinating die. I also cut a Waffle Flower Sweet Lattice panel for my background. 

Pretty Pink Posh Fresh Berries

With all the pieces ready to go, it's time to assemble some. Using the sentiment as a guide on the background panel, I used liquid glue to adhere the strawberries and foliage in place. Then I added the sentiment with foam squares so there is some dimension.

Pretty Pink Posh Fresh Berries

Not wanting white on white for my background, I took the Lawn Fawn guava ink pad direct to my card base for some textured color. Then I used liquid glue to adhere the lattice in place.

For finishing touches I added a few Spellbinders pearls and white gel pen highlights to the images.
 
I appreciate you sharing your time with me. Have a fabulous day! 
 
Links to products used or recommended are listed below:  

Thursday, June 13, 2024

Great Cards for Mom and Dad

Today I'm sharing the Mother's Day (I know, a little late) and the Father's Day cards I created for my parents.  I meant to share them earlier.  Especially the Mother's Day card.  However, these cards work for mom and dad anytime of year, and / or as a birthday card.  Moms and dads deserve more than just one day!

Concord and 9th Worlds Greatest

For my dad's card, I cut and assembled the trophy and the tools from some metallic silver cardstock.  It's not the easiest to photograph, but is sure looks great in person.  Those tools are from the All the Tools die set from Spellbinders and the trophy and stamp set  are from the World's Greatest bundle from Concord and 9th.

Concord and 9th Worlds Greatest

My dad is definitely a tool guy.  So this is perfect for him!

Concord and 9th Worlds Greatest

I created the trophy for my mom's card from gold cardstock and filled it with flowers.  I love how the flowers turned out.  I cut them from white cardstock and blended some beautiful colors of ink onto them.

Concord and 9th Worlds Greatest

Thanks so much for stopping by.  I hope this card and these products have inspired you to create a card and celebrate someone special.

-Cathy

Links to products used or recommended are listed below: 

Tuesday, June 11, 2024

Perk Up

 I can't wait to show you today's project:

Waffle Flower Happy Seagull and Concord & 9th Cup of Kindness

I combined the following products:
  • Waffle Flower Crafts - Happy Seagull | die
  • Waffle Flower Crafts - Inquisitive Seagulls | stamp
  • Waffle Flower Crafts - Sea Foam | stencil
  • Concord & 9th - Cup of Kindness | stamps + dies
Waffle Flower Happy Seagull and Concord & 9th Cup of Kindness

I used the Waffle Flower Crafts Grip Mat to ink blend:
  • Waffle Flower Crafts - Sea Foam | stencil - Distress Oxide | Tumbled Glass
  • Beach, footprints + sand - Distress Oxide | Tea Dye
The sentiments have been stamped with Distress Oxide | Vintage Photo

Waffle Flower Happy Seagull and Concord & 9th Cup of Kindness

Thanks for stopping by!

Links to products used or recommended are listed below: 

Monday, June 10, 2024

Ocean Themed Tri-Fold Scene Card

Hey everyone! It's Amanda from Twiddler's Nook. Today's mix-it-up Monday is packed full of amazing! I went a little extra coloring some images from the Mama Elephant Me and My Whale set. After cutting everything out and playing around I had a fun thought to make a window card that opened into the scene but I had too much so I went a step further and created a tri-fold card with an ever unfolding scene and still room to write a message.

Mama Elephant Me and My Whale Tri fold card

Okay, starting things off, you just need 2 regular card bases, flip one backwards and slide them together. You'll glue the back flaps together and it will give you a tri-fold card base to work with.

My front panel is scored every half inch for a shiplap look on the front. Then ink blended with peeled paint distress oxide ink. I used the Spellbinders Coastal Escape View die set to cut my window and add all of the fun porthole decorations to the front. My sentiment is from Mama Elephant's Essential Tag Sayings. It has a great bubble font that stands out perfectly.

Mama Elephant Me and My Whale Tri fold card

For the scene our card opens up to, I inked a wave panel with salvaged patina and the card flap itself with salty ocean and tumbled glass. The seashells are more great dies from the Spellbinders Coast View set and the other images are from Mama Elephant Me and My Whale. This sentiment comes from Mama Elephant's Mixed Wishes Greetings.

Mama Elephant Me and My Whale Tri fold card

Our final descent brings us to the center of the card and down in the depths with more Me and My Whale images, paired with a little coral and seaweed from the same Spellbinders die set. I did pull in another sentiment set from Mama Elephant because I couldn't resist the whale talking to his mermaid friend. This one is called Simple Friends Bubbles and it stamps and die cuts 6 sentiments at once!

The background on this panel is ink blended with mermaid lagoon and tumbled glass distress oxide inks. All of the panels were also spritzed with water and splattered with white paint for texture. 

Mama Elephant Me and My Whale Tri fold card

Because of the nature of this card, everything is glued flat and there are no extra embellishments on the inside. I always get nervous that the dimension will ruin the layer above it or pages will stick together. So I kept it all simple except for a little stardust Stickles on the stamen of the front flowers.

It has been years since I've created a card this extra. I loved taking my time and enjoying the entire process of this project. I'd love to know if you create cards this involved or like to keep it simple. 
 
I appreciate you sharing your time with me. Have a fabulous day!
 
Links to products used or recommended are listed below: 

Friday, June 7, 2024

Layered Stencil Backgroud for Quick and Easy Cards

Today I'm stepping up the cards I created yesterday and adding some layers.  They're still quick and easy cards, but I've added a little bit of dimension. I love adding dimension on my cards!

For this card I stenciled the image on an A2 sized piece of cardstock.  After stenciling, I trimmed the panel down, giving it a slight white border when placed on my folded note card.

Concord and 9th Garden Path

I stamped a simple sentiment and added some glitter glue and gems.  This time I used only a portion of the stencil and skipped the smaller section which eliminated the open area for the coordinating stamped sentiment.  It's a fun way to used the stencil in a different way.  I added a few additional layers of cardstock behind the panel to give it some added dimension.

Concord and 9th Garden Path

For this next card, I stenciled the entire image and again, trimmed the panel down to create a white border when placed on my A2 folded note card.

Concord and 9th Garden Path

This time I added a die cut sentiment.  Of course I layered it up with several layers of cardstock.  I also layered the stenciled panel onto several pieces of cardstock and included a few sequins to finish the card.

If you prefer one layer cards, take a look at my post from last week.  I used the same stencil set to create several one layered cards.

Thanks so much for stopping by.  I hope you're inspired to create today.

-Cathy

Links to products used or recommended are listed below: 

Thursday, June 6, 2024

Beautiful, One Layer Cards

Today I'm sharing a couple one layer cards, and some tips to add some "dimension" without adding layers. 

Concord and 9th Garden Path

I started with Concord & 9th's Garden Path Layering stencil.  I like this stencil because of the coordinating sentiments that are available.  They fit perfectly into the open area once you've completed your stenciling.

Here's how I "stepped up" the cards without adding layers:

For some added interest, I added some Stickles glitter glue to the centers of the flowers on this card. 

Concord and 9th Garden Path

For the next card, I added some gold glitter detail with embossing ink and gold glitter embossing powder.  It's hard to capture in photos, but this one gives you a good idea of what that looks like.  It would be fun to experiment with other colors [white, silver, matte gold].  I think white would be fun to heat emboss on some dark colors.

Concord and 9th Garden Path

For the next card I stamped the sentiment and heat embossed with clear embossing powder.  I also added some clear embossing ink and powder to some of the details on the flowers and leaves.  To finish this card, I used my fine line, black marker to add a detailed frame around the entire image.

Concord and 9th Garden Path

Here is another card I created using Stickles glitter glue and the black outline frame.  It's fun to play and experiment with different techniques.

Concord and 9th Garden Path

Stop by tomorrow for a few more cards using this layering stencil.  I've stepped up the card and added some layers and dimension giving the stenciled image a different look.

 Thanks for stopping by!  I hope I've inspired you to create something today.

-Cathy

Links to products used or recommended are listed below: 

Tuesday, June 4, 2024

You're Tea-rrific

 I've been having so much fun crafting lately. I love how this project turned out:


I combined the following products:
  • Lawn Fawn - Money Pocket | Lawn Cuts
  • Sunny Studio Stamps - Tea-rrific | stamps

The sentiment has been stamped with Concord & 9th - Midnight.

I'm sending this to my brother, he is officially retired on June 1st. The tea is from my recent trip to Japan.


Thanks for stopping by!


Links to products used or recommended are listed below: 

Monday, June 3, 2024

A Berry Fun Full Card Front Shaker

Welcome to mix-it-up Monday on the Doodlebugs blog! This is Amanda from Twiddler's Nook. We're creating a quick and fun full card front shaker with a summery strawberry theme. We've had a little relapse in weather but I'm not giving up on summer crafting in the slightest!

Waffle Flower Strawberries Stencil

I started my card today by inking up the Waffle Flower Strawberries background stencil set. To be sure the ink showed up really well on my kraft base, I used distress oxide inks. The colors I chose were candied apple, pine needles, mowed lawn and mustard seed. Then I spread a little glossy gel through the final seed layer for subtle shiny details.

Waffle Flower Strawberries Stencil

Once the glossy gel was dry, I trimmed the panel to 4x5.25 inches and wrapped a Waffle Flower shaker cover around it. I only adhered 3 sides at first, pouring in my shaker bits and then securing the last side down. I used tear tape for this because it's strong and instant. I find it works best with the plastic shaker covers. My sequins are from Pretty Pink Posh and Spellbinders.

Waffle Flower Strawberries Stencil

Next, I stamped and heat embossed a sentiment from Pretty Pink Posh Fresh Berries and used the coordinating die to cut it out. Then I stamped another small sentiment from Pretty Pink Posh Sentiment Strips | Valentine and cut it out with the smallest Pretty Pink Posh Sentiment Strip die. I adhered both of these to the front of my shaker panel with foam strips.

Waffle Flower Strawberries Stencil

Last of all, I added more tear tape to the back of the shaker panel and adhered it to a white card base. Once again, the tear tape is great against the plastic and gives you instant bond.

Now, just give it a little shake, shake, shake and it's ready to go!
 
I appreciate you sharing your time with me. Have a fabulous day!

Links to products used or recommended are listed below: