Wednesday, September 29, 2021

National Coffee Day Hop

Happy Wednesday everyone!  We're super excited to be participating again in this year's National Coffee Day Blog Hop.  

Here are the details:

The hop runs through October 5th (Pacific Time) and starts HERE

We are giving away a $25 Gift Certificate prize here, but there are load of other prize opportunities from additional participants.  Please leave us a comment on this blog post to be eligible for our prize.  We will randomly select a winner from the comments on October 5th and they will receive a $25 GIFT CERTIFICATE. (please note: we are sorry, but we cannot ship internationally - the giveaway is only open to US shipping).

Be sure to check back on October 8th for the winner's name and the details for collecting your prize.

We are also offering a great sale to celebrate National Coffee Day.  You'll save 20% on any purchase over $50 through Tuesday, October 5th.  The discount cannot be used with any other discounts or promotion.  See details below:

And now, I'm handing off the inspiration part of this post to Mayra.  She's sharing a fun, fall, coffee inspired project for all of you.  Hope you enjoy it!


Hello everyone!!! Happy Wednesday!! I am so excited to share this card inspired by the Coffee Lover's Blog Hop. I used my favorite dies for this theme. I used the Stitched Mug Frame and the Outside in Stitched Mug from Lawn Fawn. 


I began by die-cutting the layers for this fall-inspired mug. I also used the mane from the Tiny Gift Box Unicorn & Horse add-on die to make the extra creamy whipped cream topping, the leaves are from the Acorn House die, and the little mug is from the Woodland Critter Huggers Winter Add-on die set. 


The tag is from the Tiny Tags die set, the 'for you' phrase is from the Gift Card Heart Envelope die set, the 'hello' is from the Shutter Card die set. I used Distress Inks to add a bit of color to the die-cut marshmallow, leaves, mugs, and tag. I used Rusty Hinge, Ground Espresso, Brushed Corduroy, and Gathered Twigs


I then stamped the word 'fall' onto the mug using the Jump For Joy stamp set. The 'so thankful' is from that set as well. Next, I used the Basic Rectangles die set to create the base panels for the card. I hope you enjoy the card I created to share with you today. Thank you so much for taking the time to stop by. I hope you each have a wonderful and blessed day.  Please feel welcome to visit me on my blogIG or Pinterest

If you're hopping along you should have arrived here from DL.ART.

Next blog on the list is Ellen Hutson.
 
Links to products used or recommended are listed below:

Monday, September 27, 2021

Hello from Toni: Waffle Flower Slimline Christmas


Hello, everyone! Today I'm showing the versatility of the Waffle Flower Waffle Flower Slimline Christmas Tree Die.

You can create a shaker, use designer paper (Honey Bee Holiday Cheer and Doodlebug Design Night Before Christmas paper used here), or how about acetate with alcohol inks on the backside? 


I love this slimline die because it's the perfect size for 8.5x11" cardstock--no wastage. Cut the panel and then use the rest of the page as the card base. Woo hoo!


And what do you do with the extra trees cut from the panel?  You could use the other smaller tree dies included and make something like the below card. Honestly, the possibilities make my head swim!


I'll see you again soon.  If you'd like to check out my other creations in the meantime, you can visit my blog, Frankie Helps Craft, my Instagram, or my Pinterest Board.  

Products Used and/or Recommended Include:

Wednesday, September 22, 2021

Thank You with Pretty Pink Posh...

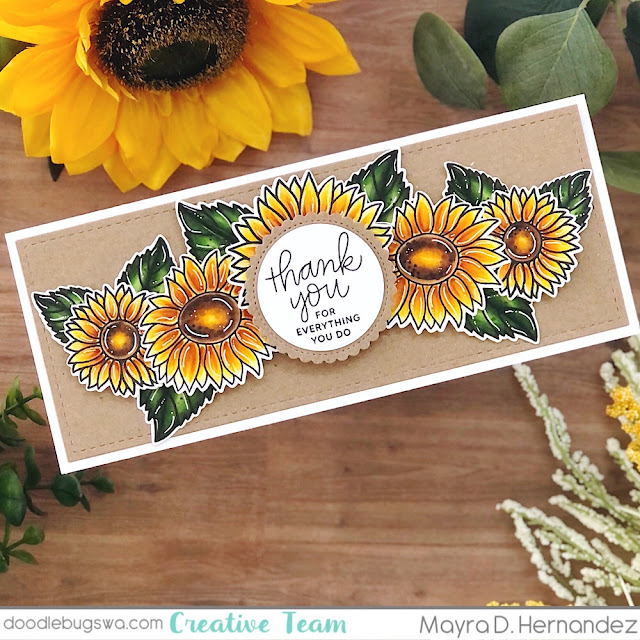
Hello and happy Wednesday everyone. Mayra here with you today. I am sharing this card using the beautiful Sunflowers stamp set from Pretty Pink Posh. 

I began by coloring the leaves, then the flowers from the set using Copic markers. Next, I used the large and smaller dies from the Peekaboo Windows die set to die-cut the panel for the card.

Copic markers used: 

YR24, Y19, Y08, Y11, E99, E97, YR27

G40, YG03, YG17, YG63, YG67, G94, G99

E89, E47, E59, E44, E55, E31 


Next, I used the Thoughtful Greetings stamp set for the sentiment. I stamped it onto a circle that was die-cut using the Valentine Circles coordinating dies. I hope you enjoy the card I created to share with you today. Thank you for taking the time to stop by. I hope you each have a wonderful and blessed day. 

Links to products used or recommended are listed below:

Monday, September 20, 2021

Hello from Toni: Mama Elephant Unicorn Birthday


Hello, Doodlebugs fans! Today let us go back in time to the '80s where all was rainbows and unicorns. LOL.


I started by using the MFT Mini Cloud Edges Stencil with various Distress Oxides, keeping my touch light so the colors wouldn't be too saturated. 

I next stamped the Mama Elephant Paola's Wishes onto the card base as well as onto the cardstock I used to cut out the Waffle Flower Outlined Clouds.


I did this so when I adhered the clouds, the sentiment would be both behind and on the clouds.  Pretty cool effect.  I colored up the rainbow using Copics.

I colored up the Mama Elephant Little Unicorn Agenda images with Copics as well. It was a pleasant change to color up such simple images--just a little shading on their bodies and then I could have fun with the manes and tails. They're so flippin' cute!


I'll see you again soon.  If you'd like to check out my other creations in the meantime, you can visit my blog, Frankie Helps Craft, my Instagram, or my Pinterest Board.  

Stay cool, dudes, and have a rad rest of your week!

Products Used and/or Recommended Include: 

Wednesday, September 15, 2021

Sending Big Hugs with Lawn Fawn...

Hello and happy Wednesday everyone. Mayra here with you today. I am sharing this sweet set of cards with you. I used the lovely new Simple Stripes Diagonal die set, along with the Giant Sending Big Hugs die. 


I began by using the largest die from the Basic Rectangles die set to die-cut the base panel for my cards. Next, I used the Simple Stripes Diagonal die set to die cut the stripes using kraft-colored card stock. I then die cut the phrase 'sending big hugs' using the Giant Sending Big Hugs die from yellow-colored cardstock. You can use the largest and medium-sized rectangles from the  Basic Rectangles die set to create a framed border. Then, I die-cut the layers for the deer using the Tiny Gift Box Deer Add-on, Woodland Critter Huggers, and the Woodland Critter Huggers Winter Add-on.


The panel for the second card was made using the Quilted Backdrop die. I then added color to the die-cut layers using Lawn Fawn and Distress Inks. For the yellow area, I used Sunflower, No.2 Pencil, Wild Honey, and Rusty Hinge. For the brown areas, I used Gathered Twigs, Brushed Corduroy, Ground Espresso, and Antique Linen I also added a couple of black splatters using Black Soot Distress Ink.


Next, I stamped the sentiment onto the banners from the Fancy Wavy Banners die set using black ink. 

I hope you enjoy the card I created to share with you today. Thank you very much for taking the time to stop by. I hope you each have a wonderful and blessed day. Please feel welcome to visit me on my blogIG or Pinterest

Links to products used and/or recommended are listed below:

Monday, September 13, 2021

Hello from Toni: Mama Elephant BOO!


 Hello, Doodlebugs fans! I have so shifted into fall mode. It's time to nest and get cozy, my favorites!


For today's slimline Halloween card I'm using lots of Mama Elephant, including Happy Haunting, Little Boo Agenda, and Slim Card Basics.


I sponged the background cardstock with Distress Oxide Antique Linen, Carved Pumpkin and Salvaged Patina, and spattered it with Copic Opaque White. I then brushed gesso over the lot. 

I used the rectangle die from Slim Card Basics to create a mask and used the same Distress Oxides to outline the scene. I spattered a tiny bit of water as well.


My next step was coloring up the little Happy Haunting images with Copics.  I used Doodlebug Design Candy Carnival to paper piece some of the outfits too. They're ever so cute!


I'll see you again soon.  If you'd like to check out my other creations in the meantime, you can visit my blog, Frankie Helps Craft, my Instagram, or my Pinterest Board.  

Products Used and/or Recommended

Wednesday, September 8, 2021

You Are Fantastic with Altenew...


Hello and happy Wednesday everyone. Mayra here with you today. I am sharing this sweet floral card with you using the beautiful Fairy Tale Florals stamp set by Altenew. 


I began by using the largest die from the Basic Rectangles die set to die-cut the base panel for my card. Next, I stamped the image onto the panel using Distress Ink in the color Antique Linen. Then, I colored the image using Copic markers. 


For the leaves: 
BG90, YG03, YG17, YG67, G46, G28, G94, G99

Flowers: 
Y21, YR21, YR23, YR24, E99, E97, E08

A bit of:
YR000, YR01, YR02

Center: 
C9, N6, N5


Next, I stamped the sentiment onto the panel using black ink. I also added a couple of black splatters using Black Soot Distress Ink. 

I hope you enjoy the card I created to share with you today. Thank you very much for taking the time to stop by. I hope you each have a wonderful and blessed day. Please feel welcome to visit me on my blogIG or Pinterest

Links to products used or recommended are listed below:


Monday, September 6, 2021

Hello from Toni: Mama Elephant Little Witches


Hello, everyone! For today's pair of cards, I have pics of my sister making them as well as she happened to be visiting at the time I made them. This is going to be fun!

Let's start with the card on the left which uses the clouds leftover from cutting out the Mama Elephant Cloud Grid Cover.


Starting from the upper left photo and moving clockwise, (1) diecut the cover panel. Apply glue to the clouds and carefully position your card base on top.

(2) Flip the lot over and use Distress Oxides to color the individuals clouds.  Distress Oxide Carved Pumpkin, Twisted Citron, Shaded Lilac, Mustard Seed, and Salvaged Patina was used here.


(3) Because you left the die in place as you applied color, when you lift away the die, you will have a lovely border of white around each cloud.


(4) Color up the Mama Elephant Little Witch Agenda and any other images you'd like (for example, MFT Spooktacular Friends and Mama Elephant Little Boo Agenda).  Lawn Fawn Oliver's Stitched ABCs fit perfectly over the clouds as well.


For the second card, we used the Mama Elephant Cloud Grid Cover to create a cute shaker.

Again, starting in the upper left and moving clockwise, (1) sponge the card base with Distress Oxides (Barn Red, Carved Pumpkin, and Mustard Seed used here). Adhere acetate to the diecut front panel using 1/8" Scor-tape. 

(2) Add another layer of the 1/8" Scor-Tape to the acetate/card front panel and sprinkle a few sequins onto your card base.


(3) Carefully adhere the panel to the card base and have fun testing the shaker.

(4) Color up a few Mama Elephant Little Witch Agenda images and adhere them to the card. Don't forget your sentiment!  I used one from MFT Spooktacular Friends embossed on a Lawn Fawn Simple Wavy Banner.


I'll see you again soon.  If you'd like to check out my other creations in the meantime, you can visit my blog, Frankie Helps Craft, my Instagram, or my Pinterest Board.  

Products Used and/or Recommended Include:

Wednesday, September 1, 2021

From Our Home To Yours with Lawn Fawn....


Happy Wednesday everyone!!! It's September!!! YAY!!! That means Fall is right around the corner, my absolute favorite season! I created this autumn-themed card to share with you today using the cute Acorn House die from Lawn Fawn


I started by die-cutting the base of the card using the largest rectangle from the Basic Rectangles Creative Cuts set. I added color to the base panel using Forget-Me-Not, Fish Tank, and Blue Jay Lawn Fawn Inks. I then die-cut the grassy, and hillside borders using the grass from the Mushroom Border die, and the hill from the Slimline Simple Stitched Hillside Borders sets. I added color to the grassy border using Artichoke and Noble Fir inks. For the hillside border, I used Gathered Twigs, Ground Espresso, Brushed Corduroy, and Rusty Hinge Distress Inks. 


Next, I die-cut the birch trees using the Birch Trees die set. I added color to the die cuts using, Gathered Twigs, Ground Espresso, and Hippo inks. Next, I added color to the die-cut layers to create the Acorn House. I used Pizza Crust, and Sugar Cookie inks for the main layer. I then added color to the leaves from the Acorn House die set using Lawn Fawn inks in the colors Sunflower, No.2 Pencil, and Mustard Seed Distress Ink. 


Next, I colored the images from the Let's Go Nuts, the rocks from the Ocean Shell-fie set, and the mushrooms from the Oh Gnome stamp set using Copic markers. The sentiments are from the Den Sweet Den, A Bug Deal, and Happy Village stamp sets. 

I hope you enjoy the card I created to share with you today. Thank you so much for taking the time to stop by. I pray you each have a wonderful and blessed day. Please feel welcome to visit me on my blogIG or Pinterest

Links to products used or recommended are listed below: