Monday, May 8, 2023

Watercolor ebmossed background with Spellbinders Flower Frenzy embossing folder

Last week I had my watercolors out, so I decided to create another card using them.  This time I added watercolor to an embossed background.  I love the way it turned out.

To create the background, I embossed some watercolor paper with the Flower Frenzy embossing folder from Spellbinders.  I then added quite a bit of water to the embossed area with my brush, and then touched color to the wet paper in different areas.  If the color didn't move enough, I added more water with my brush and gently pushed it in the direction I wanted.

After adding the color I set it aside to dry.

Spellbinders Flower Frenzy and Concord and 9th Friendly Florals
I assembled the flowers and bees using the Friendly Florals die set from Concord & 9th.  I did add just a small amount of color to the flower petals and centers with my Copic Markers.  Just to give them a little bit more of a painterly look.  I thought this would help them coordinate better with the painted background.

The sentiment is from the Versatile Greetings Hot Foil set and the coordinating die.  If you don't hot foil, the die set is a great option.  I love them both.

Spellbinders Flower Frenzy and Concord and 9th Friendly Florals

Once the paper was dry, I added some gold ink to the top of the embossed panel, touching just the raised areas.  It's easiest to do this with a large, flat, ink blending brush, but you can also use the pad directly to the paper.  Just be careful to lightly brush the top.  Heavy pressure will cause the ink to cover the entire paper.  You just want it to "kiss" the tops of the raised areas.

I also added the gold ink to the frame I cut.  I cut the frame from a soft golden yellow cardstock and then covered it with the gold ink.  I did use a heavy amount of ink for the frame as I wanted the gold to be the prominent color.

Spellbinders Flower Frenzy and Concord and 9th Friendly Florals
I tucked a tiny piece of foam tape under the petals to give them a slight lift.
 

Here's a close up of the gold ink on top of the raised embossed areas.  My photo skills don't show you how beautiful this technique really is.  It's much better in person.  I hope you'll give it a try.

Spellbinders Flower Frenzy and Concord and 9th Friendly Florals

I hope you enjoyed the project and that I inspired you to create something.

Have a great week.

Cathy


Links to products used or recommended are listed below:  
Friday, May 5, 2023

For the Birds! or bird OR beach lovers!

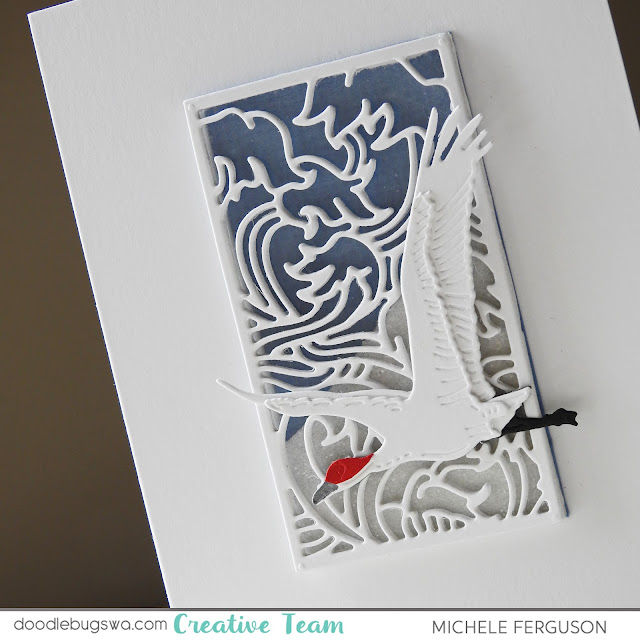
Hello again, my Doodlebugs friends!  Michele here with a card that's for the birds! or the birdlovers in each of us!  Okay, maybe the beachlovers in each of us?  WHO doesn't love that?

Red Crowned Crane and Wave Panel from Altenew

Sometimes it's best to start with the closeup, right?

My very CAS card starts by cutting this gorgeous Altenew Wave Panel Die three times 
from white cardstock.  I used 110# cardstock and a metal shim to get all those crisp cuts.
Stack and glue them up with a piece of acetate between the first and third layers.
Turn that over and add thinly cut strips of foam adhesive to those boarders.
fill with glitter, and back with your choice of blue cardstock - instant wave!

Red Crowned Crane and Wave Panel from Altenew

For those of you who worry about that glitter:  before I adhered this little shaker to my card, I added a bead of clear adhesive on all four sides to 'lock it' inside - I hope it works!

Now about this bird - Altenew brought the Red-crowned Crane to life with all 
of these gorgeous layers!  I had such fun creating a purple crane that I shared on 
Instagram recently:
@mfergu01 if you'd like to see that one!

Red Crowned Crane and Wave Panel from Altenew

His 'red crown' was created by cutting this top layer from a snippet of red to cap off all of his white - there are TWO cranes included in this set!  I'm in love!  These guys are going to collect lots of frequent flyer miles in my studio!  Living on the east shore of Lake Michigan means there are lots of waves in my future, too!

Thanks for stopping by today!
=] Michele
 
Links to products used or recommended are listed below:  
Wednesday, May 3, 2023

Mama Elephant - Happy We Are Friends Shaker Card

Hello crafty friends! This is Amanda from Twiddler's Nook with the amazing privilege to guest design on the Doodlebugs blog for the month of May. I hope you enjoy the fun things I've created! Let's get started with today's awesome shaker card!

Do you ever have a hard time not making something a shaker when you have the option? I think I really do because every time I can, I seem to go that route and love it! That's how today's card came about.

Mama Elephant Flower Friends and So Appreciated

I had a general design in mind with the polaroid frame dies holding my sentiment and the sweet images from Flower Friends below. So I die cut my frame from white cardstock and took the inside piece that cuts out and ink blended it before stamping a sentiment. For that I chose carved pumpkin and squeezed lemonade distress oxide inks. I spritzed it with water and blotted it dry, then stamped my sentiment and adhered the cute clip to the top, which is a die included in the frame set. 

Mama Elephant Flower Friends and So Appreciated

Layering my stamps in place to make sure things will fit the way I want, I thought...this could be a shaker frame! So that's what I did. I lined the back of the frame with acetate and then foam tape, sprinkled Pixie Dust micro beads inside and sealed it up with my sentiment panel. Then I moved on to stamping and coloring images from Flower Friends with my copic markers. I used the coordinating dies to cut them out and moved on to the background.

Mama Elephant Flower Friends and So Appreciated

The background panel is a piece of teal cardstock with peacock feathers distress oxide ink blended at the top fading to nothing. Then I splattered watered down peacock feathers ink across the panel, followed by white paint too. I trimmed the panel to 4x5.25 inches and popped it up on a white card base.

The photo frame is added with liquid glue and the images are added with a combination of foam squares, strips and liquid glue as well. Finally, my finishing touches were black glaze pen to the puppy and bee eyes, along with stardust Stickles to the flower centers and bee wings.

Wouldn't this card be so sweet and heartwarming to receive in the mail? I hope the recipient loves it when she gets it!
I appreciate you sharing your time with me. Have a fabulous day!

Links to products used or recommended are listed below:  

 Micro beads from Twiddlers Nook

Monday, May 1, 2023

Watercolor florals from Pinkfresh Studios Beautiful Blooms

A few weeks back, I pulled out my watercolors.  I haven't done much watercolor painting lately and thought the Beautiful Blooms set was perfect for some quick and easy watercoloring.  If you don't like to watercolor, there's a coordinating stencil option for the flowers.  The stencils make coloring the flowers with ink easy.

Watercolored Pinkfresh Studios Beautiful Blooms and Altenew Leaf Frame Cover Die
I stamped out several sets of the images on watercolor paper with a water proof black ink and then got to work painting.  After I finished painting all the images, and they had dried, I cut them out with the coordinating die.  I have quite a few left.  I predict they will make an appearance in a future blog post.

I paired a few of the watercolor images up with the Leaf Frame die from Altenew and added a sentiment. 

Watercolored Pinkfresh Studios Beautiful Blooms and Altenew Leaf Frame Cover Die


Watercolored Pinkfresh Studios Beautiful Blooms and Altenew Leaf Frame Cover Die
Here's a second color variation of the Leaf Frame die.  I couldn't decide which color combination I liked better. Since I had multiple images colored, I just made both cards.  Which one is your favorite?

Watercolored Pinkfresh Studios Beautiful Blooms and Altenew Leaf Frame Cover Die

 For this version, I decided to use the Dotted Scales die from Altenew to add some texture to the white portion inside the frame.  I thought it turned out nice.

Watercolored Pinkfresh Studios Beautiful Blooms and Altenew Leaf Frame Cover Die

The sentiments are both from the Heart Smiles stamp set from Pinkfresh Studios.

Thanks so much for stopping by!  Have a great week!

Cathy

 Links to products used or recommended are listed below: