Wednesday, April 30, 2014

What's New Wednesday


Can't wait to try the new Color Bloom Sprays from Prima on my next mixed media canvas.  The spray bottle has two settings, "full coverage" and "splatter".  However, the best news....they are permanent once they are dry!


New bright colors for Spring and Summer.


Product Demonstration - Saturday

Mary will be demonstrating the Distress product line, from Tim Holtz, on Saturday, from 10AM - 12PM and again, from 1PM - 3PM.  This includes inks, paints, and markers.  You're sure to learn some fun, new techniques.  So, be sure to stop in.


National Scrapbooking Day Celebrations


Summer Workshop

Our Summer Workshop has sold out for Saturday.  We have opened up registration for Sunday in case you missed Saturday.  So, don't delay, give us a call and sign up before Sunday is sold out too!


Join us this Friday for our FREE "Make and Take".  We're playing with Alcohol Inks and creating a "TEAL" card to participate in this month's First Friday Art Walk color theme.  The "Make and Take" is available between 5PM and 7PM, while supplies last.


 Fun Stuff You May Have Missed:

 1.  Take a look at our "You're Super" card using MFT Stamps, HERE.

2.  Stencils Inspiration using Heidi Swapp's new mini stencils can be found HERE.

3.  Stencil inspiration using Tim Holtz stencil, "Rays" can be found HERE.

Tuesday, April 29, 2014

MFT Stamps- You're Super

I couldn't wait to create something with this adorable stamp set!

She'd make a cute Mother's Day card for your "Super" mom (MOM is included in the set).

Enjoy!


Copic Markers Used:

Y02, 06, 08
B12, 24, 18
R22, 27, 29
E00, 11, 21
E41, 43, and 47

Monday, April 28, 2014

National Scrapbooking Day (Saturday)

Join us on Saturday, for our National Scrapbooking Day celebrations.


FREE Friday "Make and Take"


Join us this Friday for our FREE "Make and Take".  We're sticking with the First Friday Art Walk color theme and creating a "Teal" card using alcohol inks.

FREE "Make and Take" is available between 5PM and 7PM, while supplies last.


Saturday, April 26, 2014

Stencil Inspiration with Heidi Swapp Mini Stencils

Remember this "Make and Take" project  last week?


We loved these colors and stencils so much we created another card using some of the same products.  Since this  month's Creative Community Challenge is stencils, it seemed appropriate.  We used the stripe stencil (included in the same set as the above stencil) and the "Thanks" die from Paper Smooches.  We also embossed the black cardstock with an embossing folder from Life Style Crafts.

Here's a close up of the stripe card.  I had to add some enamel dots!!

Here's the stencils, inks, and the mini ink blending tool that I used.  The mini ink blending tool is a must!  It's perfect for inking with stencils!

Friday, April 25, 2014

Stencil Inspiration- Rays from Tim Holtz

I used the Rays stencil and Distress Ink from Tim Holtz to create this quick and easy card.

Enjoy!


Additional Supplies Used:
Enamel Dots
Simply Fabulous Sayings from MFT Stamps

Thursday, April 24, 2014

Stencil Inspiration and Modeling Paste

I've been seeing cards on Pinterest and the blogs using stencils and modeling paste.  I really love the look and am excited to incorporate mixed media into card making.  So here's my attempt using modeling paste on cards.


I used modeling paste and the Diamond stencil from Memory Box to get that great texture on the front of my card.  It's super easy.  I taped down the stencil over my cardstock.  Then, applied the modeling paste over the stencil, scraping off the excess with a pallet knife.  Removed the stencil and set aside to dry.  You can speed up the drying process with a heat tool.  However, be careful not to overheat.  The paste will bubble if it gets too hot.

The flower on the front was cut using the Delightful Peony Outline die from Memory Box.  I colored it with my Copic markers and added some clear, Wink of Stella.  It's hard to see in the image, but it is shimmery.  I secured the flower to the front of the card with Glossy Accents.  The sentiment stamp is from the Fanfare stamp set from Avery Elle.

Here's a close-up look at the wonderful texture.

Wednesday, April 23, 2014

What's New Wednesday


It's time for What's New Wednesday! 

My favorite NEW products....the mini stencils from Heidi Swapp.  We used them in our "Make and Take" last week.  You can see the card we created HERE.

Lovin' this Twinkling H2O Palette!


Sequins have been showing up on cards and scrapbook pages!  We've got a great assortment in stock.

EK Success introduced some new Specialty Paper Packs (most are adhesive backed).  Use them with your dies and punches to create textured embellishments.

Graduation is just around the corner.  Create a unique card for the graduate using these stamps and dies from MFT Stamps.

I've been working on a card using this cutie!  I should have her posted on the blog next week.  Use the MOM stamp included in this set and create your mom a SUPER Mother's Day card.

Isn't this card amazing?  MFT Stamps included the card with our last order.

Here's a close up of that beautiful lily.

We received several new stamps from Avery Elle.  Loving the stamps from this company.

These popular items are back in stock.  Get them before they sell out again.

Storage for Stickles, Liquid Pearls, and Alcohol Ink.

Dina Wakely's Bird stamp.


Don't miss our FREE Friday "Make and Take".  Drop in anytime between 5PM and 7PM.  We'll be making this fun card.  "Make and Take" available while supplies last.


Some fun links you may have missed this week:

1.  Stencil inspiration using Distress Inks and the Mini Blending Tools can be found HERE.
2.  More stencil inspiration using a "ghosting" technique can be found HERE.
3.  We posted some Art Journal inspiration on our blog.  You can find it HERE.
4.  Follow our Stencil Pinterest Board for awesome ideas and inspiration using your stencils.

Tuesday, April 22, 2014

Stencil Inspiration, Distress Inks, and Mini Blending Tools

Here's some stencil inspiration for those of you participating in our Monthly Challenge on our Facebook Creative Community Page.  If you're not participating, you should!  We give away lots of fun stuff and share all kinds of creative projects.

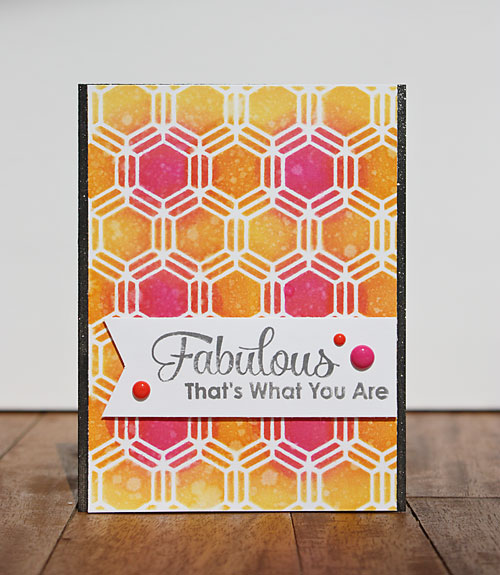
I used the NEW Tim Holtz Mini Blending Tools and Distress Ink to create this fun pattern.  I wasn't sure I really wanted one more tool sitting on my craft table.  So, I originally declined to add this cute little tool to my bag of supplies.  Well, I wanted to try the fun technique below, and couldn't get the larger tool to work.  I kept getting hard lines, and it wasn't small enough to really control where I applied the color.  Needless to say, I now have a Mini Ink Blending Tool.  They are wonderful for working with stencils!


I used Picked Raspberry, Spiced Marmalade, and Squeezed Lemonade Distress Inks to get this effect.  First, I layered my stencil on top of my Mixed Media paper from Strathmore (my favorite for these techniques) and applied the Picked Raspberry in a circle pattern as shown below.  Then, I added Spiced Marmalade (in circles) between each of the Picked Raspberry circles.  Finally, I blended Squeezed Lemonade in all the empty areas softening the edges of the circles.

I removed the stencil, and then misted the paper with water.  I held my spray bottle  at least 18 inches above my paper and sprayed it a couple of times.  I let the water drops sit on the paper for a moment.  Then I dried it with my heat tool.  I love that effect!

I trimmed the paper so that the black card base showed on each side.  Added my sentiment.  It's from the Simply Fabulous Sayings set from MFT Stamps.  For the final touches, I added enamel dots and some clear Wink of Stella to the edges of the black cardstock.  It's hard to see in this image, but it shimmery!

Monday, April 21, 2014

FREE Friday "Make and Take"


Join us on Friday!  We're playing with Gelatos and making this unique, die cut, Mother's Day card.  FREE "Make and Take" is available between 5PM and 7PM, while supplies last.


Saturday, April 19, 2014

Ghosting Technique with Stencils and Distress Ink

Here's some stencil inspiration for those of you participating in our Creative Community Stencil Challenge this month.  Want to participate?  You can find the group HERE.

I used the "ghosting" technique I use with the Dylusions Sprays to get this effect.  Only, this time, I used the Tim Holtz Distress Inks.

I applied the inks to my Mixed Media cardstock from Strathmore.  I used the Distress Ink pens, but you could use the ink pads with the blending tools also.  Both products work.  I then used my water brush to get the inks wet and moving on the paper.  I use quite a bit of water.  I like the puddles and blending  that occur with a heavier application of water (the purple is a result of the blue and red blending together).

Allow the paper to dry.  You can speed this process up using your heat tool.

Once the paper is dry, mist your stencil with water.  Place it onto your inked paper, water side down.  You want the wet portion of the stencil to touch the ink.  Let the stencil set for a few seconds before removing it.  Then, let the water sit for a few seconds on top of your paper.  Place a dry paper towel over the top of your paper to pick up the excess water (and the ink).  Don't rub.  Just place the towel down, and pick it up. The results should be the fun ghosting (or faux bleaching) technique shown below.

I finished the card with some enamel dots and some clear, Wink of Stella pen applied to the edges of the blue cardstock.

Additional Supplies Used:
Simply Fabulous Sayings from MFT Stamps
Enamel dots
Stencil from Crafters Workshop
Distress Inks - Broken China and Festive Berries
Wink of Stella brush pen (clear)