Hi friends! It's Amanda from Twiddler's Nook with this week's Mix it up Monday. Today I have a couple of mini note cards to share with you. I love these for lunch boxes, leaving in mailboxes at work or attaching to gifts like a tag. They're small and pretty quick to create but also really fun to make and give!
I started with the Pretty Pink Posh Mini Scallop Card dies. I cut two card bases and four stitched squares so I had a layer for the front and a clean slate for the inside to write on. On the white panels for the front I inked them up with the Pretty Pink Posh Starburst stencil using Lawn Fawn no. 2 pencil and deep sea inks.
For both cards, I used Mama Elephant Banner Greetings dies for the sentiments and the Write With Me stamp and die set. I chose the penguin for this card and used the scribble star from the set for the background. In my mind he's painting the stars.
After adhering the layers together with liquid glue and foam squares, I added glossy accents to bits of the penguin and his brush. Lastly, I added white gel pen highlights all over the image.
For my second card, I chose the adorable piggy image. I love how the pink pig stands out off the yellow and blue scheme of the rest of the design. I stamped these stars with gray ink envisioning him scribbling them all over with his pencil.
Same for with this card, after assembling the layers with liquid glue and foam squares, I added glossy accents to parts of the pencil and white gel pen highlights all over.
To really make these fun, I used my envelope punch board and some patterned paper from my stash to create coordinating envelopes for each one.
I appreciate you sharing your time with me. Have a fabulous day!
Products used:
Pretty Pink Posh Mini Scallop Card dies
Pretty Pink Posh Starburst stencil
Mama Elephant Write With Me stamps and dies
Mama Elephant Banner Greetings dies
Liquid glue
Foam squares
Lawn Fawn ink - narwhal, no. 2 pencil and deep sea
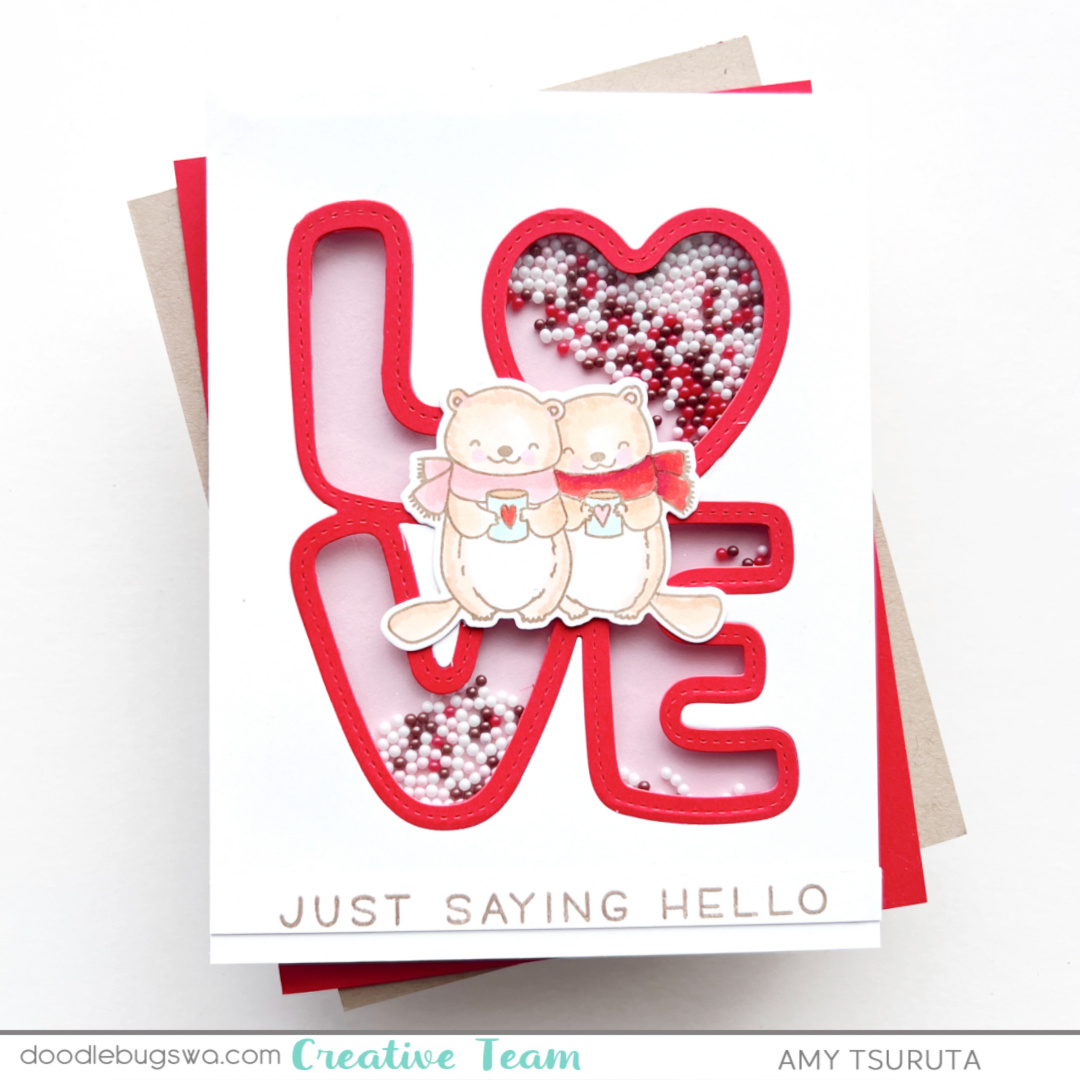
Valentine's Cards, I love designing them...especially after the holidays. It's a nice change and reminds me that Spring is just around the corner.
Today's card features:
Pretty Pink Posh - Love Word Shaker | die
Mama Elephant - December Duo | stamp + die
Lawn Fawn - Simple Sentiments | stamp
Pretty Pink Posh - Love | shaker beads
Shaker cards, I didn't really start making them until just a couple years ago. This one was easy to make:
Use the Love Word Shaker solid die with red + white cardstock.
Line up the letters in the Red Love die cut
Take the A2 white panel with the negative Love cut. Flip it upside down and drop the red outline Love die cut into the center of the panel. I used 1/8 strips of double sided tape to adhere the word securely.
Cut down acetate [use upcycled packaging] to just shy of an A2 panel. Back the White A2 panel with the red love outline with the acetate film.
I added strips of foam adhesive to create a rectangle on the back of the Love panel.
Cut pink panel a smidge smaller than an A2 panel. Position shaker beads in the middle of the panel.
Carefully pull away the strips from the double sided tape on the Love white panel. Secure it to the pink panel with the shaker beads. I make sure that I firmly press down the top panel to secure all the adhesive strips.
Finish off the card with the sentiment strip stamped in Lawn Fawn Crunchy Leaf.
I'm going to tuck this into some happy mail that is going to my daughter.
Thanks for stopping by!
Links to products used or recommended are listed below:
Hi friends! This is Amanda from Twiddler's Nook. After Christmas brings us a few more birthdays in the family so I usually need to sprinkle those in my Valentine crafting and thought it would be fun to share one with you today. This was for my dad a few weeks ago and I absolutely love how it turned out!
I started things with the Pretty Pink Posh Birthday Candles, die cutting the pieces and gluing them together with liquid glue. This gave me my color palette when coloring my images.
I chose images from Lawn Fawn Yappy Birthday Add On and Pawsome Birthday stamp sets. After coloring everything with copic markers, I used the coordinating dies to cut them out. For my "ground" I chose a Pretty Pink Posh sentiment strip to stamp and cut out.
I used the Spellbinders Tiny Dots embossing folder on a piece of white cardstock, glued my candles directly to it with liquid glue and used a combo of foam squares and liquid glue to adhere the images and sentiment strip. Then I popped the whole panel up on a white card base with foam tape.
For finishing touches today I added glossy accents to the candle flames and bits of the images like puppy noses, some of the flags, party hat and bone on the cupcake. I like the addition of bits and pieces being shiny to catch your eye and draw interest around the scene.
I appreciate you sharing your time with me. Have a fabulous day!
Links to products used or recommended are listed below: