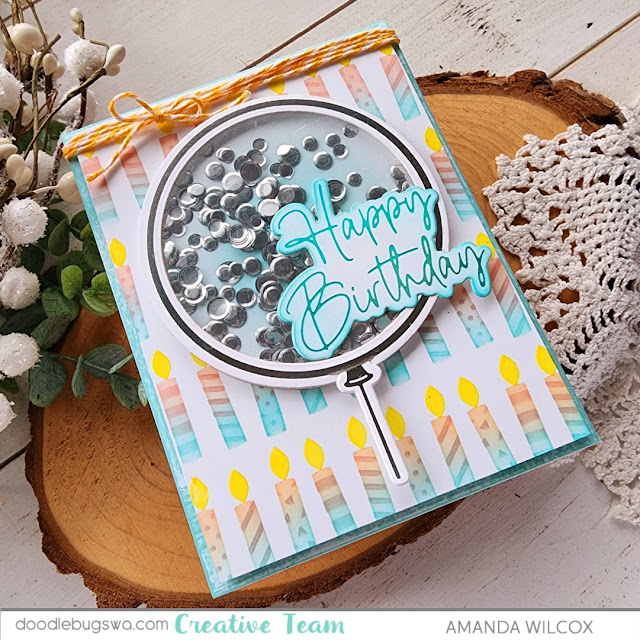
Hey friends! It's Amanda from Twiddler's Nook. Let's mix things up with a fun birthday shaker card today! I pulled out some fabulous hot foil plates from Spellbinders and combined them with Pretty Pink Posh stencils for my background and the combo couldn't be more perfect!
I started by hot foiling the Spellbinders Giant Party Balloon and the sentiment in the set. The balloon pieces are silver and the sentiment is moondust hot foil. To accentuate the moondust foil I went around the edge with a blending brush and Lawn Fawn mermaid ink after die cutting it out.
I wanted to make a shaker and this Giant Party Balloon set comes with the inner circle die to make that a reality. How fun is that! So I cut another large circle from white cardstock and inked the center with mermaid ink like the sentiment. Plus I cut an acetate circle and threw all my elements together with liquid glue and foam strips, inserting Spellbinders silver smooth discs as my shaker bits.
Next, I pulled out the Pretty Pink Posh Layered Candles stencil set. I inked the bottom of each candle row with mermaid and the top with peach fuzz. I replaced the candle layer with the detail layer and did the same thing again. Then for the flames, I spread Brutus Monroe yellow Chroma Glaze. It gives a shiny finish which is fun for the background of our blingy shaker balloon.
Finally, I took the mermaid ink pad and drug it across all four sides of my card base. I popped the stenciled panel up with foam tape and glued the balloon directly to that with liquid glue. Then I glued the sentiment to the front of my balloon as well.
To finish my card off, I tied some orange bakers twine around the top into a bow.
I appreciate you sharing your time with me. Have a fabulous day!
Links to products used or recommended are listed below:


No comments:
Post a Comment