Sunday, November 30, 2014

Happy Heart Snowman from MFT Stamps- Masking Tutorial

Today we're sharing a masking tutorial.  We'll be masking off our entire stamped image to create a snowy background.  So, grab yourself some masking paper.  We're sure you'll want to try this technique.

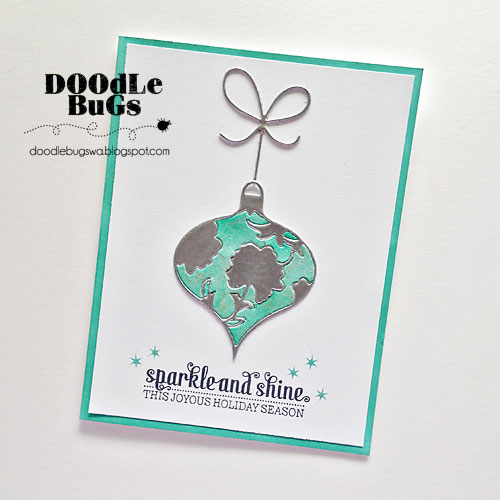
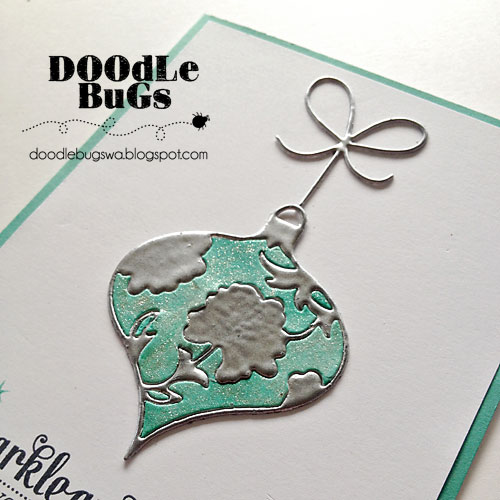
Here's the finished card.

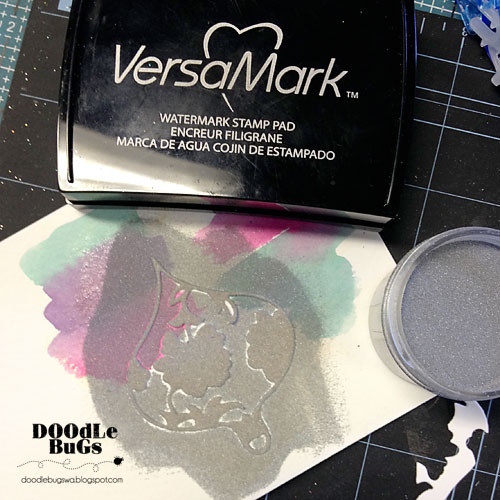
I masked off the edges of my stitched die cut rectangle with washi tape and secured it to my work surface.  This will create a clean edge when I color the background.  Then I stamped my image with Ranger's Archival Ink in Jet Black since I'm using a watercolor technique to color the image.


I used Tim Holtz Distress Ink pads and markers to watercolor the image.  I usually apply color to my nonstick craft surface, picking up the color with a wet brush and applying it to my image.


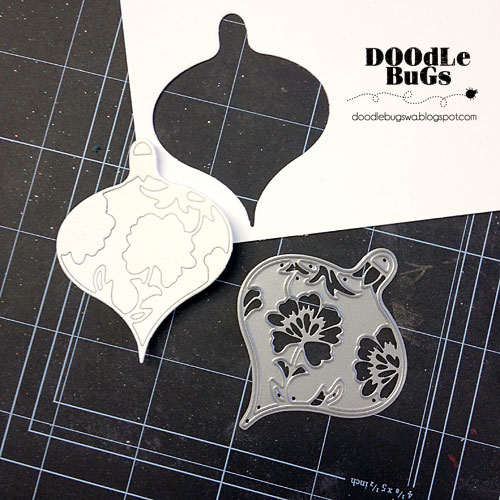
I stamped the image onto masking paper and cut out along the lines.

After cutting out the image, I removed the backing from the masking paper.  Stuck it to the front of my card, being careful to completely cover the colored image.  Any area not covered will be exposed when the color is applied to the background.


I used Distress Inks and the ink blending tool to cover the entire, exposed surface of the card.  I apply ink to the ink blending tool, and then apply it to the paper using small circular motions.

Here's what the background looks like after I colored it.  I added some splatter to achieve a "snowy effect".  I picked up some watered down, white paint with a paint brush and "flicked" it onto the surface.  I then repeated the same step with some Perfect Pearls Spray and a brush (I don't like using the sprayer).


Once it was dry, I carefully removed the masking paper.  (drum roll....)


I also removed the washi tape from the edges.  Washi tape has a tendency to tear the surface of your paper.  So, remove gently.  Don't you love the clean edge?


Here's a great tip to make your mats and card bases match your inks perfectly.  Use the ink blending tool and the same Distress Inks to color approximately 1/4" in from the edge.  Once assembled, you'll only see the inked edge and it will match perfectly


After I assembled the card, I added a layer of Glossy Accents to the heart.  It's hard to see in this image, but it gives it some dimension and makes it shiny. 

Happy crafting!


Friday, November 28, 2014

Christmas Banner Stamp from MFT Stamps

Isn't she cute?


We colored her with Copic markers and added some Wink of Stella in clear.  It's hard to see the shimmer.  Trust me, it's there.


Thursday, November 27, 2014

Wednesday, November 26, 2014

Winter Paper Mache Box and Elizabeth Crafts Glitter

We've been playing with Elizabeth Crafts glitter this month.  If you haven't been to our Facebook Community page, your missing some fun projects shared by some very creative people!  You can find that page HERE.

So, for this project, I pulled out the silver micro fine glitter from Elizabeth Crafts to cover the top of my paper mache box.  Love it!


I also used Diamond Dust (a chunkier glitter) for the snow effect on the top of the box and the trees.  We found the adorable fawn at The Co-Op down the street.


Tuesday, November 25, 2014

Mama Elephant Polar Pals (Take Two)

We have another card today featuring Polar Pals stamp and die set from Mama Elephant.  Love this set.  It's perfect for your cards, and/or just the right size for your tags!


The background is embossed with the Falling Snow texture fade (embossing folder) from Tim Holtz.  After embossing, we used Distress Ink (Evergreen Bough) to cover the entire piece of the embossed paper.  Seems liked it needed a little shimmer after that, so we sprayed it with the Perfect Pearls spray.

The penguins were stamped and cut using the coordinating die.  They were colored with Copic Markers and embellished with Xmas Red Stickles.  We used foam dots to raise up the penguins and the star banner between them.


Monday, November 24, 2014

Mama Elephant Polar Pals

Today we're posting a cute card we created using the Polar Pals stamp set from Mama Elephant. 


The cute snowmen were colored with Copic Markers and then "shimmered up" with the Wink of Stella pen in clear.  The heart was die cut from white paper, and colored with Copic Markers to match the snowman's hat.  It's popped up with a foam dot and glittered with Stardust Stickles.

 
Tomorrow we'll be featuring another card using the same stamp set.  So, don't forget to check back.


Sunday, November 23, 2014

Quick and Easy Countdown Calendar

Looking for a quick and easy way to countdown to Christmas?  Mary came up with the wonderful idea!  (No, our countdown calendar is not accurate.  I believe as of today, there are 32 days until Christmas)


She die cut a piece of chalkboard paper.  Then, fixed it to a piece of red cardstock, die cut from a larger die.  Glued a mini clothespin to the top of a mini easel and clipped the chalkboard piece to the front with the clothespin.  She embellished it with some poinsettia die cuts from the Poinsettia Spellbinders die.


She even created a mini eraser!  She glued a Tim Holtz Curio Knob, to the top of a button, and then secured a foam piece from the Tim Holtz Mini Ink Applicator Tool.  Brilliant!

Have fun!

Saturday, November 22, 2014

Memory Box Kensington Christmas Tree Die

Today we're sharing a fun technique! 

We die cut the Kensington Christmas Tree, from Memory Box, using white paper.  Then covered it with VersaMark ink, green embossing powder, and used our heat tool to melt the powder.  That gave the tree a shiny, enameled look.


After we secured the green tree to the front of our card, we cut the tree again in red.  Snipped off the flowers and adhered them to the top of the green tree.  Added some Stardust Stickles, a sentiment from Mama Elephant, and it'd done!


Wednesday, November 19, 2014

Black Friday/Small Business Saturday Sale and Event


We have something for everyone on your Holiday list.  Below, is a list of the special promotions available between 9AM and 12PM.

For the artist on your Holiday list.

For the young artist on your Holiday list.

For the scrapbooker on you Holiday list.  (These books work with Project Life page inserts)
 For the paper crafter or card maker on your Holiday list.  Watch a video demonstration on the Magnetic Platform HERE.

Our best selling paper trimmer!  Don't miss this GREAT deal!  Watch a video demonstration on the CutterPillar Pro HERE.


Don't miss our best deal of the year, on the Big Shot die cutting machine.  Watch a video demonstration on the Big Shot Machine HERE.

As always, we'll be giving away loads of products (more than $1000) at 12PM.  You must be present to win.  Below is a list of a few of the items we'll be giving away:

Private card making class for you and SEVEN of your friends.  (value $200)
Big Shot Machine with dies and accessories  (value over $400)
Assorted packages of paper and embellishments (each valued at over $15)
Assorted stamps
Assorted dies
Assorted albums (each valued at $20 or more)
Assorted party supplies
and much, much, more!

Don't miss it!

Tuesday, November 18, 2014

Sizzix Triplets- Christmas Tree Die

Have you seen the Triplets Christmas Tree Dies from Sizzix?  Love all the wonderful combinations you can get from one die set! 


I cut all the tree combinations from white paper, and used Tim Holtz Distress Ink and the Ink Blending Tool to color the trees.  I used Mowed Lawn for the trees, Vintage Photo for the trunks and Picked Raspberry for the background tree (the one peeking through the circles).  I applied a darker layer of ink at the bottom, using less ink as I worked my way towards the top.


I used the Snowfall embossing folder from Sizzix/Tim Holtz to emboss the background piece behind the trees.  After I embossed it, I used the Tim Holtz Distress Ink (Peacock Feathers) to add the color.  I applied a darker layer of ink towards the bottom and lightened the color as I worked my way up.

There are many dies on the market for cutting snow and hills (I think I might have to have one).  However, since I don't have one now, I just used my scissors to cut a few snow hills.


The frosty glitter is Diamond Dust.  I applied some Glossy Accents to the trees and snow, and then sprinkled on the Diamond Dust.  Wow!  I love this effect.

Here's some fun combinations you can cut from this fantastic die set.

And, just in case you couldn't make it to our Holiday Workshop.  Here's a look at one of the cards we made using the set.


Monday, November 17, 2014

No Saturday "Make and Take"


A quick reminder...there will be no "Make and Take" this month.  Our Holiday Workshops and the Thanksgiving Holiday are keeping us super busy on Saturdays this month.

We'll be back in December with some super fun "Make and Takes."

Sunday, November 16, 2014

Holiday Classes at Doodlebugs

We have a few spaces still available in our Holiday classes.  Here's what we have scheduled in the Studio next month.

Join us for an afternoon of mixed media.  We'll use paint, paper, tissue, ink and stamps, to create this wonderful collage house on a deep edge canvas.   Class is limited to 8 students.  Class details can be found HERE.

Next we have a frosty, mixed media shadow box, using a deep edge canvas.  Join Mary for an afternoon of fun creating this beautiful winter scene.  Class is limited to 8 people.  Class details can be found HERE.


Don't miss our last Holiday class.  We'll crackle glass jars using a simple technique.  You'll want to make these for all of your friends.  Class details can be found HERE.


Saturday, November 15, 2014

Penny Black Hedgehogs

I love the adorable hedgehogs from Penny Black.  Here's a cute card we have displayed at the store using the Santa's Hat Hedgehog stamp from Penny Black.  Isn't he adorable?


We colored him with Copic Markers and used some Stardust Stickles around the fur on his hat.

Thursday, November 13, 2014

Memory Box Lydia Ornamnet (Take Two)

Remember this die from our blog post on Tuesday?  We've used the left over pieces from that card to create this beautiful card.


We used a Spellbinders Nesting Labels die and rubber mats to create the embossed frame for this card.  Please refer to our post on Tuesday for additional details on how to make this card.  As we mentioned above, this card was created from the leftover pieces, using the same techniques, as the card we posted on our blog on Tuesday.


Tuesday, November 11, 2014

Memory Box- Lydia Ornament Tutorial

Today we're sharing a beautiful card along with a fun technique for heat embossing your dies.  We used the Lydia Ornament die and Crisp Bows die from Memory Box to create this card.


First we die cut the ornament die from some mixed media (or you could use watercolor) paper.


We removed all the inside pieces, keeping only the ornament shape.  We ran some adhesive over a piece of scrap paper and stuck the ornament down.  This holds everything in place and makes it easier to heat emboss.  Cover the die cut piece with VersaMark ink, cover with silver embossing powder, then melt with your heat tool.  We applied two coats (just repeat the steps above).  Love how the thick layer of silver looks.


Add some Evergreen Bough Distress ink to your non-stick craft sheet.  Add some water with a brush and apply to some mixed media (or watercolor) paper.  Once dry, cut the ornament again from the watercolored portion of the paper.


We wanted the base of the card to match the ornament exactly.  So, we masked off the back of the card with some washi tape and inked the edges of the paper.  We added a white cardstock mat to the top (not shown in the image), creating a 1/4" border around the edge of the card.

Adhere the silver portion of the die to the front of the card (the white, cardstock mat that will sit on the top of your inked card base).  Then insert the die cut pieces that were cut from the watercolored paper.

Finish the card with a die cut, silver embossed bow (use the same technique we used for the ornament), a sentiment (we used one from Mama Elephant), and some Wink of Stella.  The Wink of Stella was added to the watercolored portion of the ornament.

Here's another look at the finished card.