Saturday, August 30, 2014

Wild Rose Studios

Our Christmas stamps have begun to arrive and we've been busy creating displays and samples.  Here's a sample I created using a new stamp from Wild Rose Studios.  Hope you enjoy it!


I used Copic Markers to color the image.  I then added some Stickles for a little "bling".


Here's a picture of the stamp.


Thursday, August 28, 2014

Distress Ink Challenge

We've had lots of activity on our Creative Community Facebook Page this month.  Seems like everyone is enjoying the Distress Ink Challenge.

I was inspired by Ryan and Emily's video using the Distress Inks.  Here's the card I created using that technique.  If you missed the video, you can view it HERE.  If you'd like to join our Creative Community Facebook Page, visit this LINK.

I used Watercolor paper, Evergreen Bough Distress Ink and an embossing folder from WR Memory Keepers for the background.  I love their 6x6 embossing folders.  They allow you to use the patterns both vertically and horizontally on A2 cards.


The speech bubble was cut using the Saying Hello Tranformable Die-namics from MFT Stamps.  The sentiment is from the Avery Elle's Simply Said Hello set.  Love these sets (they also have one that coordinates with Happy and Love).  This set is designed to compliment a hello die or stamp.


Wednesday, August 27, 2014

What's New Wednesday


What a busy week!  We're posting a quick "What's New Wednesday" this week, as we have lots of things on our plate today!  Stop in soon to see what's new!

Doodlebug Designs- Friendly Forest Collection


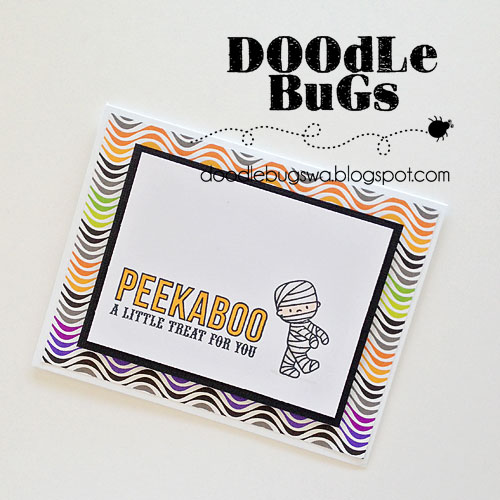
Doodlebug Design-  Ghouls and Goodies Collection


Doodlebug Designs- Sprinkles (love the bits of shimmer inside these colorful enamel dots)


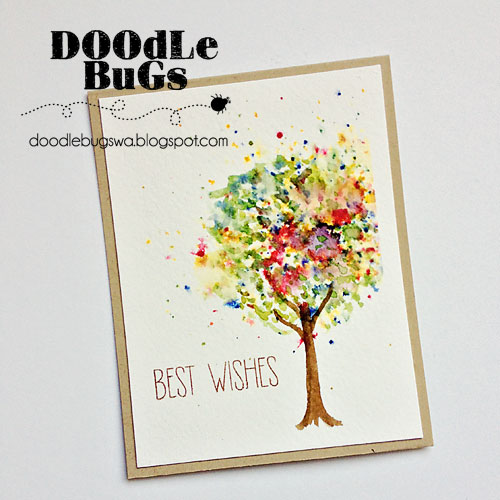
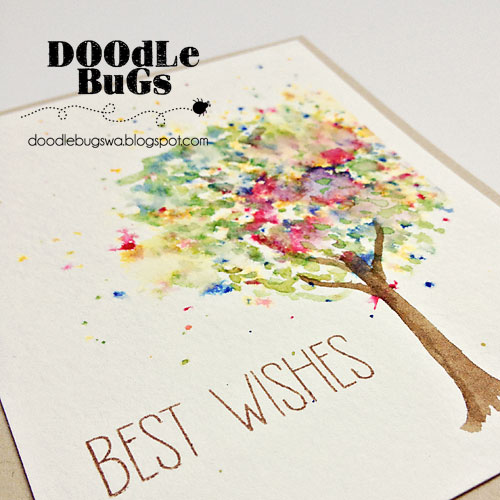
Here's a close-up view.


Visit this post on our blog for some ideas on decorating the wooden bangles we have in stock. 


1.  Our Holiday Workshop is completely sold out.  Give us a call if you'd like to be on the waiting list.

2.  Our store hours will be changing on September first.  Our new hours will be:
  •  Monday through Saturday  10AM until 5PM
  • Sunday 11AM until 3PM

3.  Our FREE "Make and Take" will be available on Saturday instead of Friday, beginning September 13th.  Our last Friday "Make and Take" is this Friday.  We will take one week off, and begin again on Saturday, September 13th.  The "Make and Take" will be available between 1PM and 3PM, while supplies last.

4.  You only have a few days left to fill your card for our Gift Certificate drawing.  If you have a card started, it needs to be filled and in the drawing before the close of business on August 31st.  We will randomly select a name to win a $100 Gift Certificate on September 1st.


Join us this Friday for our FREE "Make and Take".  Our "Make and Take" is available between 5PM and 7PM, while supplies last.


Tuesday, August 26, 2014

Wooden Bangles

Last week we received an assortment of wooden bangles.  We've all been having fun decorating and embellishing them with our own unique styles.  Be sure to stop in for a look at each of them.


Here's a peek at my finished bangle.


Today, I'm sharing the process for creating my bangle.  I love stencils and modeling paste (love the texture) so I started there. 

I used a stencil to add modeling paste to the bangle and allowed it to dry.  You can speed the drying process up with your heat tool.  However, be careful that it doesn't get too hot.  The modeling paste will bubble if it gets too hot.


Once the paste was dry,  I painted the entire piece with white acrylic paint.


I painted the color onto the raised areas and let dry.  This process doesn't need to be "perfect". 

I then mixed some black acrylic paint with satin glazing fluid from Golden.  This extends the drying time of your paint.  I used approximately 1 part paint to three parts glazing fluid.  I brushed the mixture over the outside portion of the  bangle.  You can tape off the inside of the bangle if you like.  I was just extra careful not to get any inside.  I let the paint dry for approximately 2-3 minutes.  Then I used a baby wipe to remove the excess paint.  This process leaves the black paint down inside the cracks and in random places.


Let dry, and it's ready to wear!

Monday, August 25, 2014

FREE Friday "Make and Take"


Join us for our last FREE Friday "Make and Take".  We'll be making this colorful card Emily created using Distress Inks.  Our "Make and Take" is available between 5PM and 7PM, while supplies last.

NOTE:  Beginning September 13th, we'll be holding our FREE "Make and Take" on Saturdays.  We hope you'll join us.  More details coming soon!!


Additional Supplies Used:

Stamp from Paper Smooches
Bird Die from Memory Box

Tuesday, August 19, 2014

Annual Holiday Workshop

We finally have the dates for our Annual Holiday Workshop!  Join us on November 8th or November 9th for a full day of creative fun.  We'll be making some adorable hand-made Holiday gifts and a wonderful assortment of Holiday cards.  Don't miss it!  Call us, and sign up now.

See below for details.


MFT Stamps Every Day is a Picnic

We have more Distress Ink Inspiration today for those of you participating in our Monthly Challenge.  Find more information regarding our Monthly Challenge and Creative Community HERE.

I love how versatile Distress Inks are.  You can use them in such a variety of ways.  I don't use them much for stamping or "distressing" my projects.  I love to watercolor with them.

I stamped the image below on Mixed Media paper, using Archival ink from Ranger.  I chose the colors I wanted to use from my collection of Distress Inks and stamped a bit of each color onto my non-stick craft mat from Ranger.  With a wet brush, I picked up the color I needed, and painted it onto the surface of the paper.  Super easy!!


Here's a closer look.  I used a white Uniball gel pen for the freckles and dots on the butterflies.  The shimmer on the sun (it's hard to see) is from the clear Wink of Stella pen.


The stamp set is from MFT Stamps, Every Day is a Picnic.

Monday, August 18, 2014

FREE Friday "Make and Take"


Join us on Friday for our FREE "Make and Take".  We'll be using Distress Inks to create a beautiful watercolor butterfly that we'll use to embellish a quick and simple card.  The FREE "Make and Take is available between 5PM and 7PM, while supplies last.


Additional Supplies Used:

Memory Box Butterfly Die
Washi Tape
Paper Smooches Stamp

Saturday, August 16, 2014

More Mama Elephant Bootastic Cards

I'm not the only one who thinks these stamps are adorable!  Emily has been having fun with them too.  Here are a couple of cards she created with the set.


Here's a closer peek at those cute characters.


I love this little guy and the dangling spiders.

Here's a closer peek at him.


Thursday, August 14, 2014

Distress Ink Tree

I saw this fun technique in a online class I took a few months back.  I thought it would be the perfect project to share today since our Challenge this month is Distress Inks.


This card is SUPER easy!!  Mist a piece of watercolor paper or mixed media paper with some water.  Choose some Distress Ink colors and create a pallet of the inks on your non-stick craft surface.   Pick up the ink with a wet brush and flick the color onto the paper creating the round, top portion of the tree.  I didn't choose the colors in any particular order, except I did apply the green last and used more green than any of the other colors.

I used my brush and some Vintage Photo Distress Ink to paint the trunk.  The sentiment stamp is from Avery Elle.


Wednesday, August 13, 2014

What's New Wednesday


Here's what's new at Doodlebugs this week.

We received several new Christmas collections this week.

I love the gold details in this collection from Teresa Collins.


If you're looking for traditional Christmas, you'll love this one.  It has a wonderful "woodland feel" mixed with traditional colors.

Take a look at these awesome paints from Americana.  We ordered the whole display!!  These versatile paints can be used on a variety of surfaces, including glass and metal.  You can find more details HERE.

You've all been waiting for these!  New Memory Box Christmas dies!  Stop in for a look at all the beautiful dies!


We still have a few spots left in the classes below:

Elizabeth Crafts Technique Class-  We will not be repeating this class again this year.  Class details can be found HERE.


Travel Portfolio-  Class details can be found HERE.


Fall Explosion Box-  Class details can be found HERE.


Introduction to Zentangle-  Class details can be found HERE.


Be sure to join us this Friday for our FREE "Make and Take".  We'll be making the project shown below.  Our "Make and Take" is available between 5PM and 7PM, while supplies last.


Fun stuff you may have missed:

1.  Adorable Halloween cards using the new Mama Elephant stamps can be seen HERE.

Tuesday, August 12, 2014

Mama Elephant - Bootastic

I've been loving these new stamps from Mama Elephant.  Such fun and fresh images and easy to color with Copics.

Remember those images I posted about a week ago?  As I promised, here are the finished cards.


Isn't she cute?